The purpose of this article is to help you to:
Understand the Google Sheets Integration.
Create and Link Google Sheets Credentials.
Create triggers for syncing events.
Update the triggers.
Stop Google Sheets syncing.
Manage failed events for the triggers.
Manage Google accounts.
Notifications.
Error messages and reasons.
Overview:
Google Sheets is a feature that allows you to sync your BookingKoala events to your Google Sheets. To start syncing, you will have to create a trigger. While creating a trigger, you have to choose an event and action you want to perform on Google Sheets. When the selected event is triggered in BookingKoala, an action will be performed on your Google Sheets.
This feature is available for all the plans with different numbers of limits per month to sync the events according to the plan selected. The event limit will be reset after a month automatically.
Plan | Event limits |
Starter | 100 events /month |
Growing | 1000 events /month |
Premium | 10000 events /month |

You can track the synced events and the total number of days left to reset the usage in the triggers listing page.
Create and Link Google Sheets Credentials:
Before you can set up Google Sheets triggers, you must create and link your Google Sheets credentials. Follow these steps:
1. Navigate to Apps & Integrations:
Go to “Settings > General > Apps & Integrations > Google Sheets”.
Enable Google Sheets.

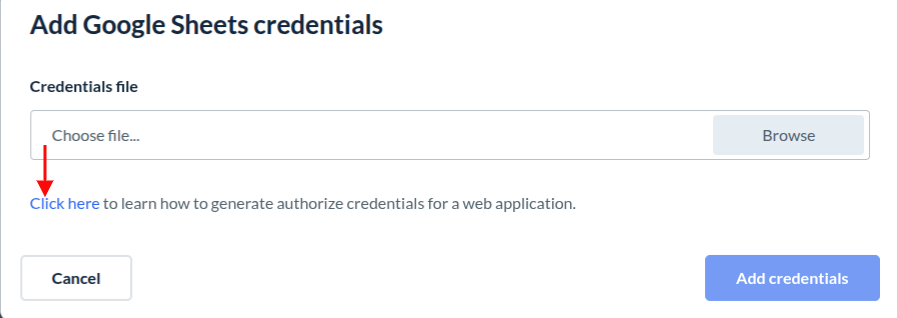
2. Add Google Sheets Credentials:
On the “Add Credentials” pop-up, click the blue "Click here" link at the bottom left. This will redirect you to a Google Set up your environment article explaining how to set up an environment. Please read the entire article and then follow the steps:
Set Up Your Project in Google Developer Console:
1. Go to Google Developer Console:
Open your web browser and go to the Google Developer Console.
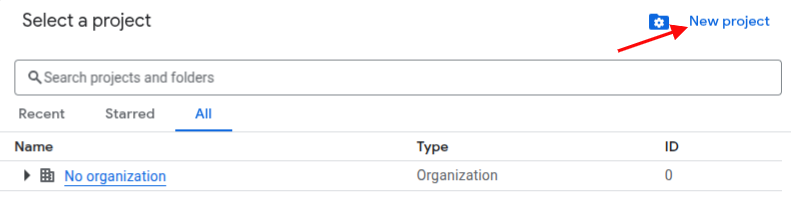
2. Create a New Project or use an existing one:
Click on the “Select a Project” drop-down at the top of the page.

Click the “New Project” button.
Enter a name for your project (e.g., "My Sheets Web App").

(Optional) Select a billing account if required.
Click “Create”.
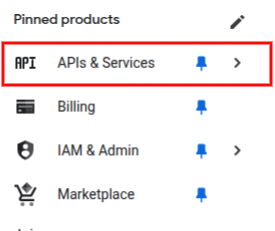
Go to APIs & Services from the PINNED PRODUCTS listing.
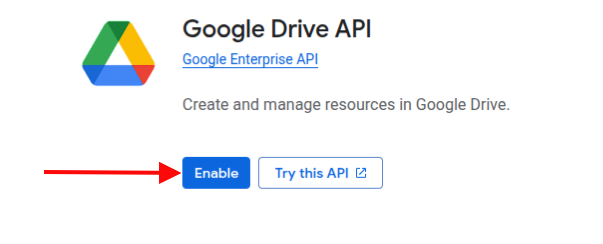
3. Enable the Google Drive API & Google Sheets API:
In the project dashboard, click “Enable APIs and Services”.
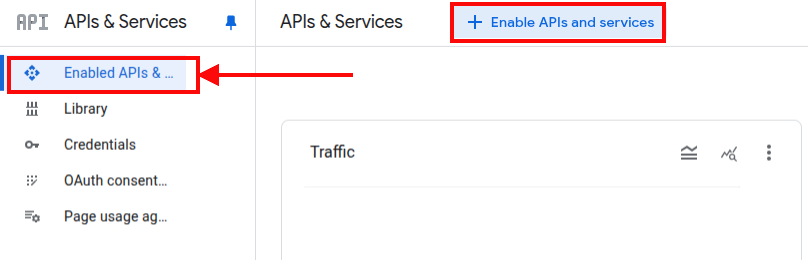
Search for "Google Drive API & Google Sheets API" and “Enable” both the apis.

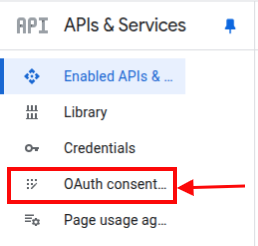
4. Set Up OAuth Consent Screen:
a) In the left-hand menu, click “OAuth consent screen”.
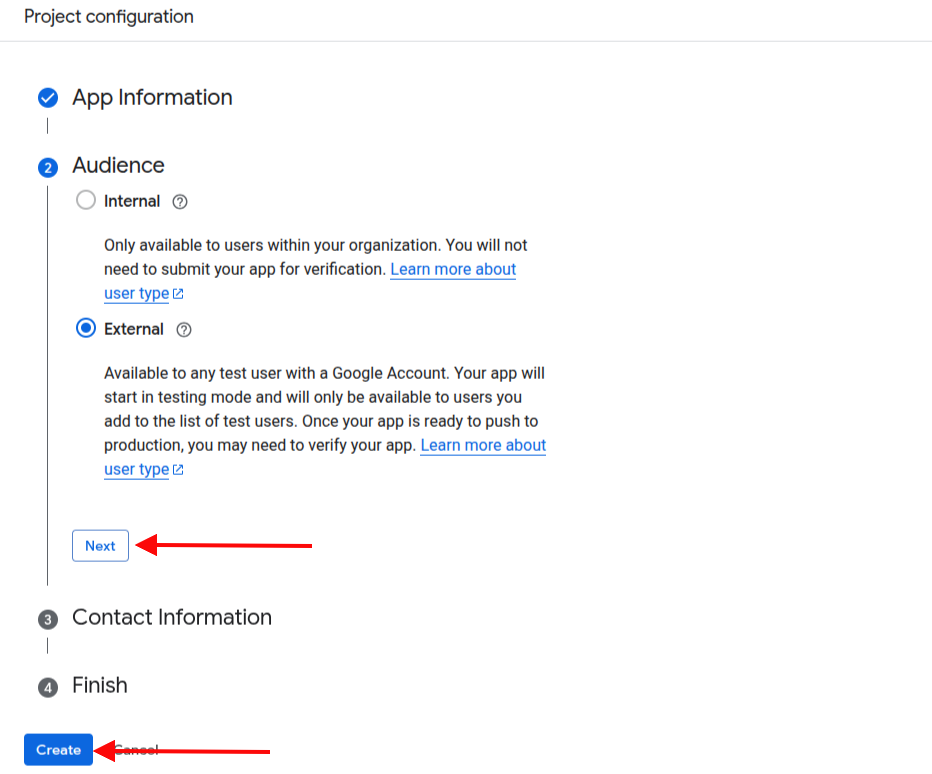
b) Set up Project Configuration:
App name: Enter the name of your application.
User support email: Enter a support email address.
Audience: Select (External).
Contact Information: Add an email for Google to notify you about any changes to your project.
Finish: Select Agree to Google Api Services Policy.
Create: Then, click on create to complete the project configuration.
c) Branding: Set up your app information and logo.
App information: Set up app information if not already set. ( App name and User support email).
App logo (optional): To display your brand logo in the OAuth content screen while adding a Google account in the Google Sheets integration page.
Add Authorized domains, or it will be added in the next steps.
Click “Save”.
d) Clients: Then go to “Create client” to create the client.
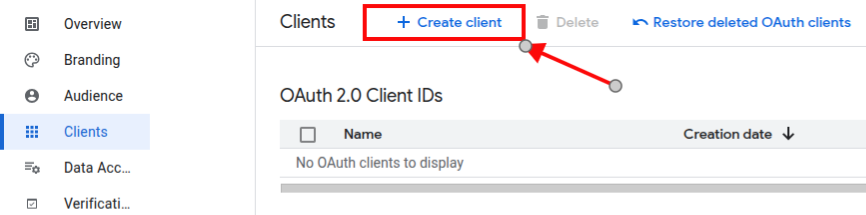
Choose “Web application” as the application type.
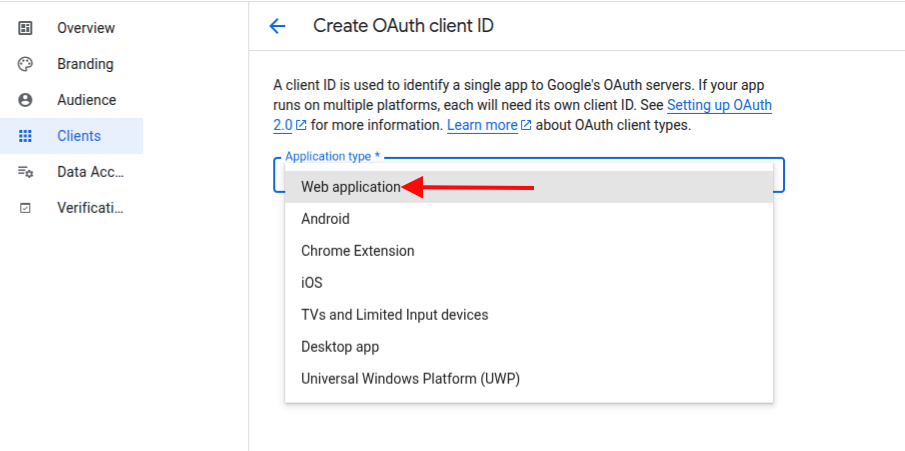
Enter a name for the OAuth 2.0 client (e.g., "Your Business Name") if you have not set it yet.
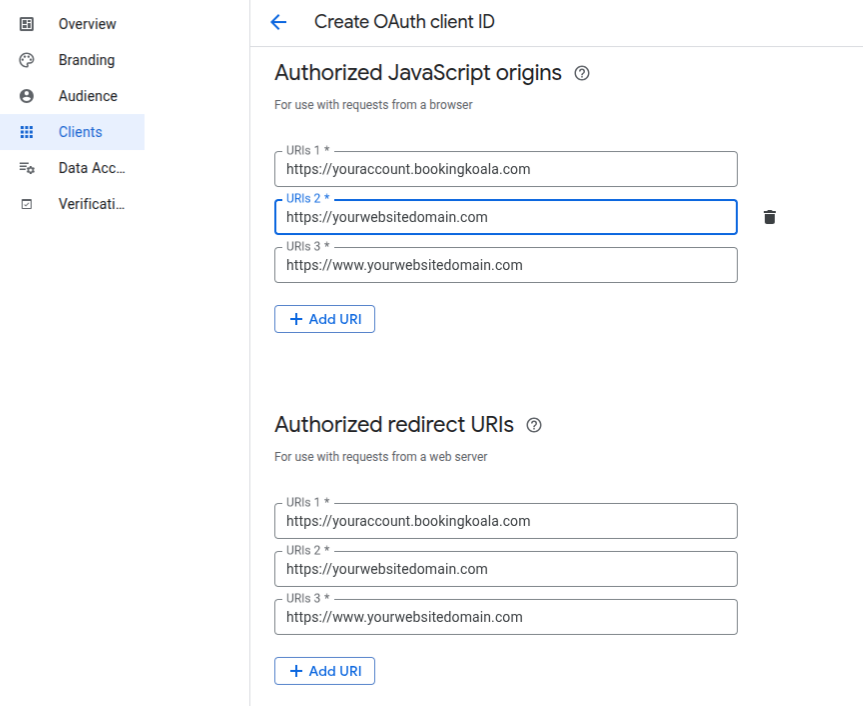
In the Authorized JavaScript origins, click “Add URI” and enter your website domain(e.g., https://www.yourwebsite.com).
In the Authorized redirect URIs section, click “Add URI” and enter your website domain as the redirect URL (e.g., https://www.yourwebsite.com).
Click “Create”.
Important: Make sure to download the OAuth client JSON by clicking on “Download JSON”. This will be used to upload the credentials in BookingKoala's “Third party integration page”.
Note: If you have connected a custom domain or a subdomain (e.g.,https://yourwebsitedomain.com or https://bookings.yourwebsitedomain.com), you do not need to include "www." for a subdomain
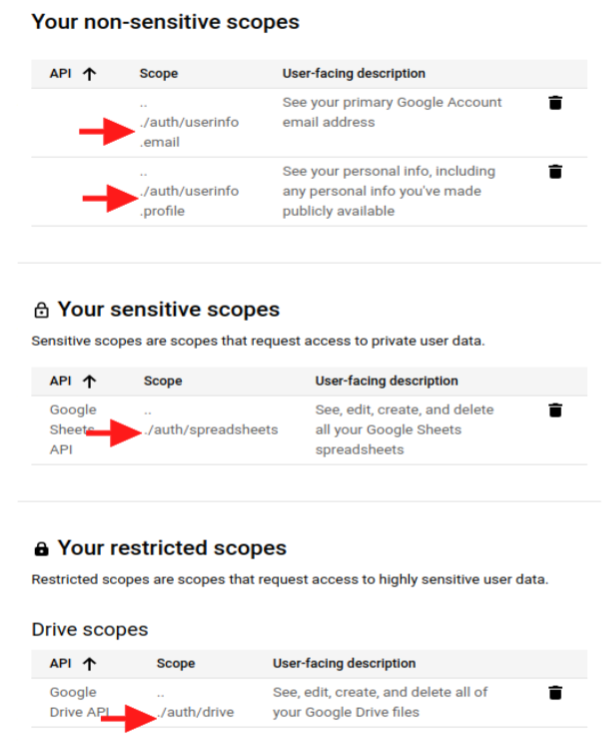
e) Data Access: Set up scopes (permissions) that are required for the Google Sheets access for the Google account.
Scopes for Google APIs: Click “Add or Remove Scopes” and add the necessary scopes.

Add the selected scopes (as mentioned in the screenshot below) and click on “Update” below. ( Note: Make sure to enable the required api’s first as mentioned in the previous steps.)
Click “Save”.
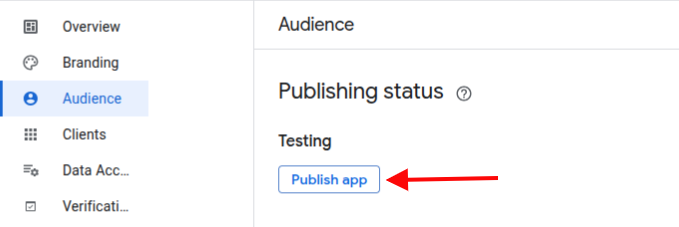
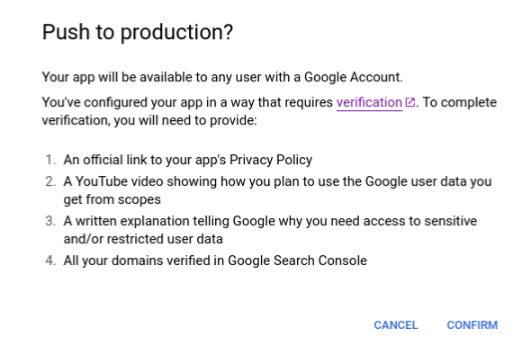
f) Audience: Once the project is configured, you can publish the app. To publish the app, navigate to the “Audience”. To publish the app, please refer to the “OAuth App Verification Help Center”.
In the publishing status, click “Publish App” to publish.
To publish the app, you will need to submit the following information to Google:
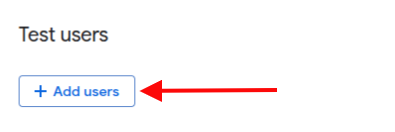
Please note, app verification by Google may take some time. While the verification is in progress, you can use the test mode. To enable test mode, add the email addresses that you want to allow for Google Sheets integration. In testing mode, you can use Google Sheets for the added accounts without publishing your app.
Link the Credentials
1. Go to Settings > General > Apps & Integrations > Add Credentials

2. Browse for the credentials file and click the “Add Credentials” button.
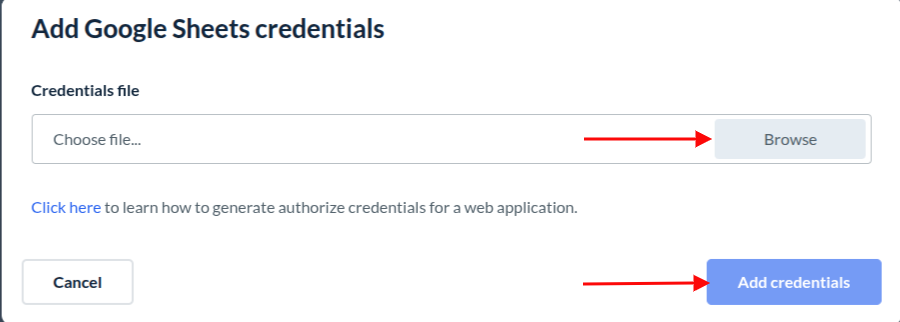
3. A green notification will confirm that the credentials have been successfully added. Click “Continue” to proceed to the Google Sheets Integration page.

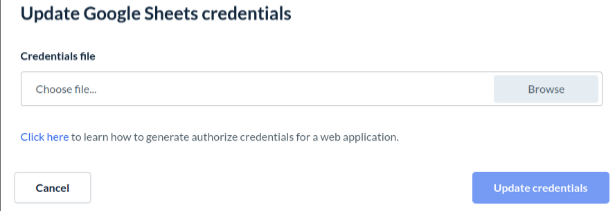
Update the credentials
If you already have credentials and want to update them, click the “Update Credentials” button.

A warning pop-up will inform you that updating your credentials will permanently delete all your existing Google Sheets accounts and will stop syncing. To resume syncing, you'll need to reconnect the accounts. To proceed with updating your credentials, type “CONFIRM” and click the “Proceed” button.
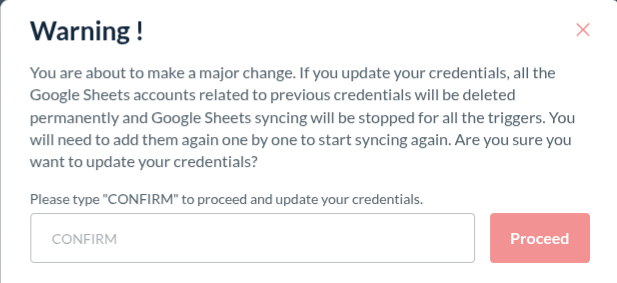
Now, browse your new credentials file and click the “Update credentials” button to update the credentials.
Create triggers for syncing events:
After uploading the credentials, you will be redirected to the Google Sheets integration page by clicking the “Continue” button. In the Google Sheets page, click on the “Create a trigger” button at the top right corner to create a new trigger.

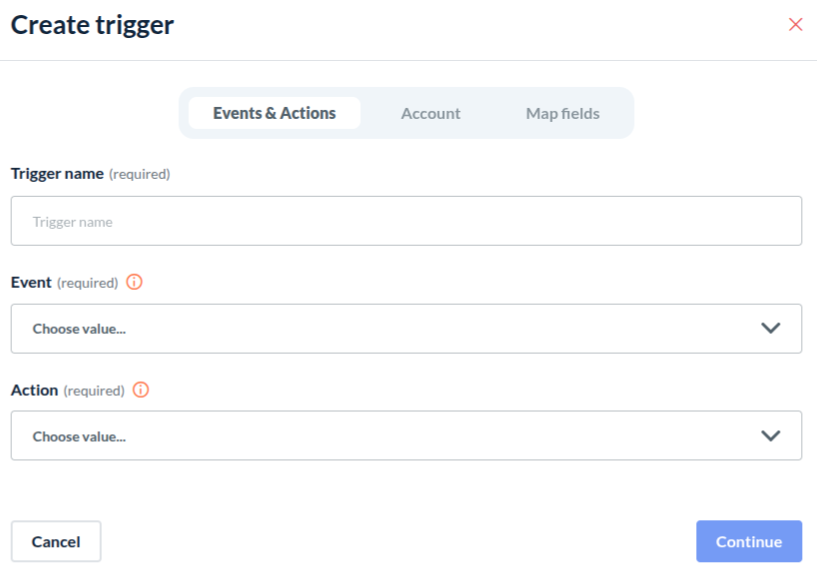
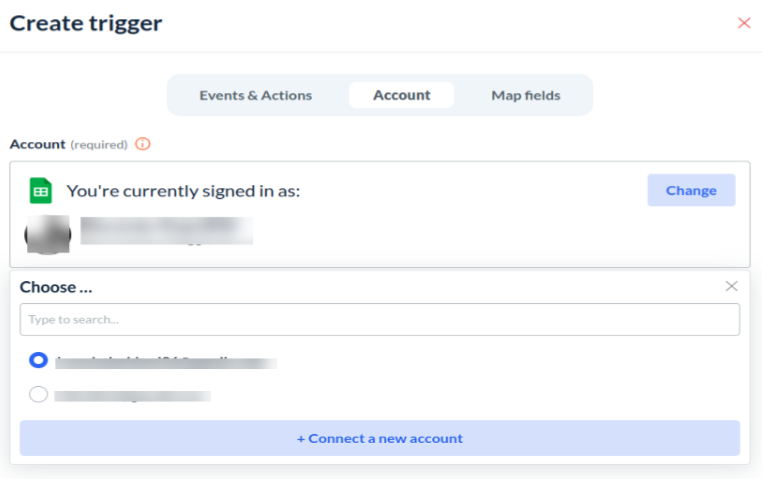
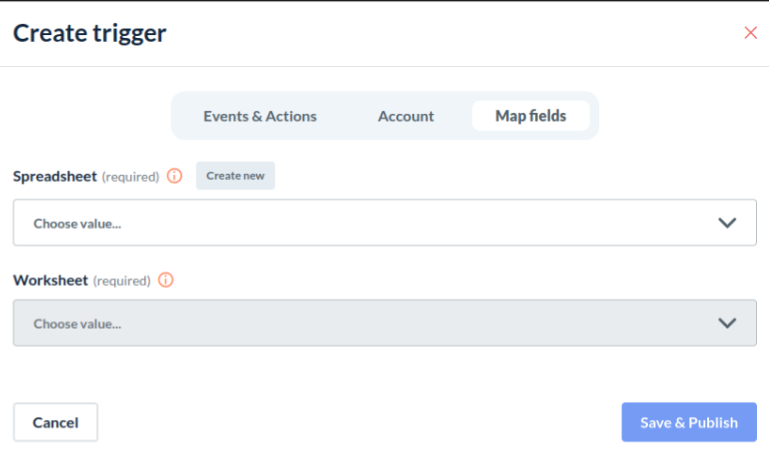
After clicking the “Create a trigger” button, a create trigger sidebar will be opened with three tabs.
1. Events & Actions: In this tab, you can enter the name for your trigger. Choose an event from the events listing and then choose the action that you want to perform when the event is triggered.
2. Account: Choose or connect a Google account in which you want to select the Google Sheet for syncing.
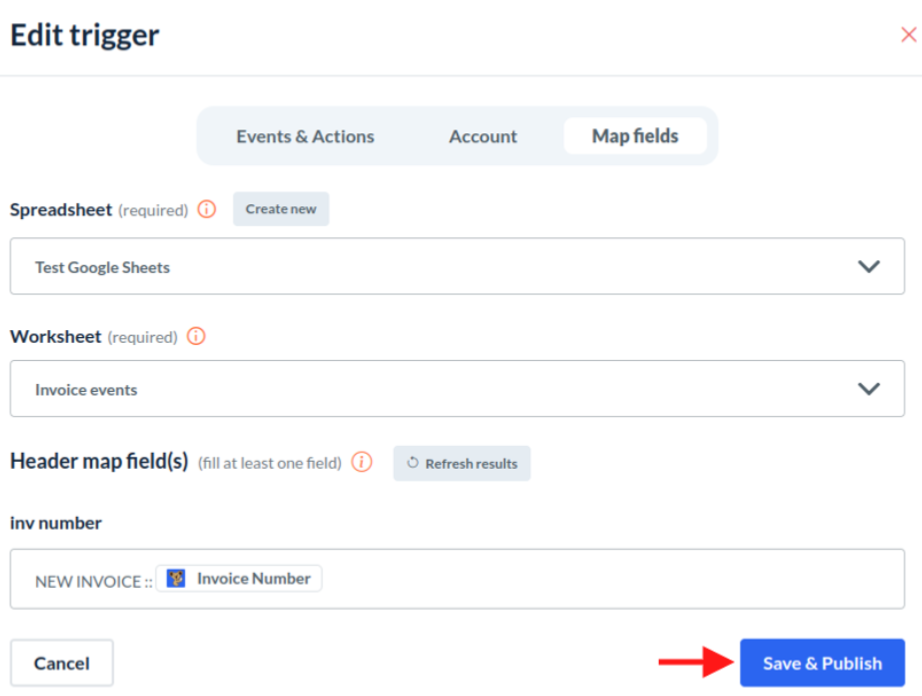
3. Map fields: In this section, you have to select a Spreadsheet and then a Worksheet to map the fields for syncing. Now the rest of the map fields will be shown based on the Action selected in the “Events & Actions” tab. You will be able to map the fields based on the event selected from the “Events & Actions” tab. Each event has its own fields to map. Like events related to booking have booking fields, events related to the provider have provider fields, and so on..
If you select an event of a type like booking, and then you map the fields of that event, and then you select an event of a type other than the previously selected type, then your filled map fields will be reset.
Action-based Map fields:
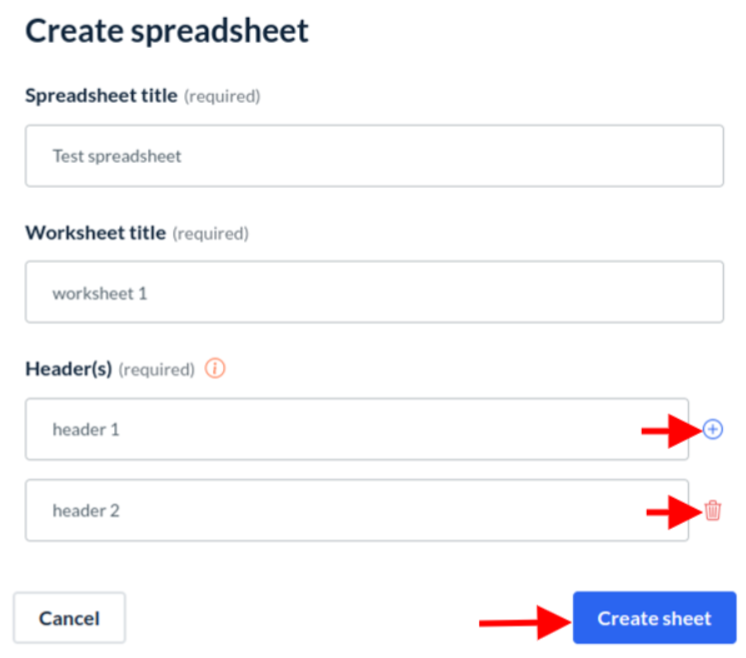
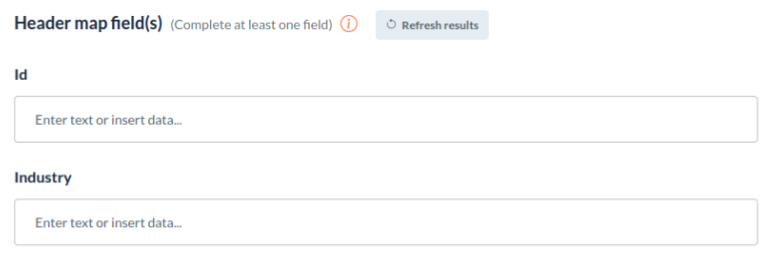
Create spreadsheet row: If you have selected this action, then you will be able to see the “Header map fields”. Header map fields are the fields in which you can insert or write the data you want to show when a new spreadsheet row is created. You will have to fill in at least one of the header map fields. Also, you will be able to create a new spreadsheet in this case by clicking on the “Create new” button in the spreadsheet dropdown. By clicking the “Create new” button, a pop-up will open where you can add a spreadsheet title, a worksheet title, and the headers for the worksheet. You can add headers by clicking the “+” button in the headers. Also, you will be able to remove the headers by clicking the delete button.
After filling in all the data, click the “Create sheet” button to create a new spreadsheet.
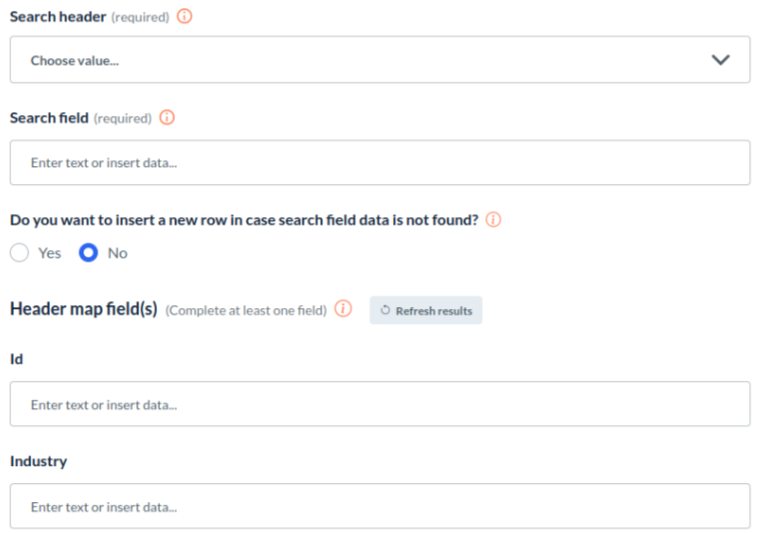
Update spreadsheet row: On selecting update spreadsheet row, you will be able to see “Search header”, “Search field”, and “Header map fields” fields. In the “Search header” field, you can select a Google Sheet header to search data in that header’s column. Then, in the “Search field,” you have to enter the exact data you want to match in the selected “Search header” column. Also, there will be a question: “Do you want to insert a new row in case search field data is not found?” By default, its value is “No”. On selecting “Yes”, if the mentioned “Search field” data is not found in the selected “Search header” column, then a new row will be created in the worksheet.
Then, in the “Header map fields”, you can enter the data that you want to replace with the matched worksheet row data. You will have to fill in at least one of the header map fields.
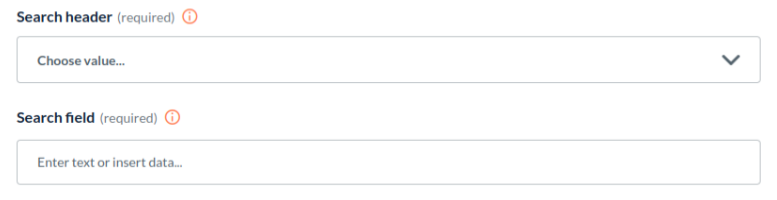
Clear spreadsheet row: On selecting this option, you will be able to see “Search header” and “Search field” fields in the map fields tab. In the “Search header” field, you can select a header in which you want to search the entered data in the “Search field”. “Search field” is a field in which you can enter text or insert data to find in the “Search header” column.
4. Save & Publish: In the “Map fields” tab, there is a button to Save & Publish the created trigger data. After clicking this button, your trigger will activate, and the syncing of your events will start. You can see the created trigger in the triggers listing.
Update the triggers:
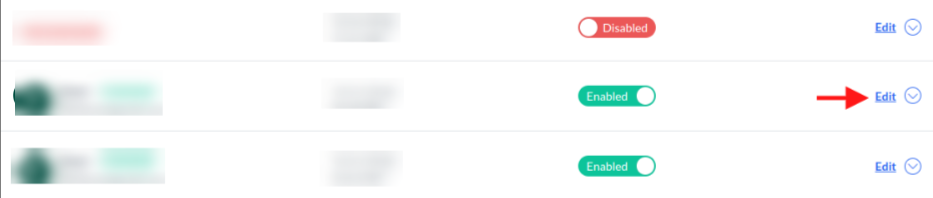
On the click of the “Edit” button from the triggers listing, you can edit a trigger.
A sidebar will open with the prefilled data, and you can edit any field of the trigger from this sidebar. Some fields are dependent on other fields, so changing one field can reset the other dependent fields of the trigger.
For example:
Event: Changing the event from one type to another ( eg, from event of type booking to event of type provider or invoice, or customer) will reset all the mapped data from the map fields, like from the Search header and Header map fields.
Action: On changing the action, your fields in the Map fields tab will change based on the action selected.
Account: On changing the account, all the fields like Spreadsheet and Worksheet dependent upon the account will reset. You need to select them again.
Spreadsheet: On changing the spreadsheet, this will reset the worksheet field.
Worksheet: Changing the worksheet will change the header map fields. But the values of header map fields will remain there in case the header map fields are not reset before (like in case of a changing event). This will also reset the Search header field because it depends on the worksheet.
In the end, you can save and publish the changes by clicking the “Save & Publish” button.
Update trigger name and status:
If you want to update the trigger name and status, you can directly update them from the listing.
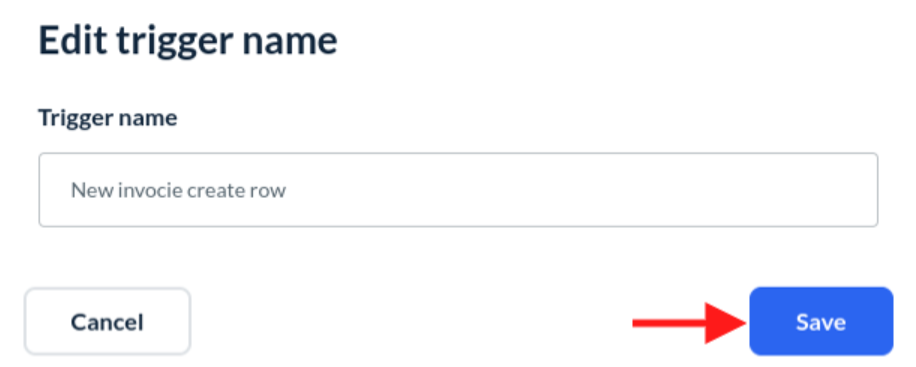
Trigger name: From the triggers listing, with the trigger name, you will be able to see an edit sign.

On clicking the edit sign, a pop-up will open. You can now enter a name that you want to update and show in the listing. On clicking the “Save” button, the trigger name will be updated.
Trigger status: If you want to enable or disable the trigger to start or stop events syncing for that trigger. You can directly do it from the trigger listing by just clicking the status switch.

Stop Google Sheets syncing:
There are different ways to stop syncing for Google Sheets events based on what you want to stop syncing for.
Stop syncing for a single trigger: If you want to stop the syncing for a single trigger, then there are three ways to do that:
First, you can disable the status for the trigger. It will stop the syncing for that trigger. You can enable it later.
Second, you can delete the trigger. On deleting the trigger, syncing will stop for that trigger. You need to create a new trigger to start syncing again.
Third, you can delete the Google account from the “Manage accounts” page associated with the trigger to stop syncing for the trigger. But keep in mind, this will also stop the syncing for the triggers that use the deleted account.
To start syncing for these triggers again, you need to add the Google accounts for each trigger, again by editing the triggers.
Stop syncing for the Google account-specific trigger: If you want to stop syncing for all the triggers for a Google account, you can achieve it using two ways.
Either you can disable the triggers' status manually one by one and enable them later to start syncing again.
Or you can delete the Google account from the “Manage accounts” page to stop syncing for all the triggers using that account.
To start syncing again, you need to add the account for each trigger one by one by editing the triggers.
Stop syncing for all the triggers: To achieve this, you can disable the status for Google Sheets from the “Apps & Integrations” page. To start the syncing again, you can just enable Google Sheets again.
Note: Please note that on updating the credentials, all your Google Sheets accounts will be deleted permanently, and the syncing will stop. To start syncing again, you need to add them one by one for each trigger.
Manage failed events for the triggers:
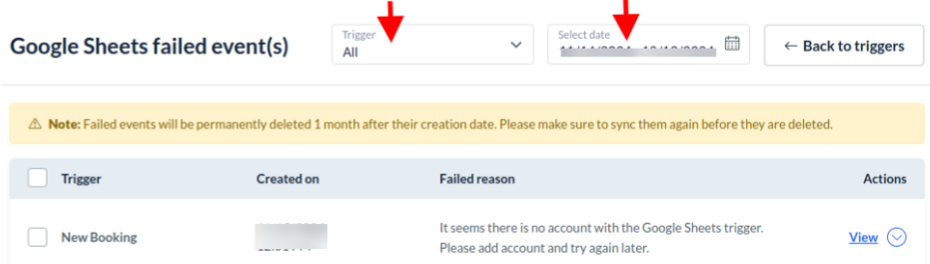
You can see all your failed events in the Failed events page. You can redirect to the Failed events page by clicking the “Failed events” button from the triggers listing page.

Apply filters:
Trigger filter: You can get all the failed events for a specific trigger by selecting the trigger from the trigger filter. Select “All” to get all the failed events.
Date filter: You can get the failed events between the selected date range from the date filter.
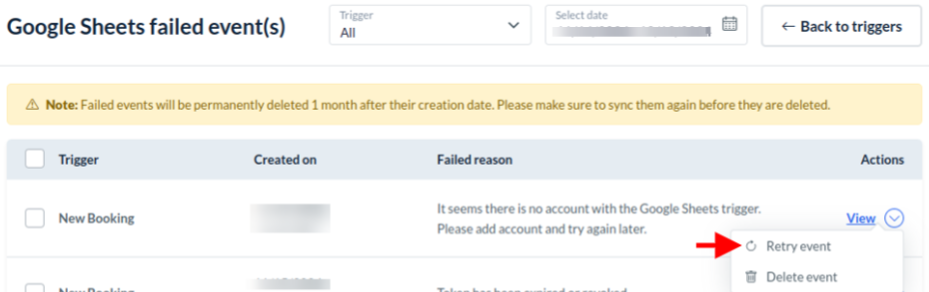
Retry syncing: You can retry the syncing for failed events in bulk or one by one. To perform syncing again one by one, you need to click the dropdown in the failed event listing and click on the “Retry event” option. This will perform syncing on that event again.
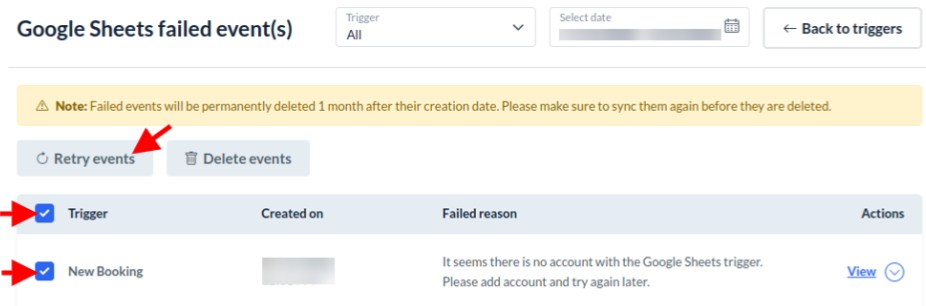
To perform syncing in bulk, you can select multiple events or select all the events from the listing and click on the “Retry events” button at the top of the listing to perform syncing for the selected events again.
Delete events: As in retry syncing, we can sync events in bulk or one by one; similarly, we can delete the events. So, to delete events one by one, you need to click on the dropdown in the failed events listing and will have to click on “Delete event” to delete the event.

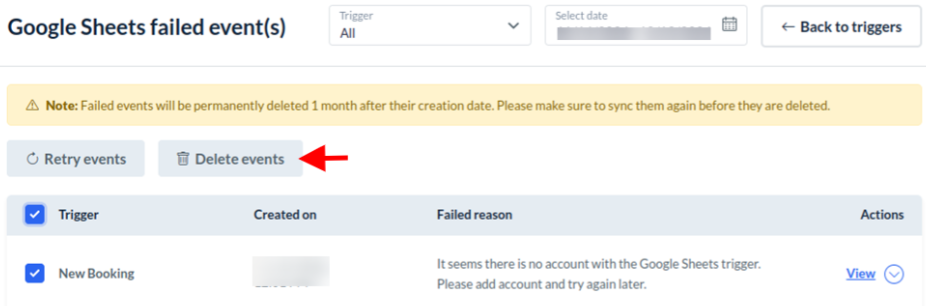
To delete the events in bulk, you need to select the events you want to delete and then click on the “Delete events” button at the top of the listing. This will delete all the selected events.
Note: Please note that failed events will be permanently deleted 1 month after their creation date. Please make sure to sync them before they are deleted.
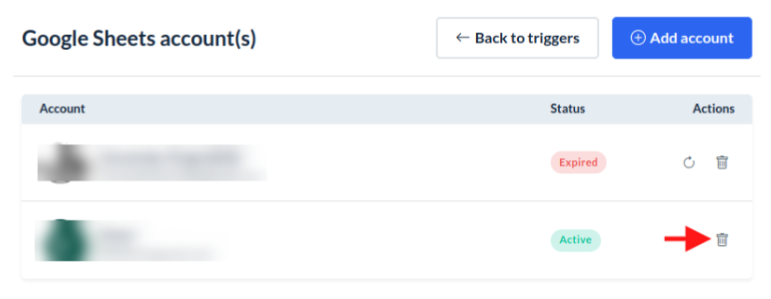
Manage Google accounts:
To manage your Google accounts, go to the manage accounts page by clicking the “Manage accounts” button from the trigger listing page.

On this page, you can connect a new account by clicking on the “Add account” button at the top. Or you can reconnect your expired account or delete the connected Google account.
Add account: You can click on the “Add account” button at the top of the page and connect a new Google account. After adding a new account, the account will be displayed in the Manage Accounts page. Also, you will be able to select this account while creating or updating your trigger.

Reconnect: If your account expires, you will be able to see a reconnect page in the accounts listing. You can click on the reconnect icon to reconnect it.
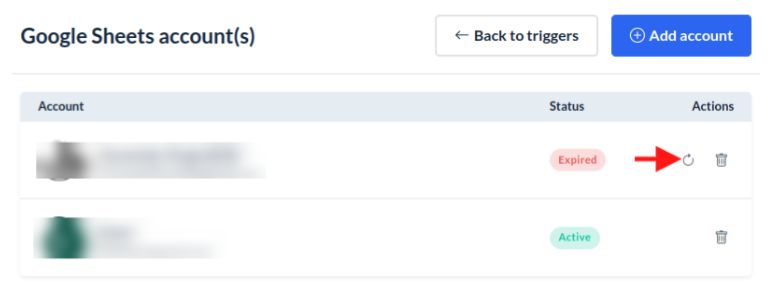
Delete account: If you want to delete your Google account, you can click on the delete button (trash bin) in the accounts listing. This will open a warning pop-up to confirm the delete account process. If you confirm it, your account will be permanently deleted.
Notifications:
Email: You will get an email notification whenever a Google Sheets event fails to sync. To enable/disable email notifications for the Google Sheets failed events, go to: Settings > Notifications > Email > Admin > General

SMS: To enable/disable SMS notifications, go to: Settings > Notifications > SMS > Admin > General

You can also send email notifications to the staff by enabling it from the per-staff notifications section. To enable/disable email notifications for staff, go to: Settings > Staff > Staff Members > Edit Staff > Notifications

Error messages and reasons:
Here you can find some error messages with reasons that you can face while working with Google Sheets. This will help you to debug the error.
1. Message: “Unable to parse range: Sheet41!A:A.”
Reason: a. The worksheet “Sheet41” is deleted from the spreadsheet.
b. The worksheet name is changed and is not updated on the trigger.
2. Message: “Requested entity was not found.”
Reason: The Spreadsheet was deleted permanently. (For temporary moves to trash, syncing will still work.)
3. Message: “Request had invalid authentication credentials. Expected OAuth 2 access token, login cookie, or other valid authentication credential. See Integrating Google Sign-In into your web app | Authentication.” OR: “Token has been expired or revoked”.
Reason: Access to the user's Google account has expired or been revoked.
4. Message: “Google Sheets API has not been used in project 7596…. before or it is disabled. Enable it by visiting the Google Cloud console, then retry. If you enabled this API recently, wait a few minutes for the action to propagate to our systems and retry.”
Reason: “Google Sheets API is not enabled for the provided credentials.”
5. Message: “Quota exceeded for quota metric 'Write requests' and limit 'Write requests per minute per user' of service 'sheets.googleapis.com' for consumer 'project_number:22824…'.”
Reason: a. Quota limit has been exceeded, i.e, Google Sheets api request limit has been exceeded. Usage limits | Google Sheets sheets quota and limits.
6. Message: “The service is currently unavailable.” Or “Internal Error Encountered”
Reason: This error indicates that the request reached the Google Sheets side, and their service was unavailable to process the request. This is beyond our control, as the error encountered is on their side.
By following these steps, you can effectively sync your events with Google Sheets, and please feel free to address any issues that may arise during the process.
If you have any questions or need further help, feel free to reach out to our support team.