This article will guide you through:
Connecting your Xero account to BookingKoala.
Enabling and configuring payment syncing for different entities (booking, gift card, custom invoice, and separate charge).
Syncing payments automatically or manually.
Stopping payment syncing when needed.
What is Xero?
Xero is powerful online accounting software for businesses, automating invoicing, bank reconciliations, and reporting. Get real-time financial insights, track expenses, and keep accurate records – all in one place – to simplify cash flow management and tax preparation.
What you can do with Xero:-
Automate tasks like invoicing, bank reconciliations, and reporting
Get up-to-date financial data for a full picture of your business
Keep accurate records in a single place for easier tax returns
How to Integrate Xero with BookingKoala?
Integrating your BookingKoala platform with Xero requires a Client ID and Client Secret Key from a Xero developer app. Follow the steps below to create a Xero developer app, generate the necessary credentials, and complete the integration process.
Step 1: Create a Xero Developer App and Generate Credentials
1. Sign Up for a Xero Developer Account:
Visit the Xero Developer Portal Sign-up page.
Complete the registration form with your details, including name, email, and company information.
Click Next: Confirmation green button to create your account.
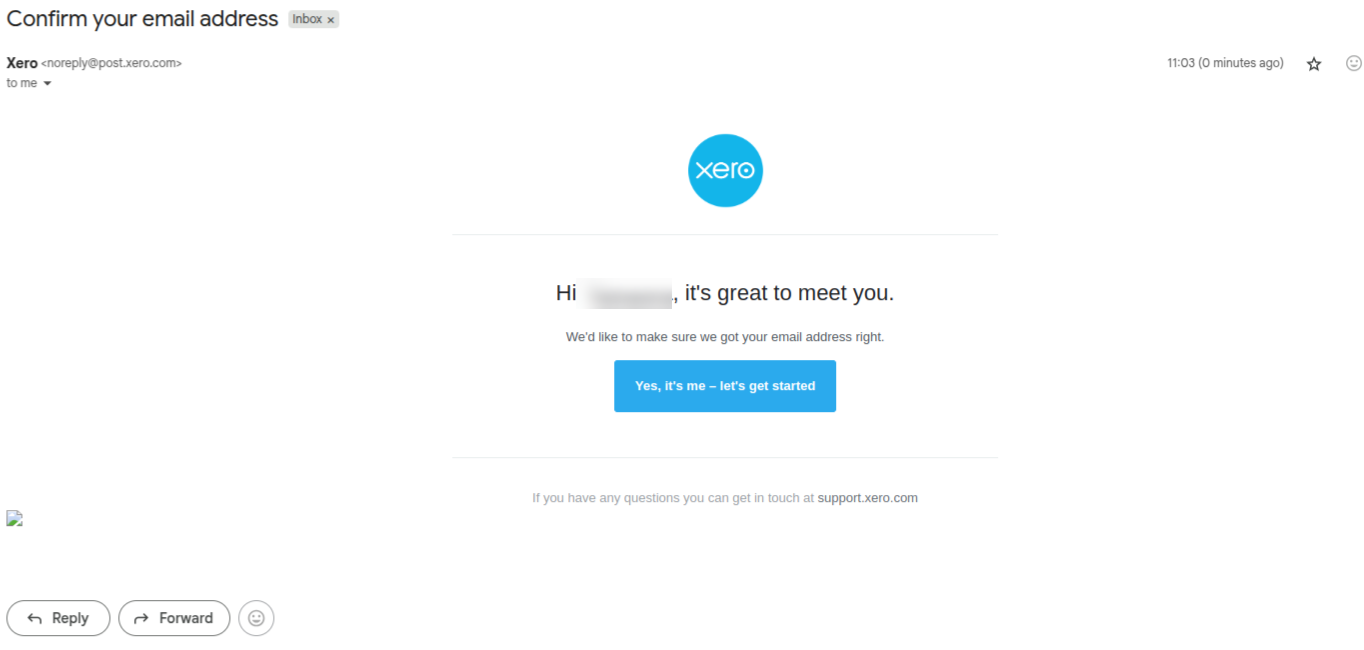
2. Verify Your Email:
After signing up, check your email inbox for a verification message from Xero.
Open the email and click the verification button to confirm your account.
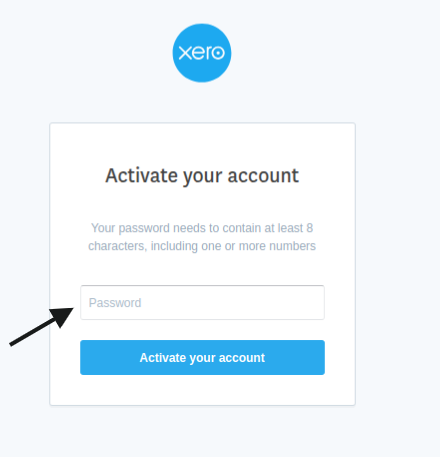
3. Activate Your Account:
After verifying your email, you will be prompted to create a password.
Choose a strong password and save it securely.
Click Activate your account to proceed.
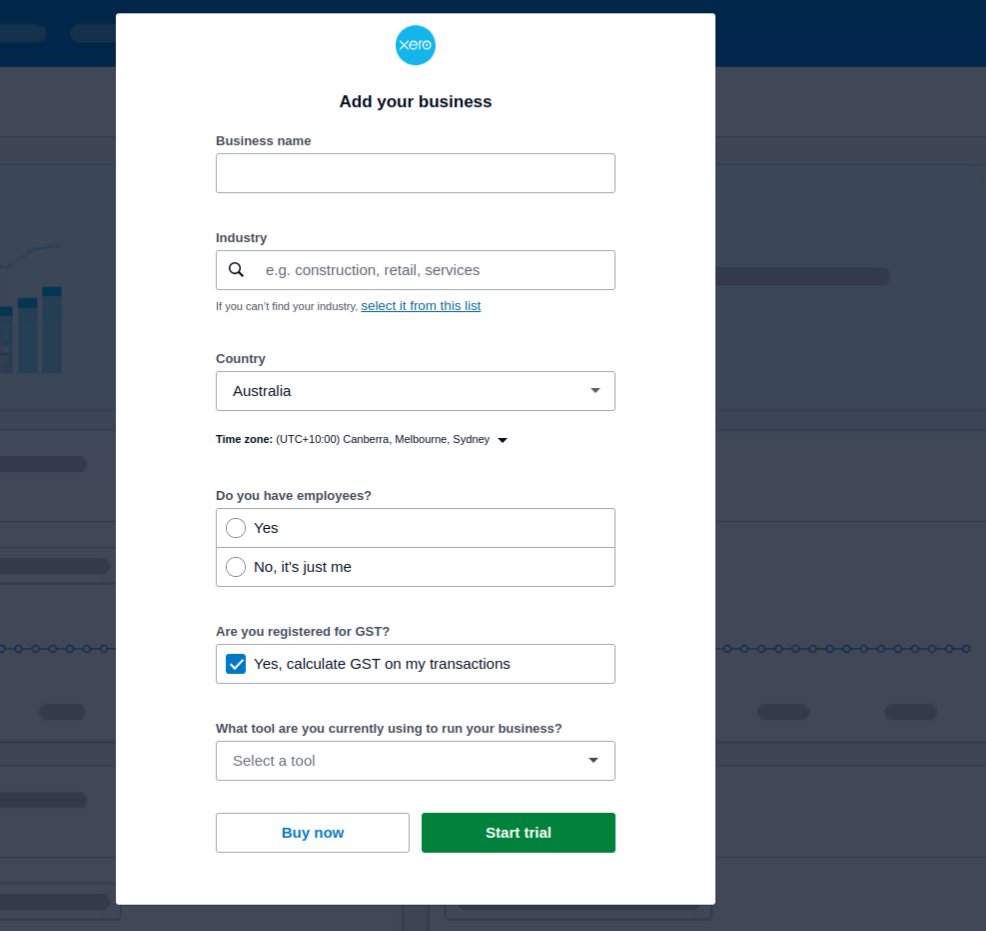
4. Provide Business Details:
You will be asked to enter details about your business, such as business name and industry.
Choose whether to purchase a subscription or start with a free trial.
With this, an organisation will be created.
5. Answer Additional Questions:
Xero may ask questions about how you manage your accounting tasks.
Provide responses based on your current accounting practices.
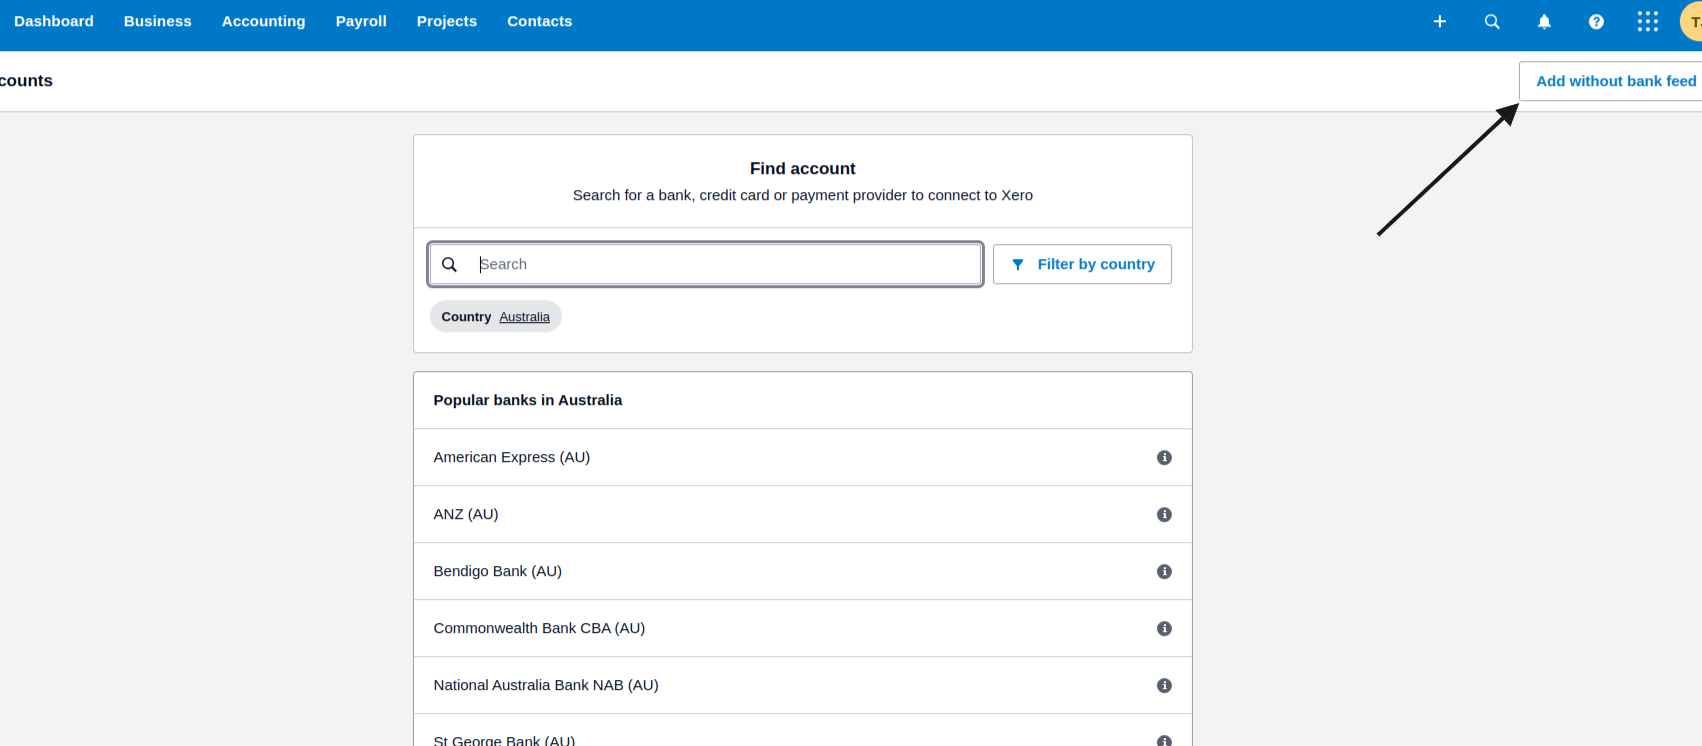
6. Add a Bank Account:
You may be prompted to add a bank account.
You can add a bank account with or without a bank feed.
7. Log in to the Xero Developer Portal:
Go to the Xero Developer Portal and log in using your credentials.
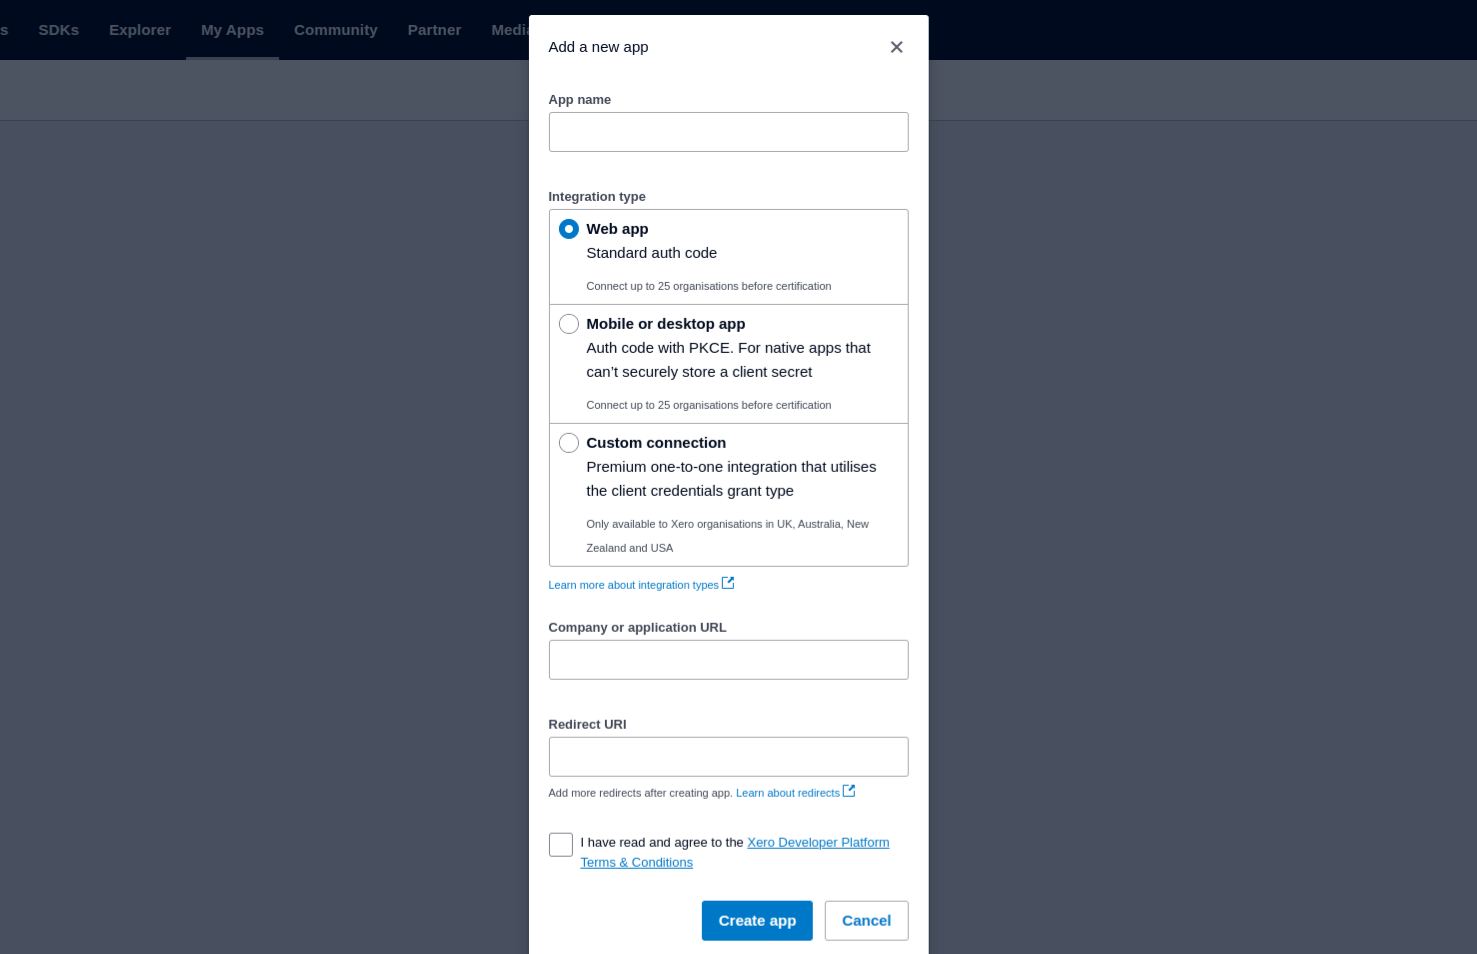
8. Create a New App:
Click on Create New App to start the setup process.
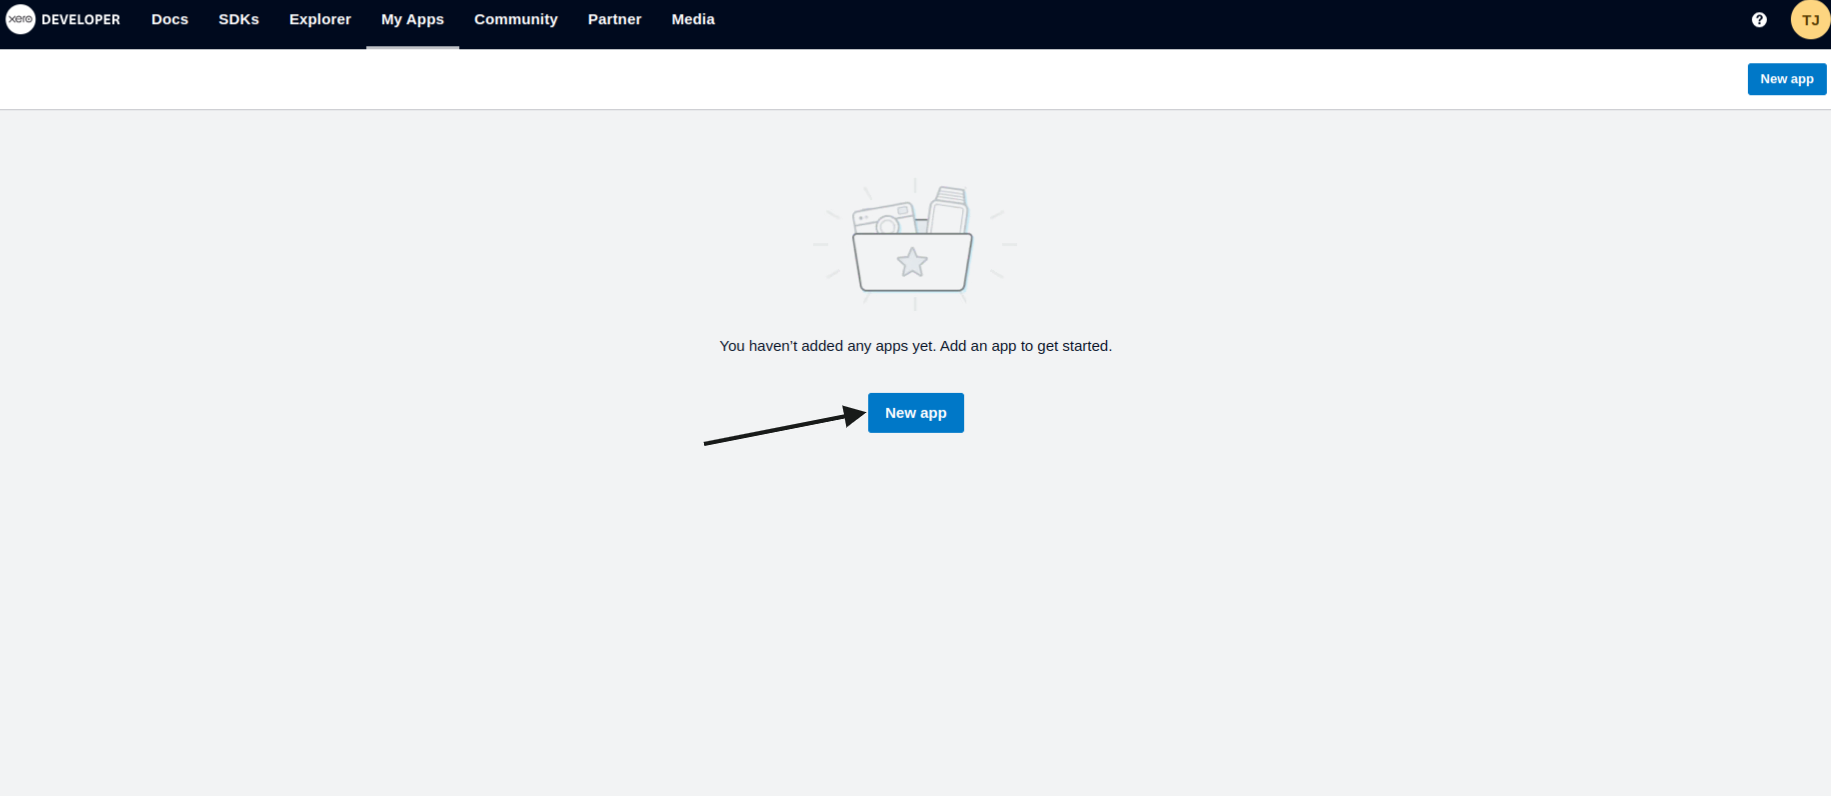
Provide the following details:
App Name: Enter a unique and meaningful name for your app.
Integration Type: Select Web App.
Company/Application URL: Enter the URL of your BookingKoala account.
Redirect URL: You have to use https://account.bookingkoala.com/accounting/xeroconnect/ as a redirect URL.
Click Create App to finalize the setup.
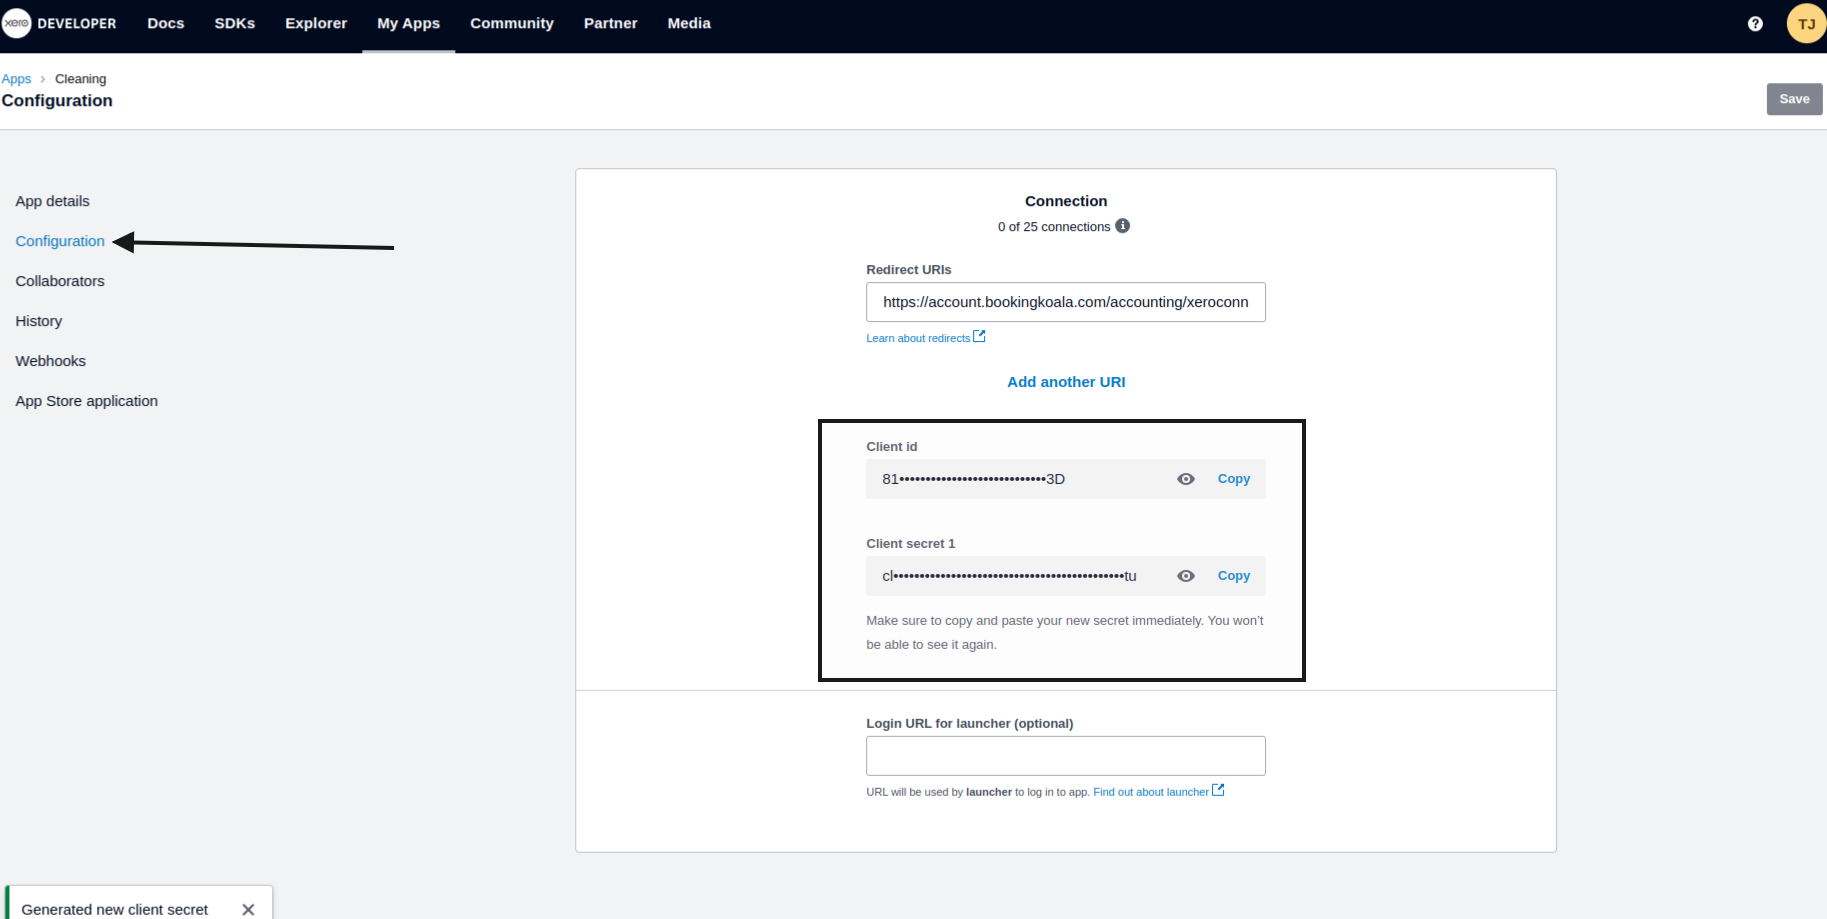
9. Generate Client ID and Client Secret:
Once your app is created, go to the Configuration section.
Copy the Client ID displayed on the screen and save it securely.
Click on Generate a Client Secret and copy it immediately, as it will not be displayed again.
If you lose your secret key, you will need to generate a new one. However, after generating a new secret key, you have to reconnect Xero with BookingKoala.
Step 2: Connecting your Xero account
To connect your Xero account to BookingKoala, go to:
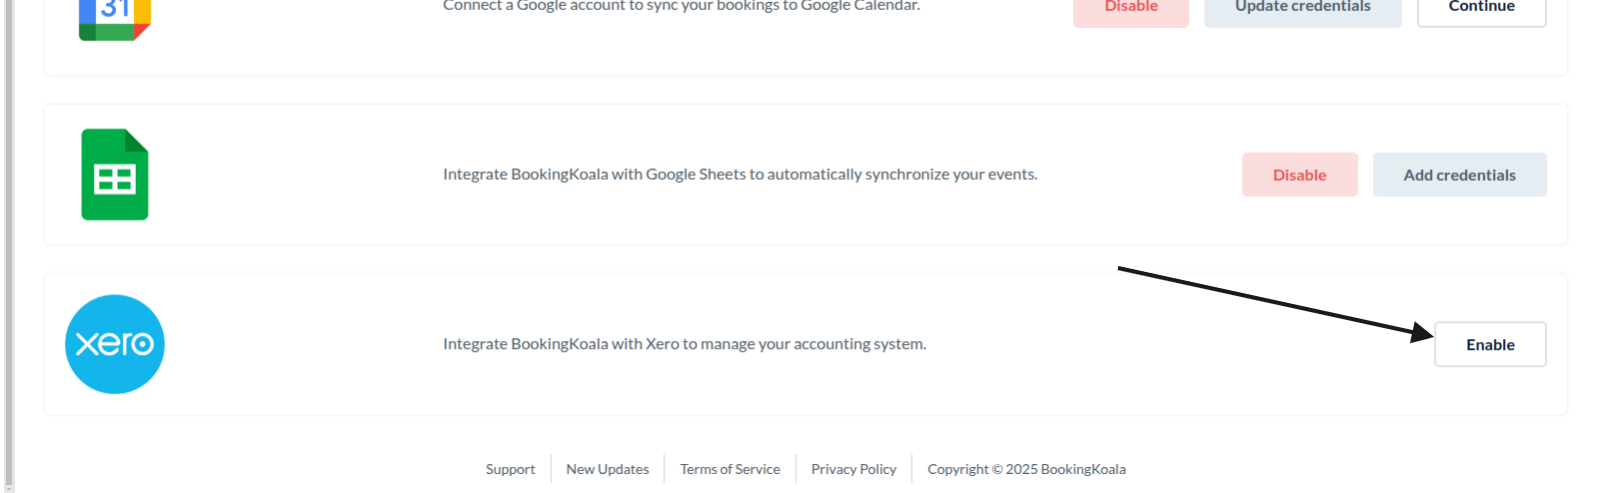
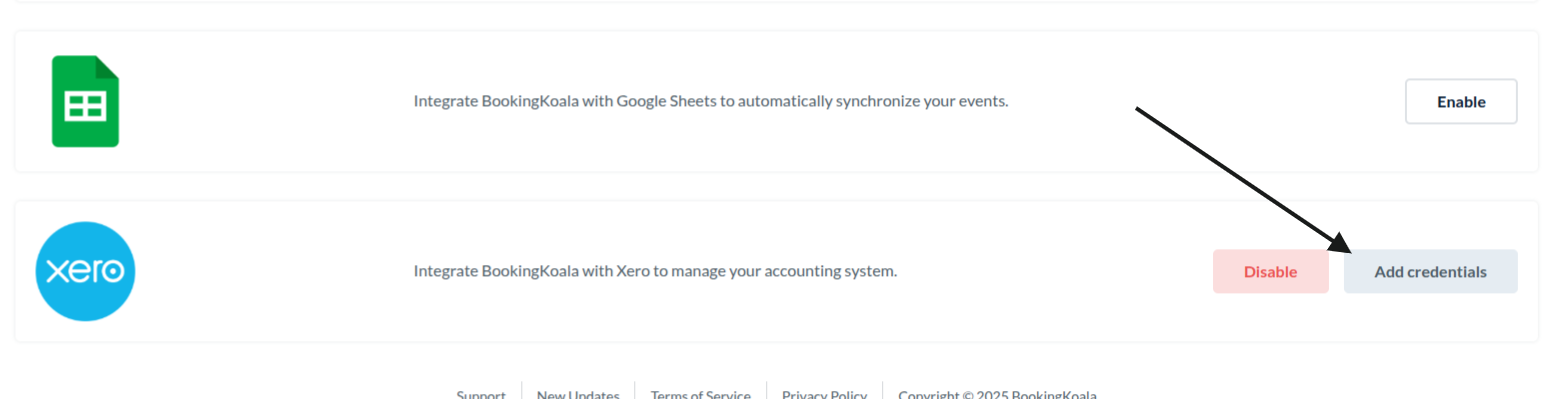
Settings > General > Apps & Integrations
Scroll down to the Xero box and toggle the switch to enable Xero integration.
Add Xero Credentials: Click on the Add Credentials button to open the credential entry form.
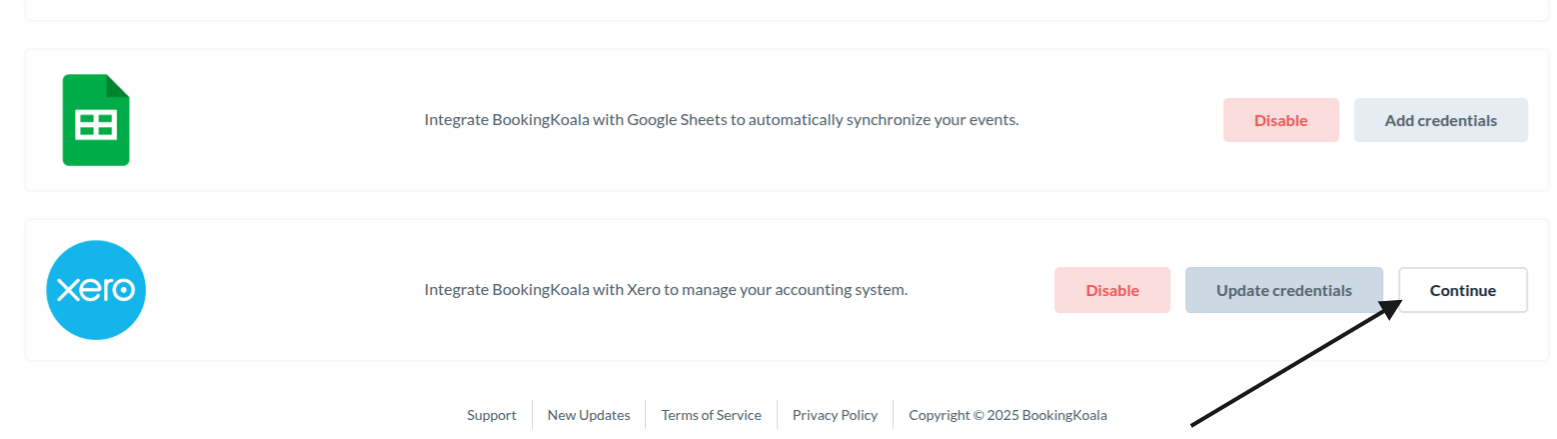
Paste the Client ID and Client Secret Key copied from the Xero Developer Portal.
Click Save to store the credentials.

Connect to Xero: Click the Continue button to proceed to the Xero integration page.
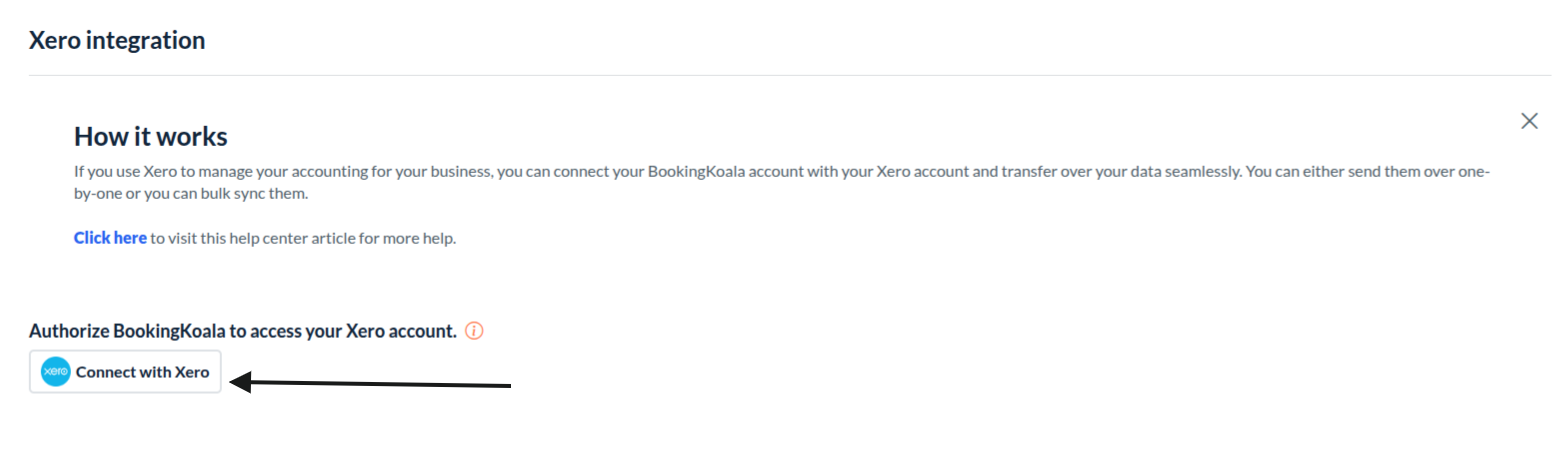
On the Xero integration page, click Connect to Xero.You will be redirected to Xero’s authentication page.
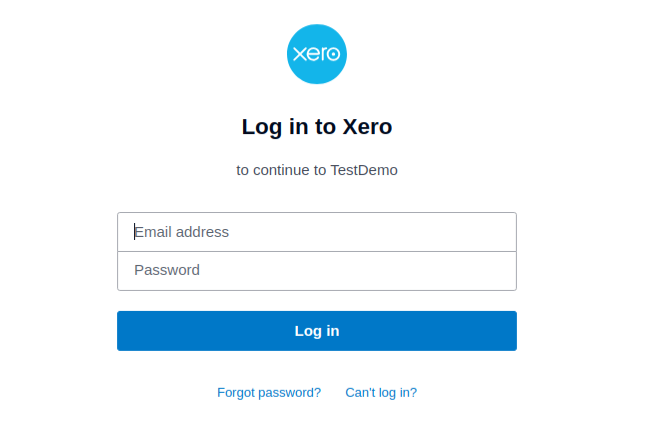
Enter your Xero login credentials and click Log in. (If you’re already logged into your Xero account, this step will be skipped.)
Once logged in, select the organization you want to connect with BookingKoala.
Click the Allow Access button to give permission for BookingKoala to connect to your Xero account.
Note: Each Xero organization can only be connected to one BookingKoala account. If the organization is already linked to another account, you’ll need to disconnect it there first.
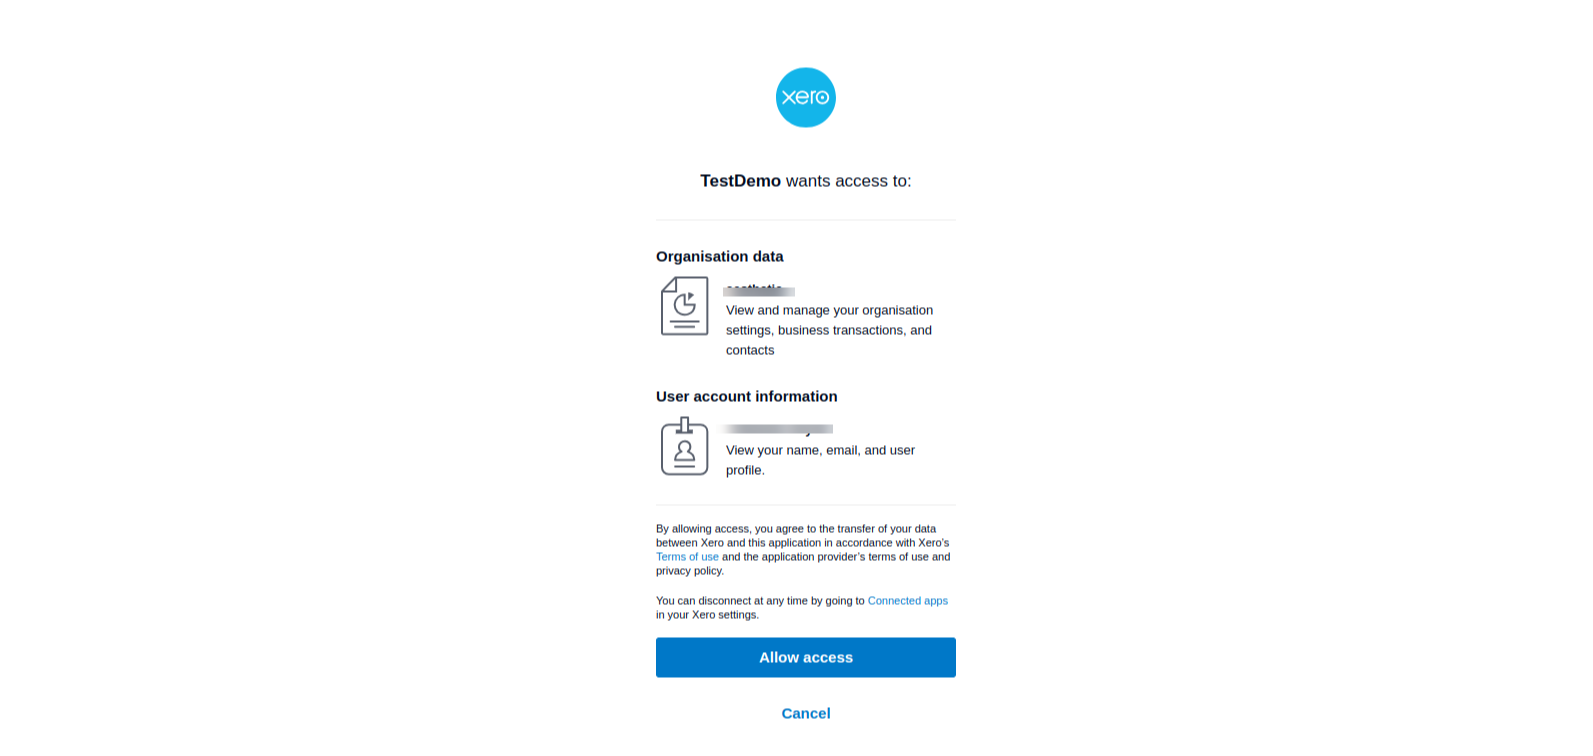
After granting access, you will be redirected back to the Xero integration page in BookingKoala.
You’re now ready to enable syncing and configure your settings.
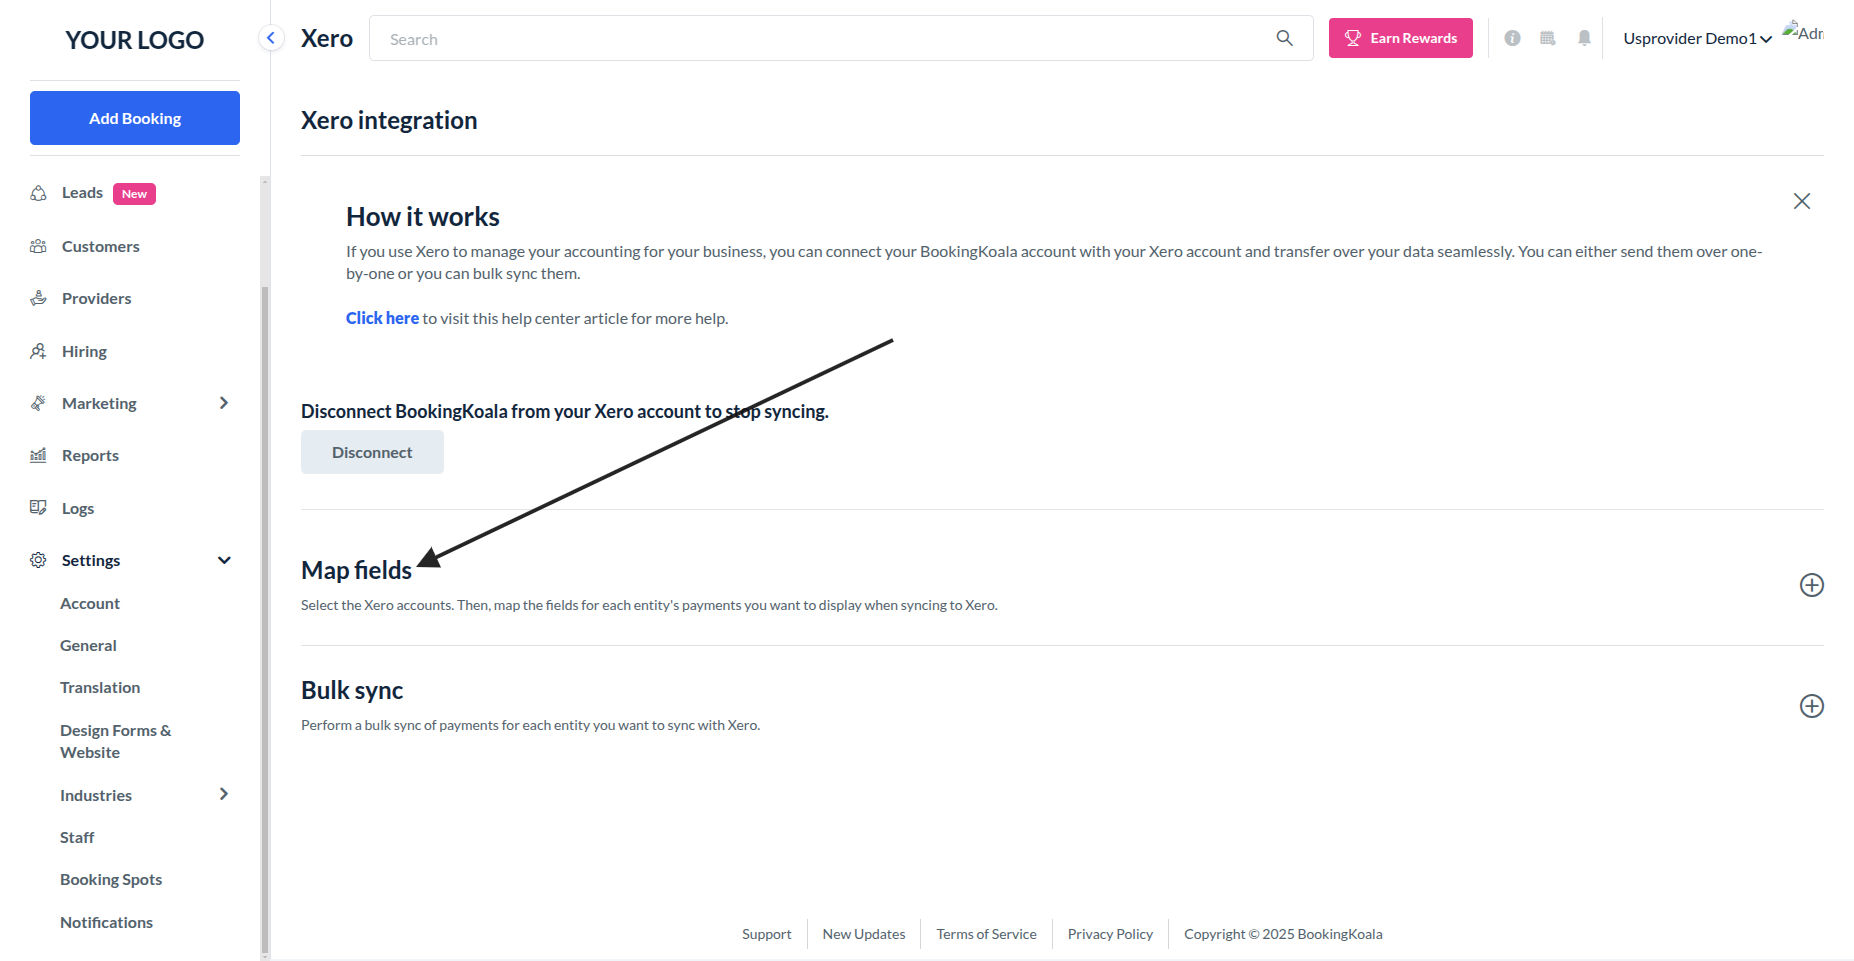
Enabling Xero Syncing
Once your Xero account is connected, you need to enable syncing and map the fields for each payment entity.
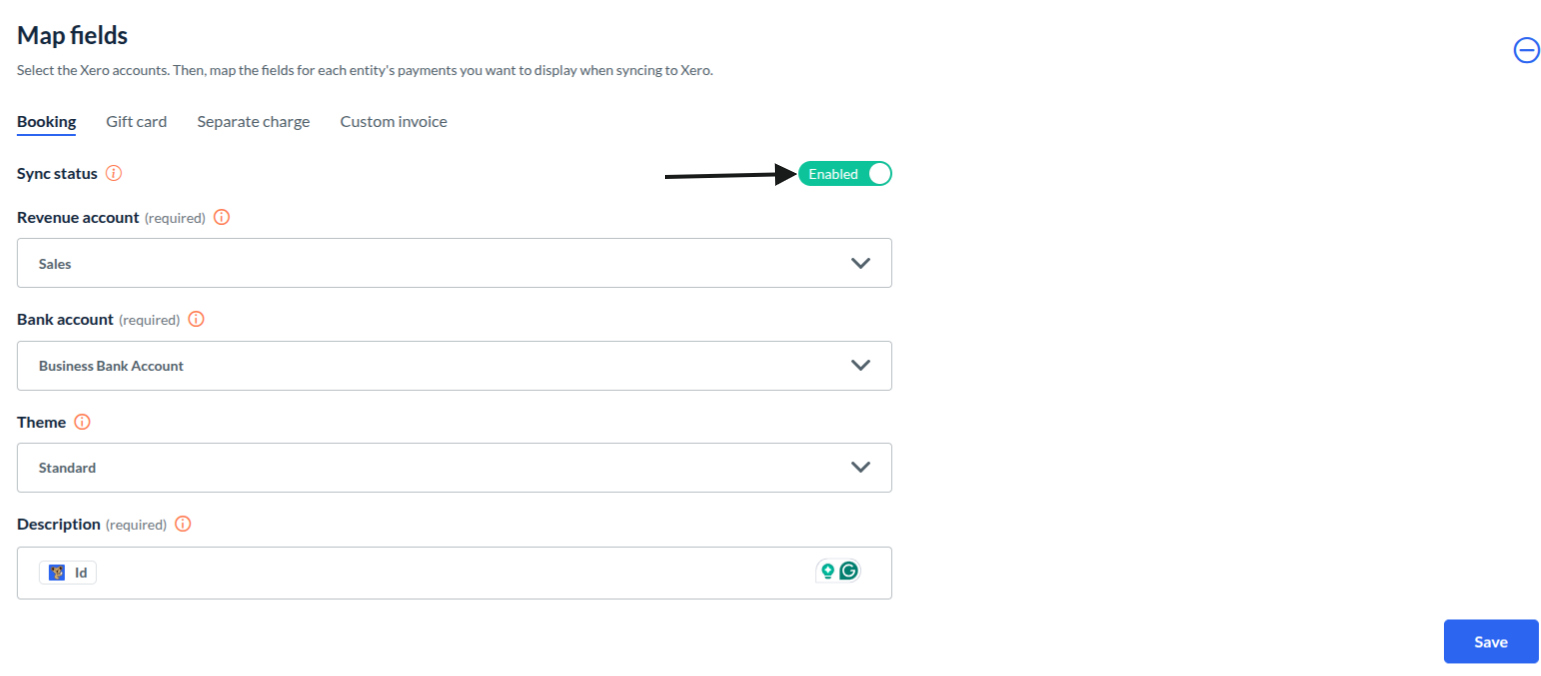
Step 1: Locate the Map Fields Section
On the Xero integration page, click on the Map Fields section to expand it.
Step 2: Enable Syncing for Each Entity
In the Map Fields section, you will see tabs for each entity, such as:
-Booking
-Gift card
-Separate charge
-Custom invoice
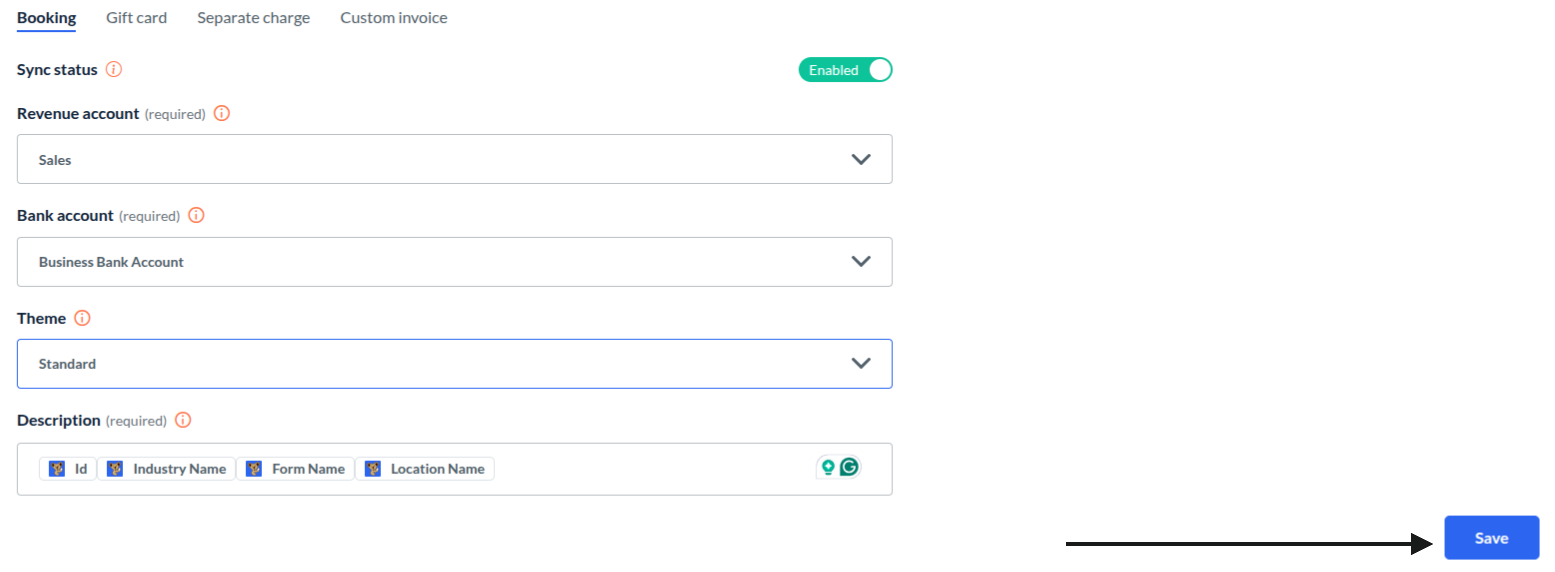
For each entity, toggle the Sync Status to enable syncing.

Step 3: Configure Required Fields
For each entity you enabled, you must fill in the required fields:
Revenue Account: Select the appropriate account from the drop-down menu.
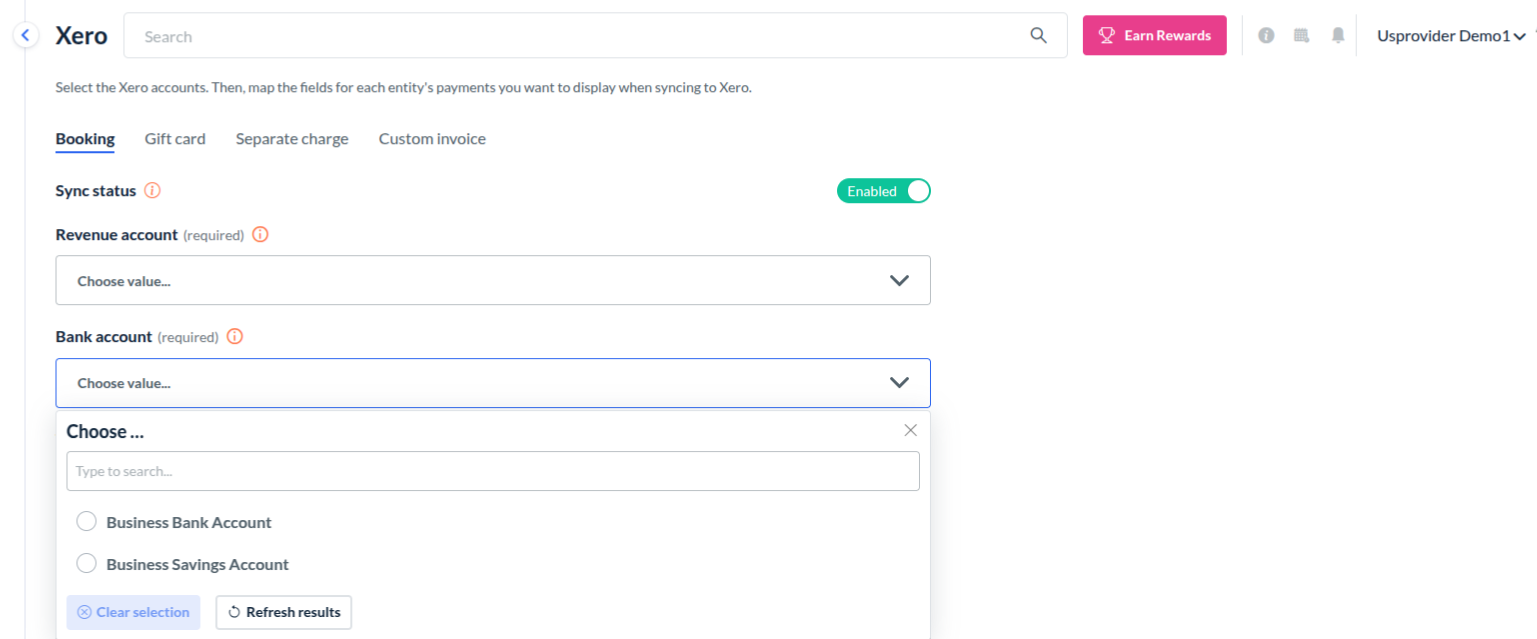
Bank Account: Choose the bank account where payments should be recorded in Xero.
Theme: (Optional) If applicable, choose a theme from the dropdown.
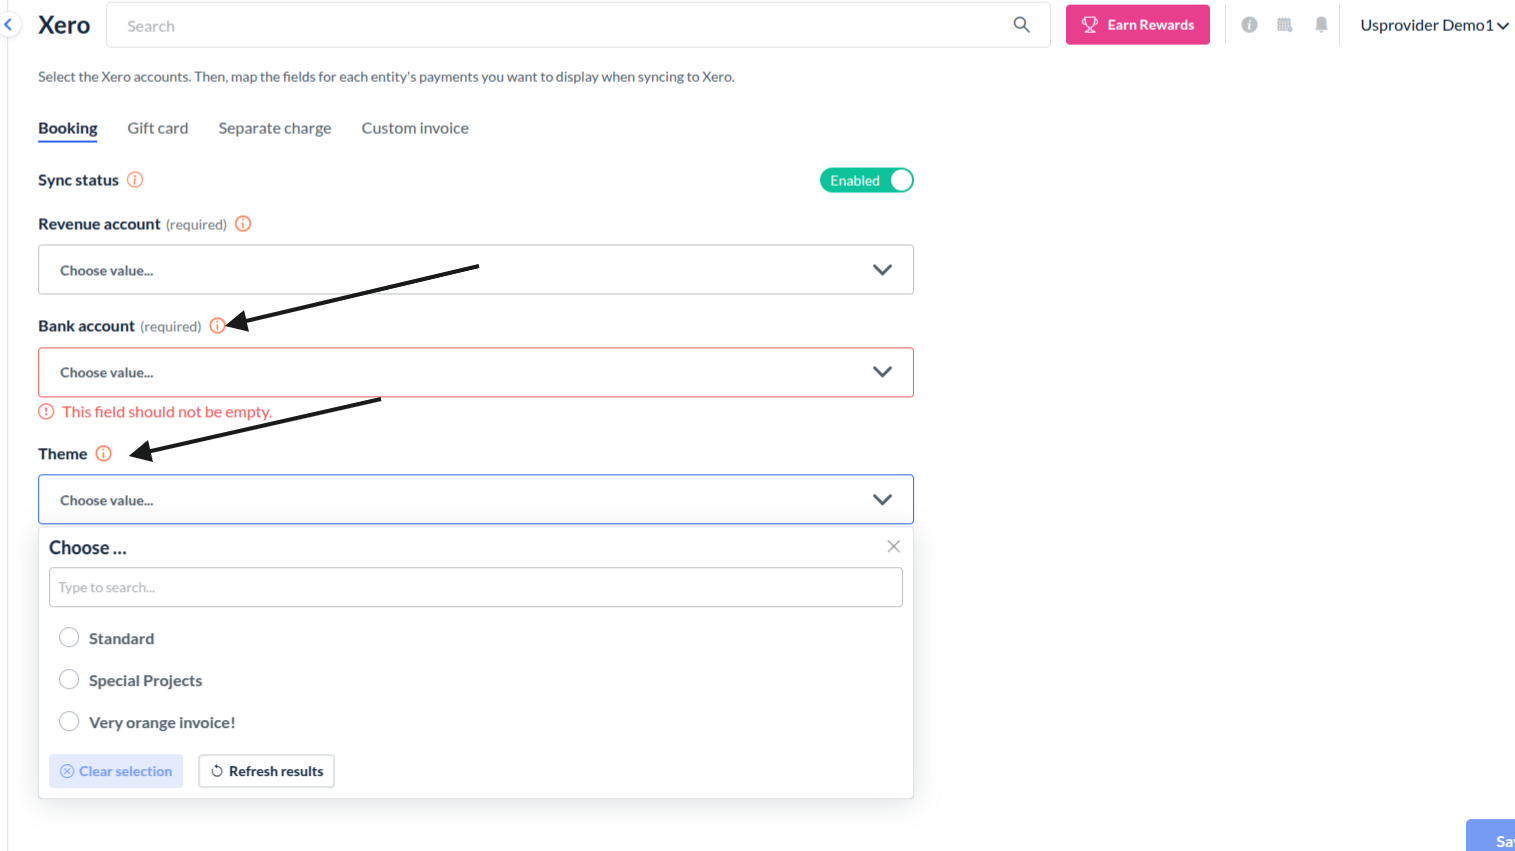
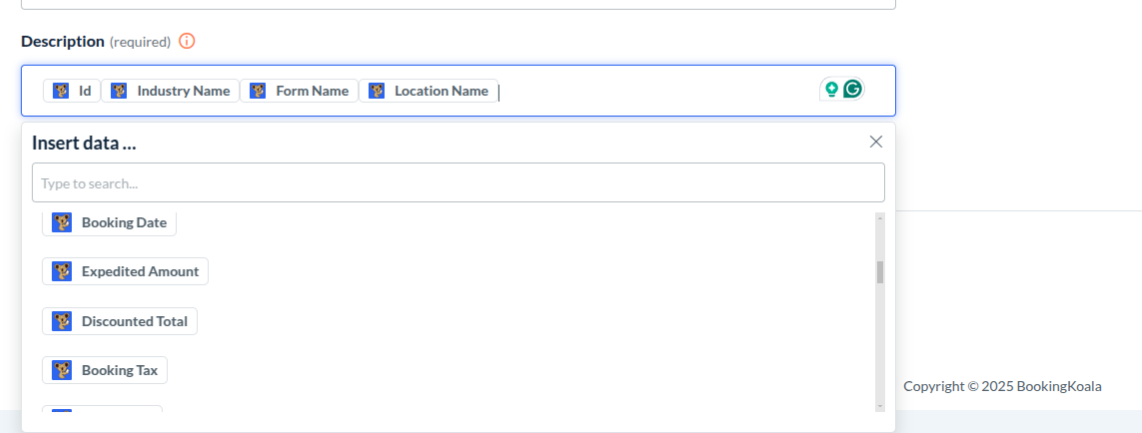
Description: Add a description or map specific fields to be included in the synced payment details.
Step 4: Save Your Settings
After filling out all the fields for an entity, click the Save button.
Repeat this process for each entity you want to sync.
Syncing Payments: Automatic and Manual
You can sync payments automatically or manually, depending on your preferences.
1. Automatic Syncing
Once your Xero account is connected and all required fields are configured in the Map Fields section, payments will automatically sync when processed in BookingKoala.
For example:
-Charging a booking.
-Purchasing a gift card.
-Charging a custom invoice and a separate charge.
-Processing a refund.
An invoice will be created in your Xero account for each payment. For each refund, a credit note will be created.
If a payment fails to sync automatically, you can manually sync it.
2. Manual Syncing
Sync Individual Payments
To sync payments manually for specific entities:
1. Bookings:
Go to: Bookings > Booking Charges > All Charges > Bookings
Open the Actions dropdown and click the View accounting sync option.
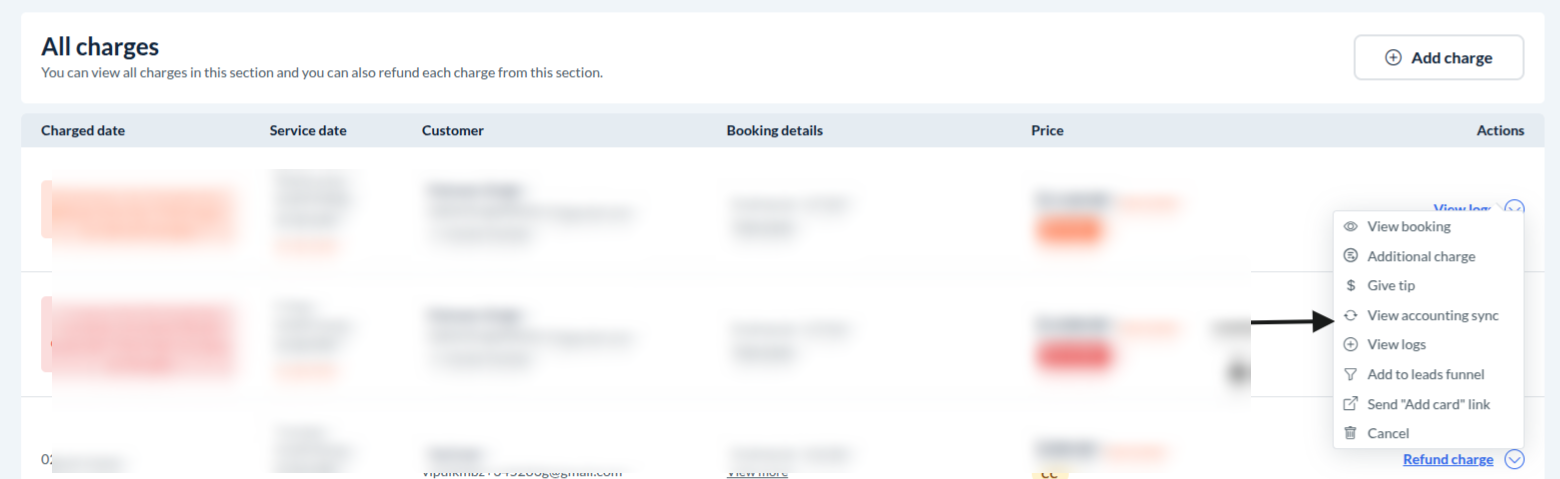
In the pop-up, locate the unsynced payment and click the Sync button.
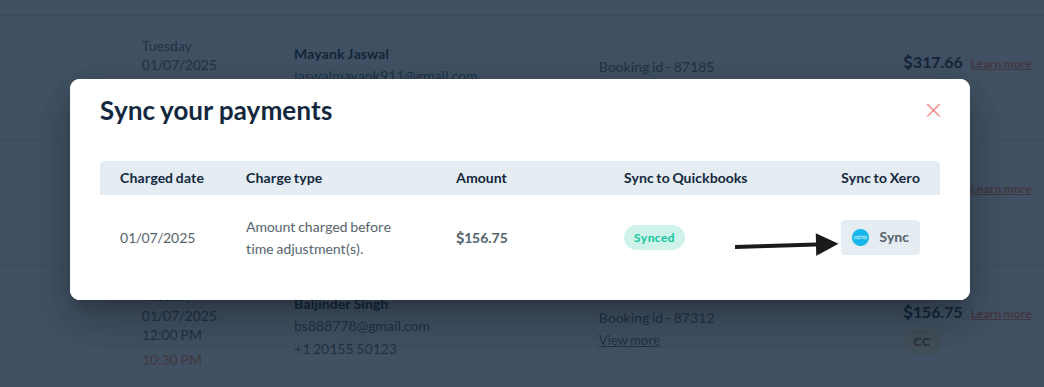
The payment status will update to Synced, and the Sync button will be removed.
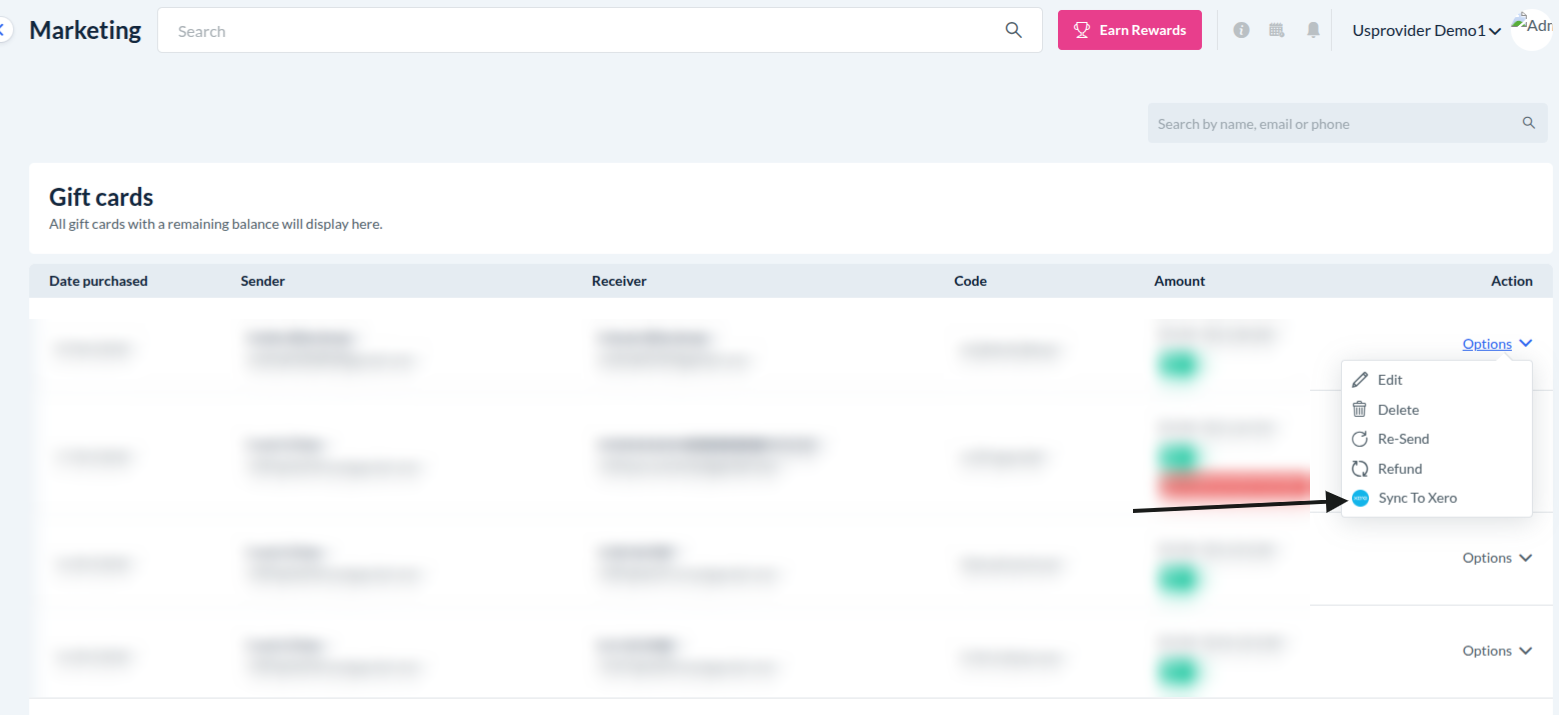
2. Gift Cards:
Go to: Marketing > Gift Cards > Gift Cards
In the Actions dropdown, click Sync to Xero.
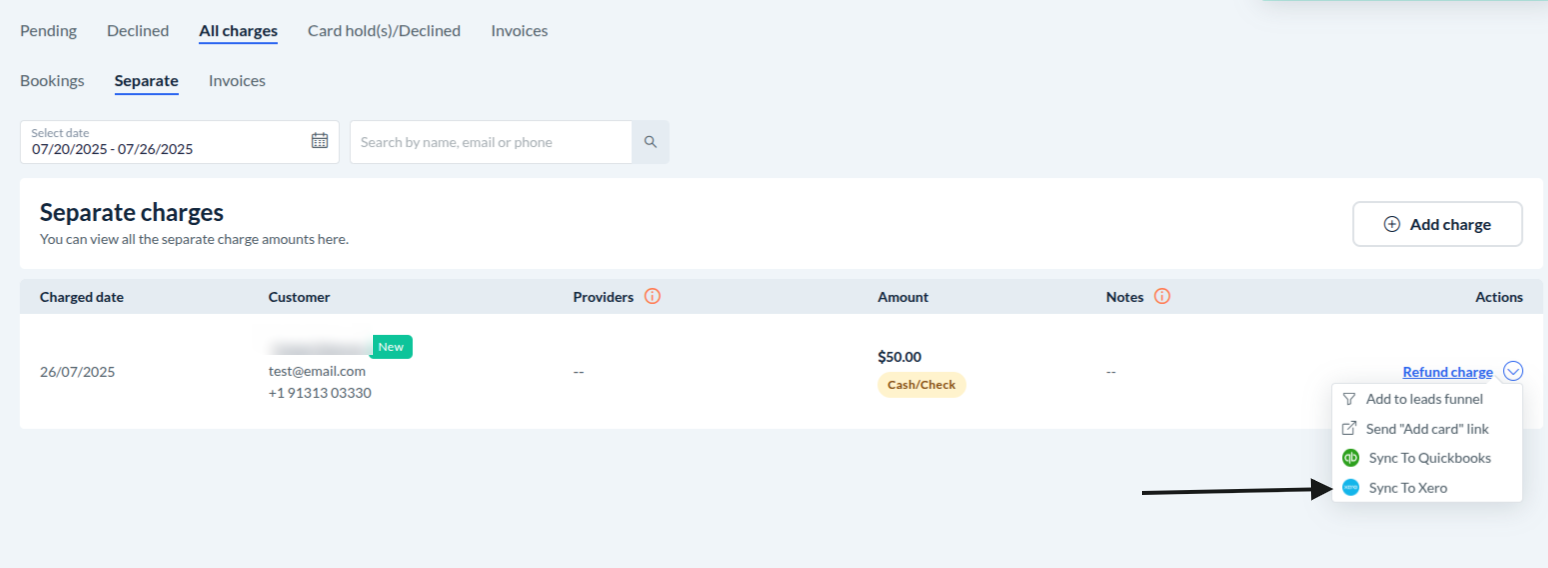
3. Separate Charges:
Go to: Bookings > Booking Charges > All Charges > Separate
In the Actions dropdown, click Sync to Xero.
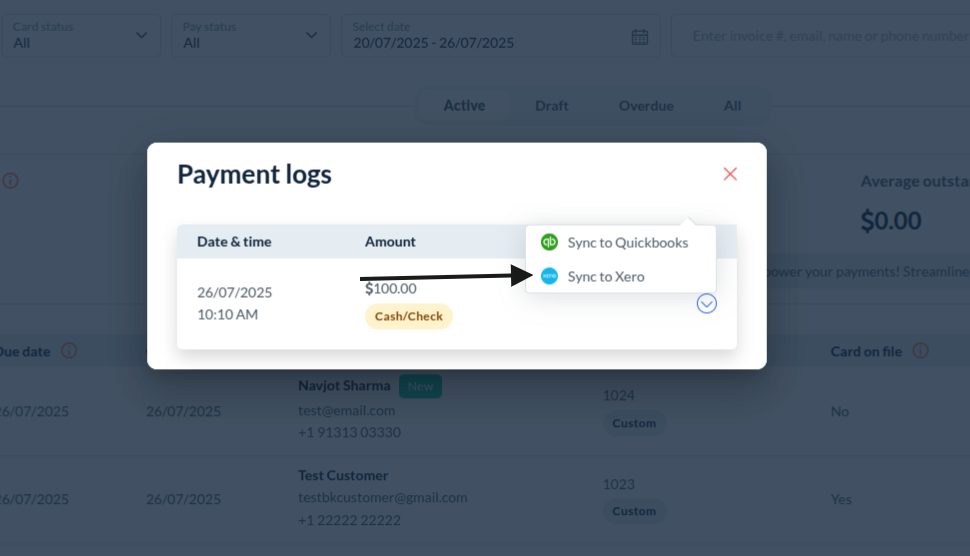
4. Custom Invoices:
Go to: Bookings > Booking Charges > Invoices
Open the Actions dropdown and click Payment Logs.
In the pop-up, under the Actions column, click the Sync to Xero button.
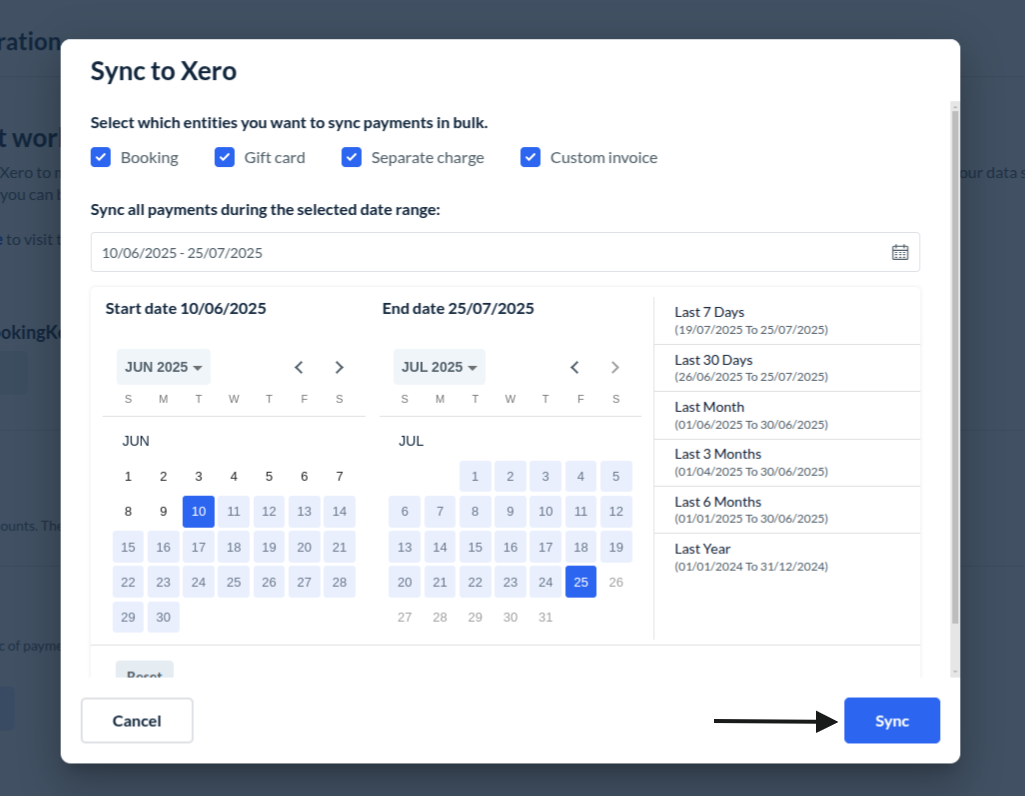
Bulk Sync Payments
To sync multiple payments at once:
Go to: Settings > General > Apps & Integrations > Xero > Continue
On the Xero integration page, under the Bulk Sync section, click the “Bulk sync” blue button to open a pop-up.
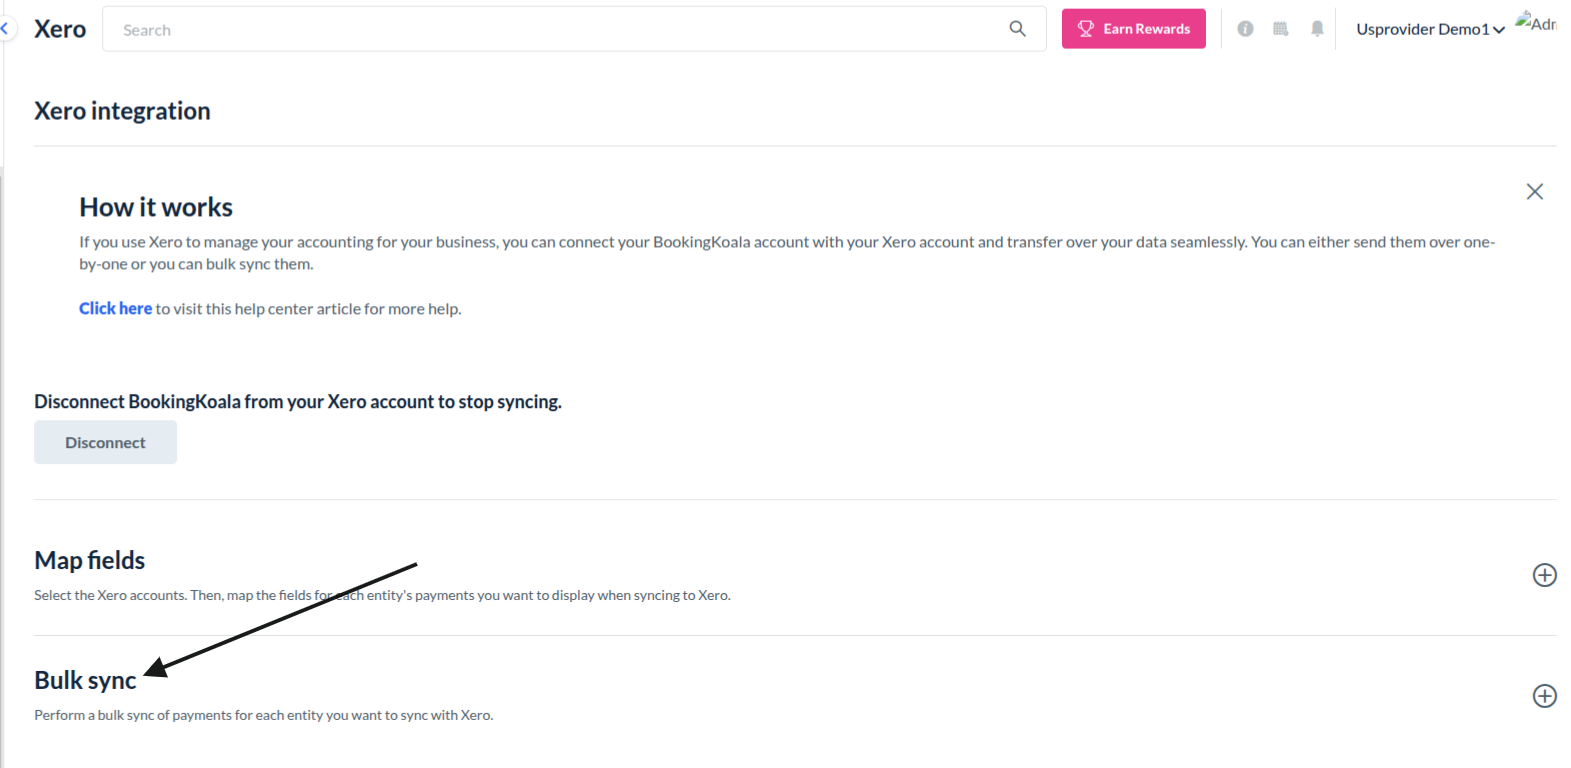
3. Select the entities you want to sync (e.g., Booking, Gift card, Separate charge, and custom invoice).
4. Choose a start date and end date for the sync.
5. Click Sync to begin the bulk syncing process.
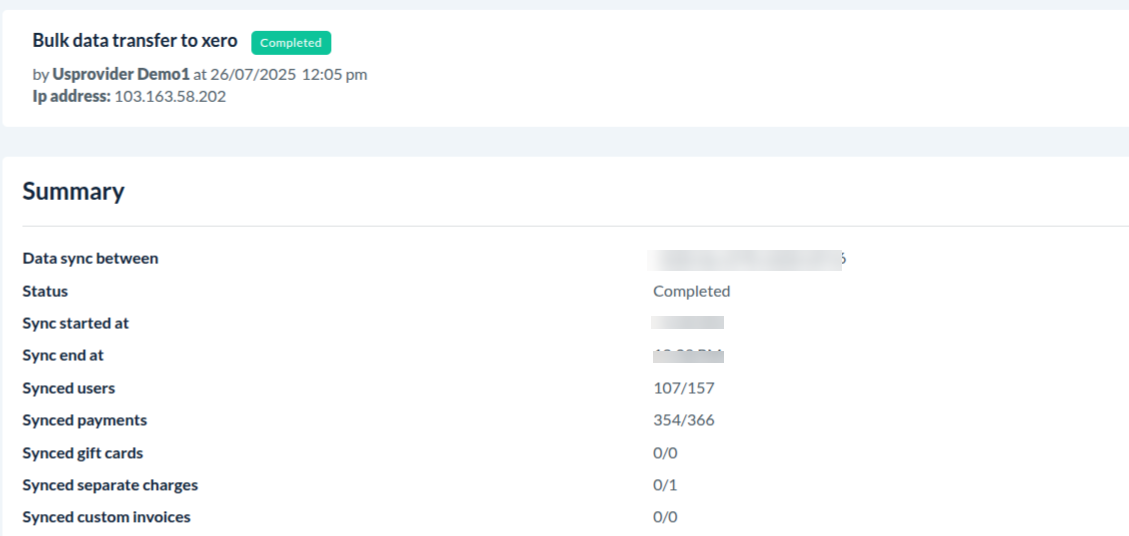
To check the status of bulk syncing:
Go to: Logs > System Logs

Click the eye icon to view the details of the transfer.
Under the logs, you will see a green "Completed" label added under the Activity column once the sync has finished.
Stopping Payment Syncing
You can stop syncing payments completely or for specific entities.
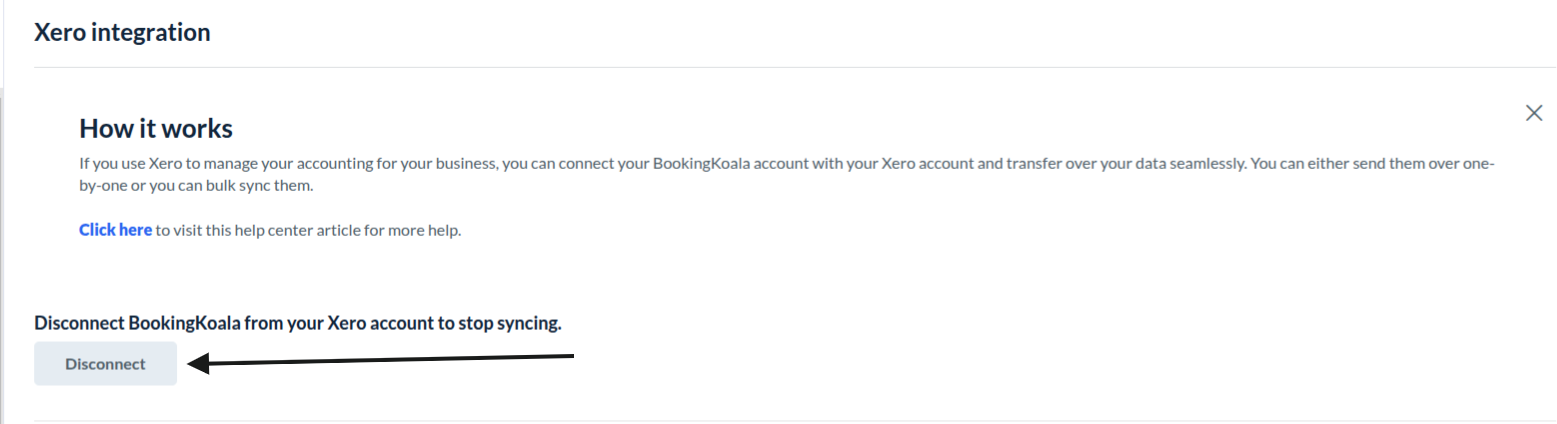
Stop All Syncing (Disconnect Xero)
Go to the Xero integration page.
Click the Disconnect button.
This will remove Xero’s access to BookingKoala.
All syncing will stop immediately.
Stop Syncing for a Specific Entity
Go to:
Settings -> General -> Apps & Integration-> "Map Field" section
Select the entity tab, you want to stop syncing.
Toggle the Sync Status to disable syncing for that entity.
Payments for that specific entity will no longer sync with Xero.
By following these steps, you can integrate and manage your Xero account with BookingKoala. If you have any questions or need further help, feel free to reach out to our support team.