The purpose of this article is to help you understand:
What is a Facebook pixel
How to create a Facebook pixel for individual accounts
How to create a Facebook pixel for business manager accounts
Where to add the Facebook pixel base code if you have embedded BookingKoala forms
How to connect a Facebook pixel to your website
What is a Facebook pixel?
The Facebook pixel is a piece of code that helps you track customer conversions, grow your audience, and get additional insights on how people are using your site.
You can create and install a Facebook Pixel for your individual account, or if you have a Facebook Business Manager account, Facebook allows you to create up to 100 pixels.
Facebook Pixel for Individual Accounts
To set up a Facebook pixel for an individual Facebook account, you must have a website for your business and the ability to update your website's code. If you have a BookingKoala account, you already have both of those and are ready to begin!
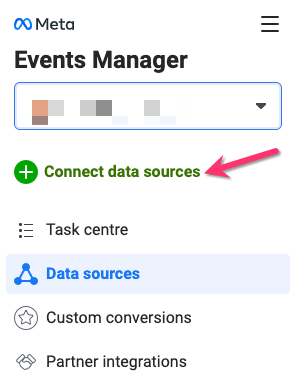
First, click on the link to go to the Events Manager section of your Facebook account.
In the left side menu, click the green "+ Connect Data Sources" button.
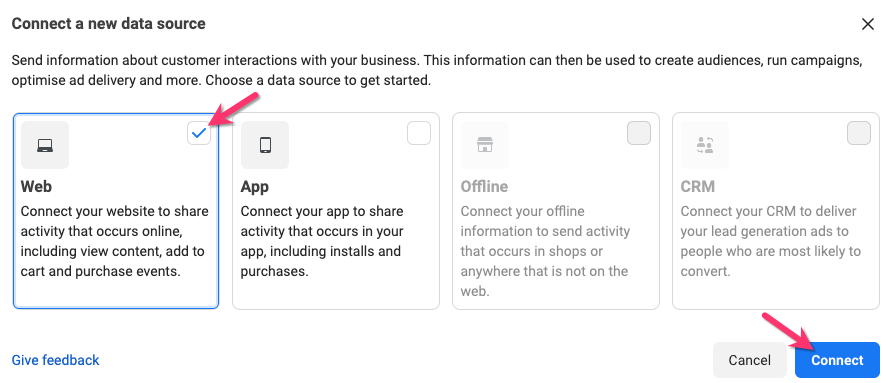
Select "Web" as the data source, then click "Connect".
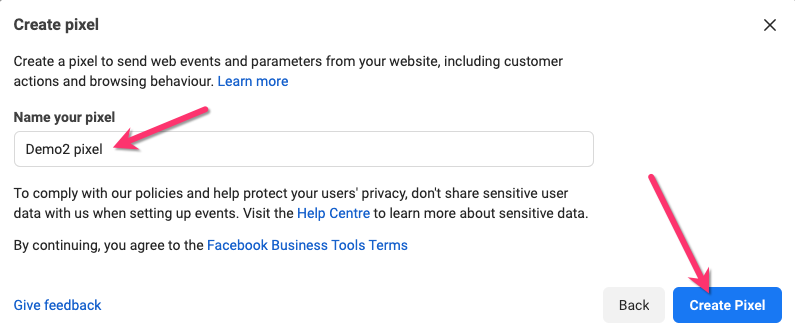
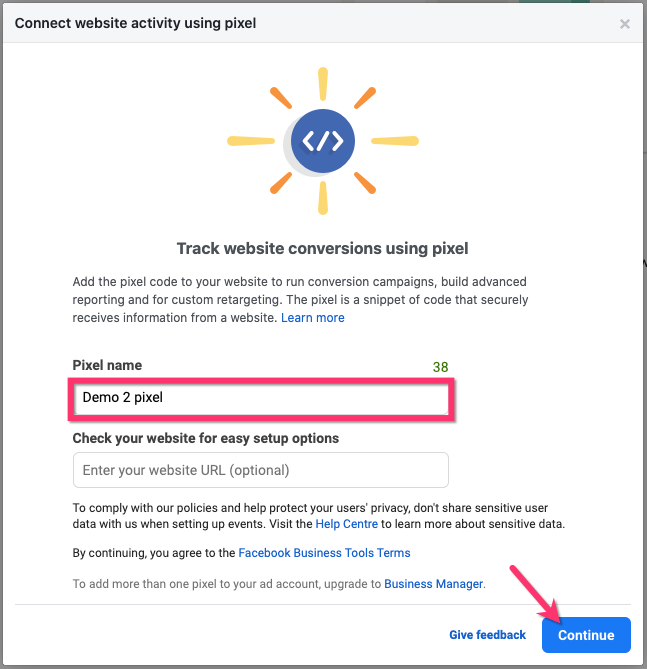
Enter a name for your pixel into the box and then click the blue "Create Pixel" button.
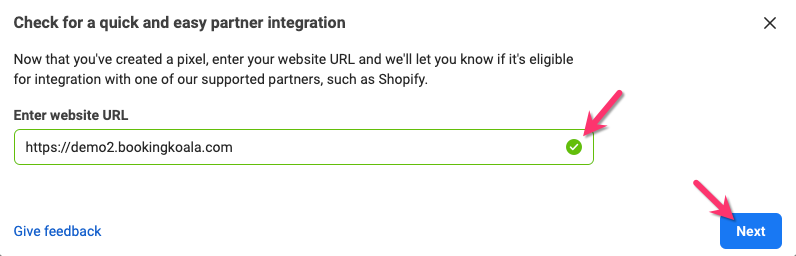
To check for easy integration, enter your website URL into the box, and then click the blue "Tick" button.
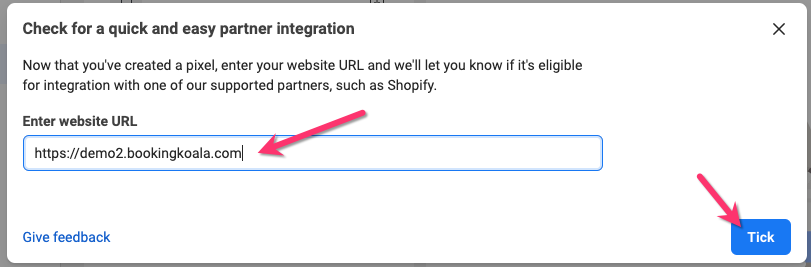
A green checkmark will appear to the right of your URL if your site can be integrated easily. Click the blue "Next" button to proceed.
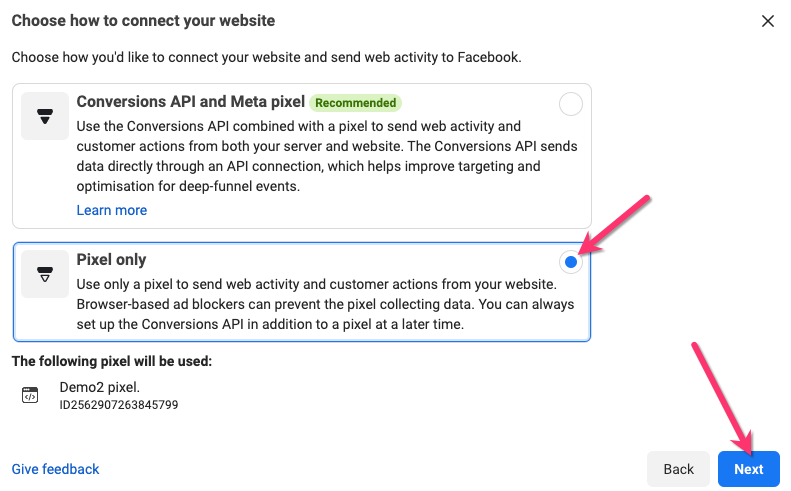
Select "Pixel only" and then click "Next".
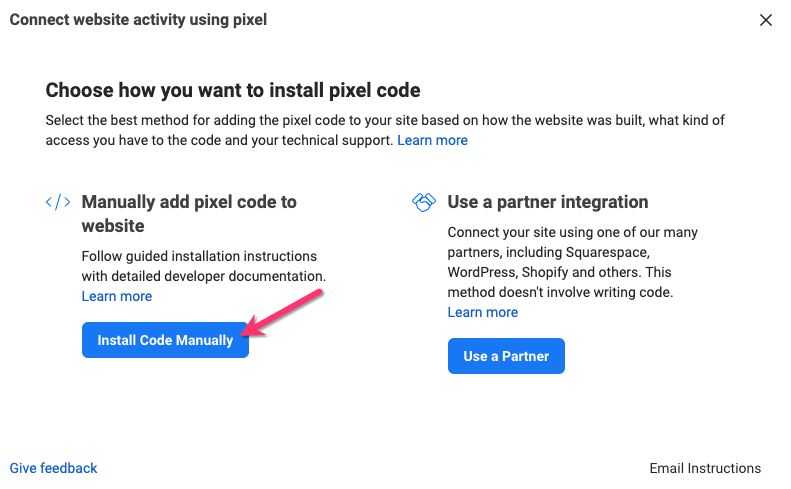
Then, click the blue "Install Code Manually" button.
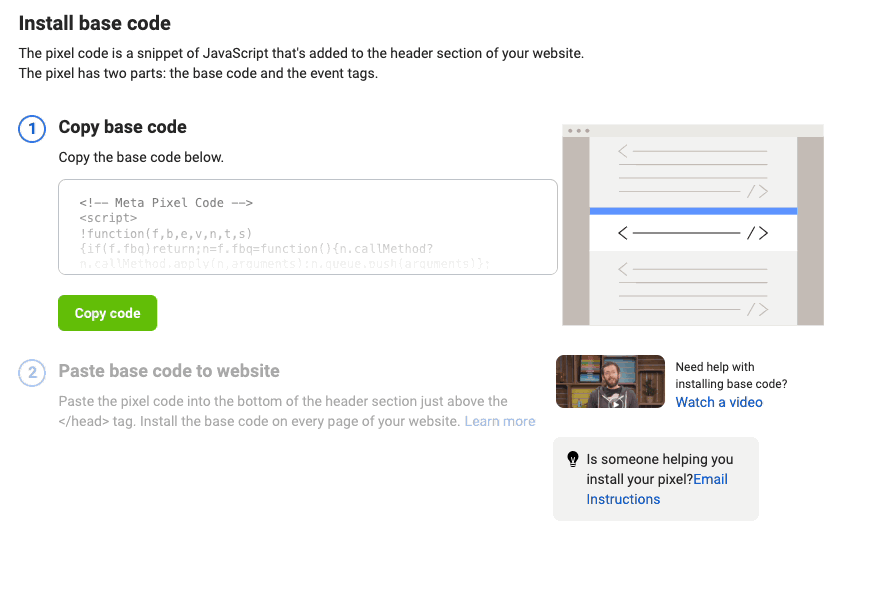
Click the green "Copy Code" button to copy the base code for your Facebook pixel.
Next, open your BookingKoala account and go to:
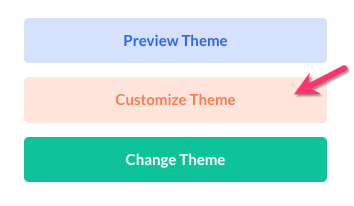
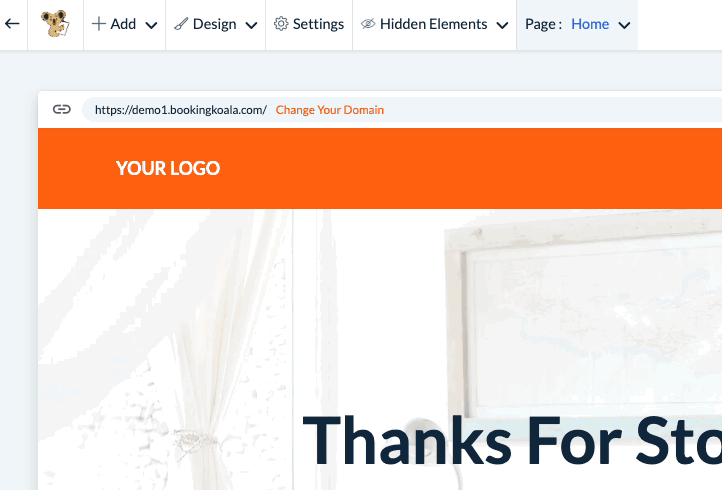
Settings > Design Forms & Website > Website Builder & ThemesClick on the orange "Customize Theme" button to open the website builder.
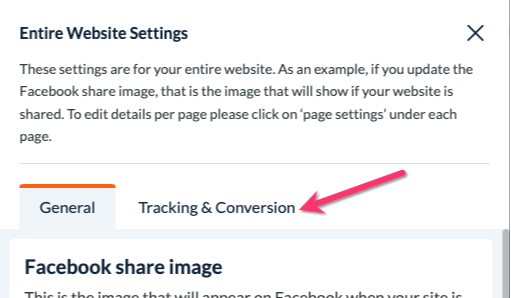
For your pixel to work properly, it needs to be displayed on every page of your website. The best place to put the code is in the global settings of your website. Click on the Settings tab at the top left of the main menu to open your global site settings.

A left-side menu will appear. Click the "Tracking & Conversion" tab at the top of the menu.
Scroll down until you see a box called "Facebook pixel". Paste your code into the box below.
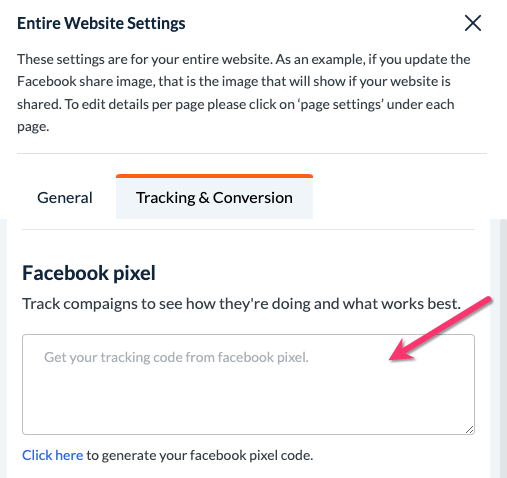
Then, click the light blue "Save" button at the bottom of the left-side menu. A green notification will appear in the top-right corner, letting you know the settings have been saved.

To push the code live, click the blue "Save & Publish" button at the top right corner of the page. A green system notification will appear in the top center of the page letting you know your site has been published.

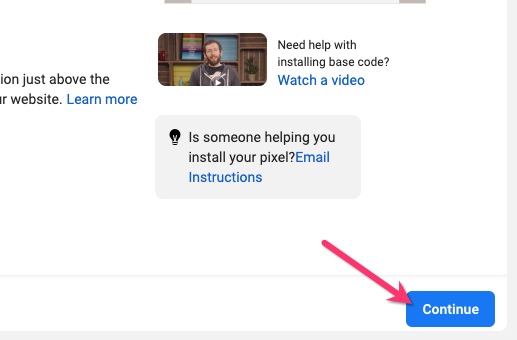
Back on the "Install Base Code" screen in the Facebook Events Manager, click the blue "Continue" button.
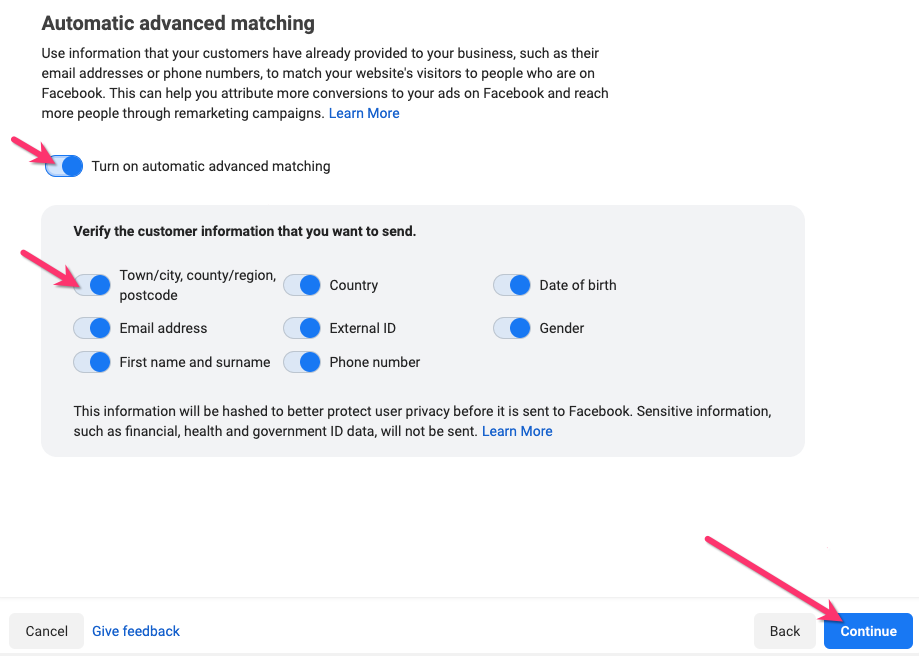
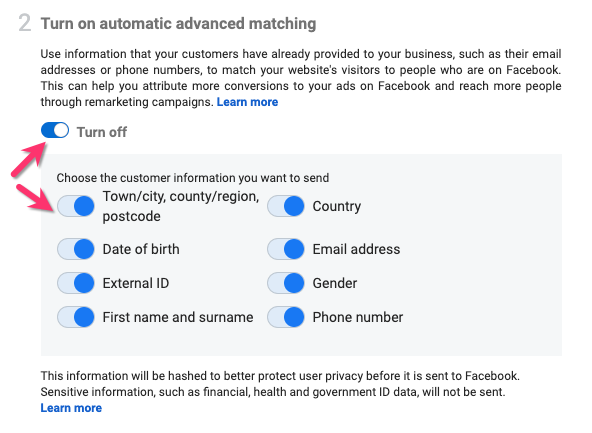
Next, turn on automatic advanced matching by clicking the toggle button to turn it blue. You will see the different types of customer information you want to send. Then click the blue "Continue" button.
You have now successfully installed your base code. You will see that the final step is to set up your event codes, which are used to track specific pages of your website.

There are two different options to set up these codes: using Facebook's Event Setup Tool or manually installing the event codes. Both options are covered later on in this article under the section "How to Install Event Codes".
Facebook Pixel for Facebook Business Manager Accounts
You may be interested in creating a Facebook pixel for your Business Manager account if you already have a business manager account, someone else manages your Facebook ads, if your business has more than one website or major product/service, or if you want to start measuring metrics but are not yet ready to start creating adds.
Before your begin, make sure you have access to a Business Manager account and that you are an admin on the account you'd like to use.
First, click the link to go to your business settings in the Facebook Business Manager.
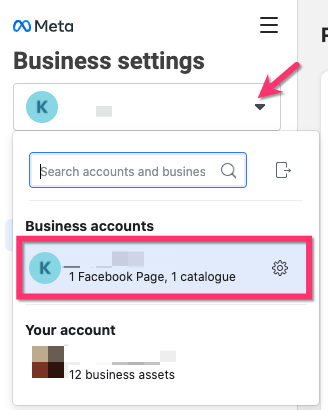
Select your business name from the top left menu.
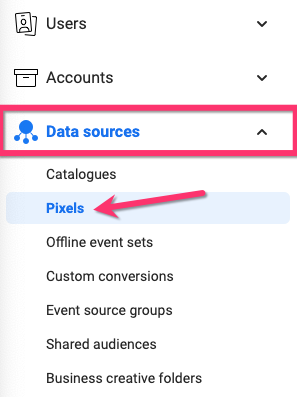
Click on the "Data Sources" tab in the left menu and then select "Pixels".
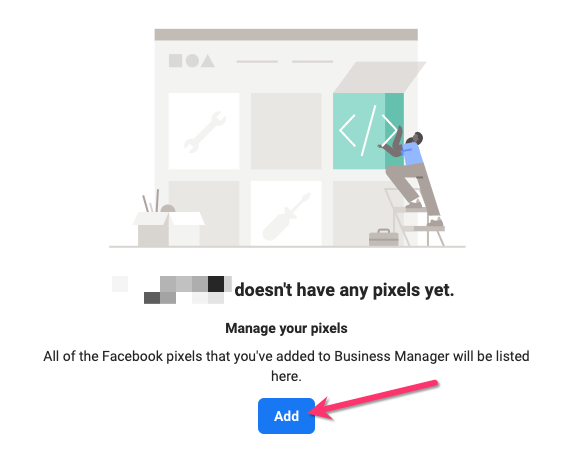
Click the blue "Add" button at the center of the screen.
A pop-up window will appear. Enter a name for your pixel in the first box and then click the blue "Continue" button.
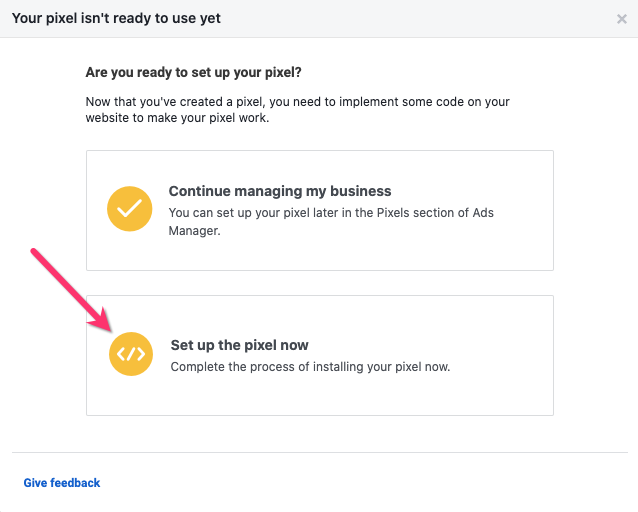
You will be directed to a new pop-up window letting you know your pixel isn't ready to use yet. From here, click "Set up the pixel now" to proceed with connecting the pixel to your BookingKoala account.
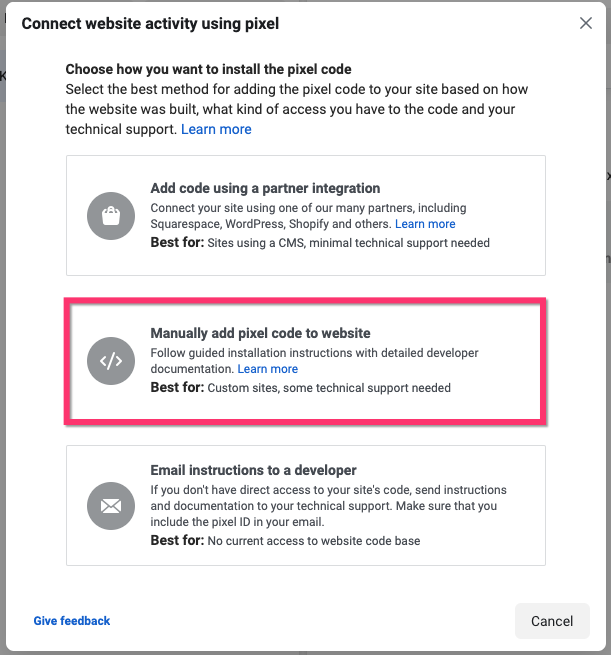
On the next page, select the middle option, "Manually add pixel code to website".
Your Facebook pixel code will be located in the first box. Copy the code by clicking inside the box. In a few steps, you will post this code into your Bookingkoala account.

Scroll down to the second step and make sure automatic advanced matching has been turned on. If not, click the toggle button to turn it blue and you will see the different types of customer information you want to send.
Next, open your BookingKoala account and go to:
Settings > Design Forms & Website > Website Builder & ThemesClick on the orange "Customize Theme" button to open the website builder.

For your pixel to work properly, it needs to be displayed on every page of your website. The best place to put the code is in the global settings of your website. Click on the Settings tab at the top left of the main menu to open your global site settings.

A left-side menu will appear. Click the "Tracking & Conversion" tab at the top of the menu.

Scroll down until you see a box called "Facebook pixel". Paste your code into the box below.

Then, click the light blue "Save" button at the bottom of the left-side menu. A green notification will appear in the top-right corner, letting you know the settings have been saved.

To push the code live, click the blue "Save & Publish" button at the top right corner of the page. A green system notification will appear in the top center of the page letting you know your site has been published.

Then, you will need to log out of your BookingKoala account temporarily to test the connection.
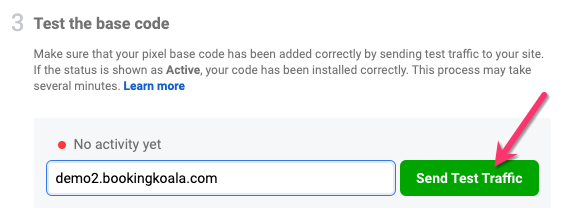
Back in your "Install pixel" pop-up in Facebook, scroll down to the third step called "Test the base code". Enter your store URL into the box below and then click the green "Send Test Traffic" button.
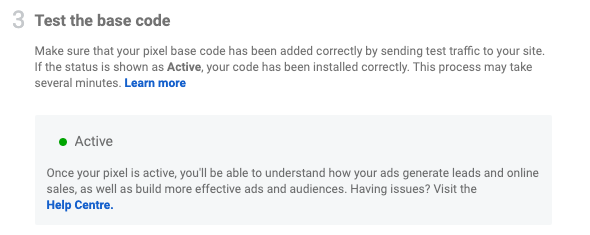
A new window will open with your webpage. Navigate back to the "Install Pixel" pop-up and give the system a few moments to check that your code is active. If your code was saved correctly, you will eventually see a green dot with the word "Active".
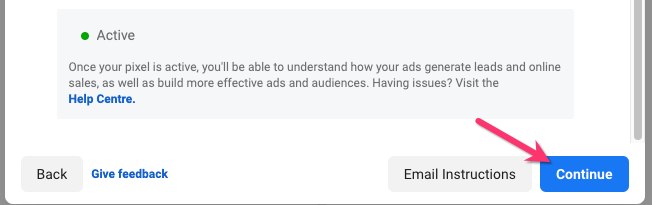
Click the blue "Continue" button at the bottom of the page.
You have now successfully installed your base code. You will see a pop-up with two different options to set up "Event Codes", which is covered in the next section.
Facebook Pixel for Embedded Forms
If you've embedded BookingKoala forms onto your website, you will still need to add the Facebook pixel and the event tracking code in the sections stated above. You will also need to add the Facebook pixel to your header section in your website builder.
Go to:
Settings > Design Forms & Website > Website Builder & ThemesClick on the orange "Customize Theme" button to open the website builder.

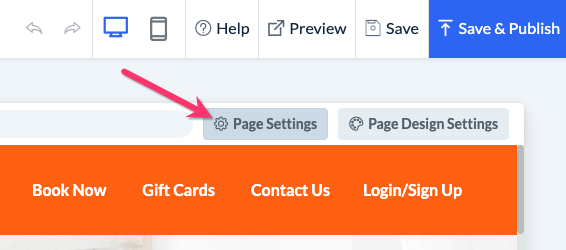
Click on the grey "Page Settings" button by the top-left of the screen.
A "Page Settings" pop-up will appear. Click the "Header Code" tab and paste your Facebook pixel base code into the box below. Then click the blue "Save" button.
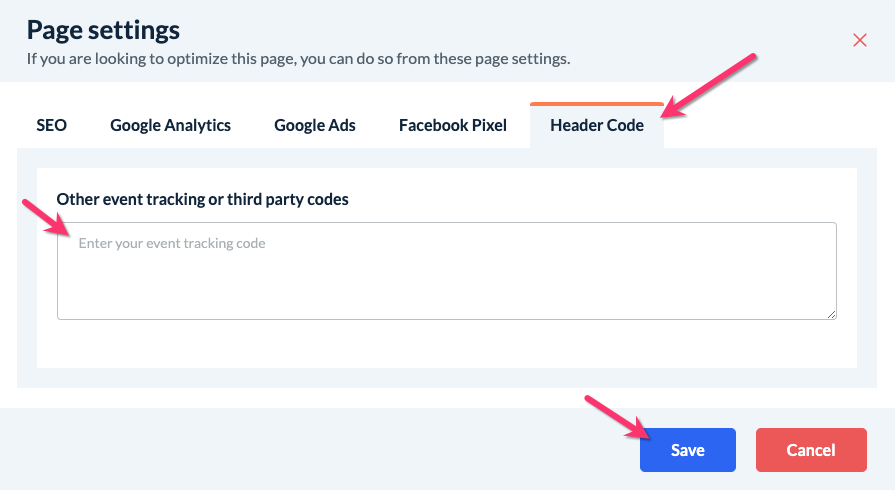
To push the code live, click the blue "Save & Publish" button at the top right corner of the page. A green system notification will appear in the top center of the page letting you know your site has been published.

How to Install Event Codes in BookingKoala
The next step in the Facebook pixel installation process is to install event codes into your site. Event codes track the various events that take place on specific pages of your website.
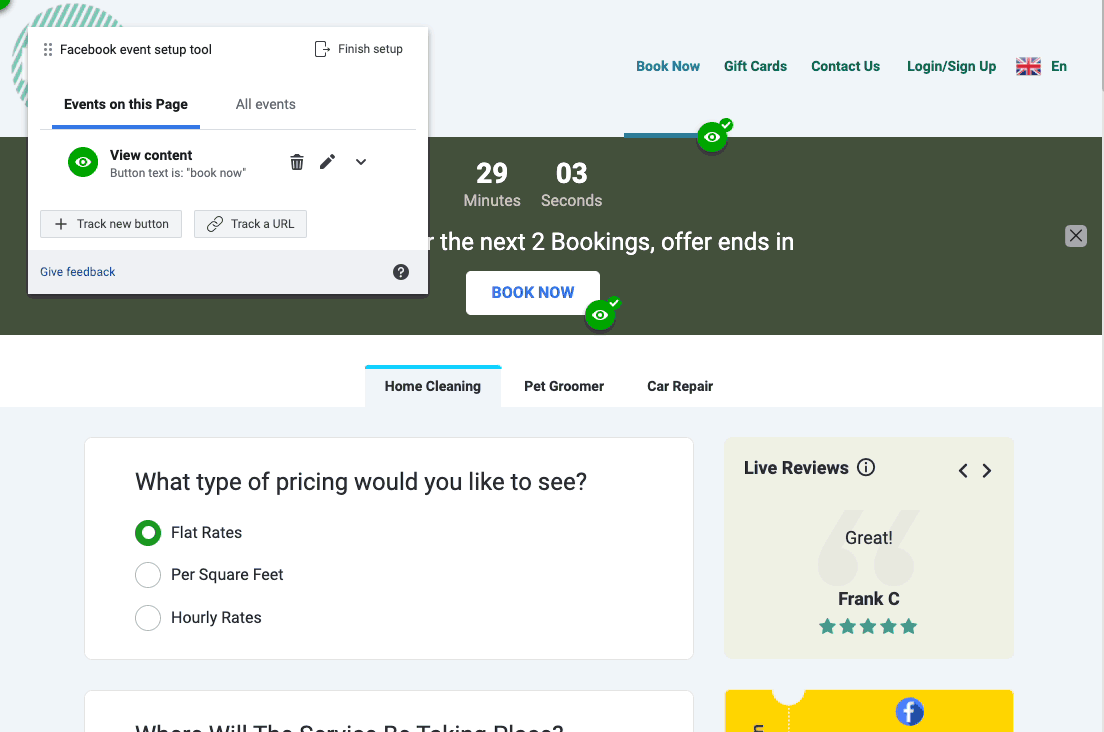
After installing your base code, the pop-up window will give you two options to help with installing your event codes. If you set up an individual Facebook account, your event set up prompt will look like this:

If you set up a business manager Facebook account, your setup screen will look like this:
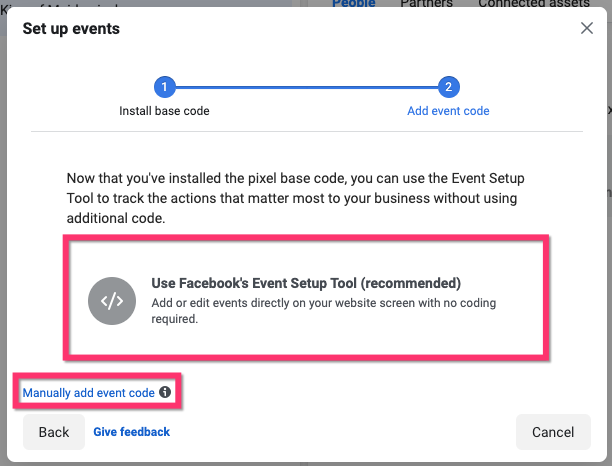
The first option is to use Facebook's Event Setup Tool to easily add event codes to your site.
The second option is to manually add event codes to your page using the Bookingkoala Website builder.
Using the Facebook Event Setup Tool
Click "Open Facebook Setup Tool"/"Use Facebook's Event Setup Tool" to proceed with using the event setup tool to add your event codes. This code-free tool allows you to navigate your site and add events to buttons and URLs without having to insert any custom code.
To proceed, enter your Website URL into the box and then click the blue "Open Website" button to launch the tool.
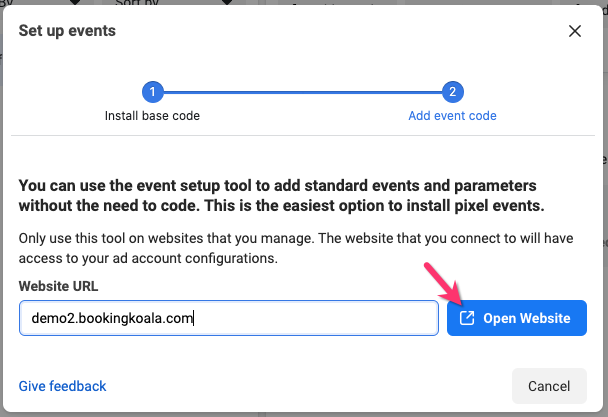
A new window will open, bringing you into the Event Setup Tool on your website.
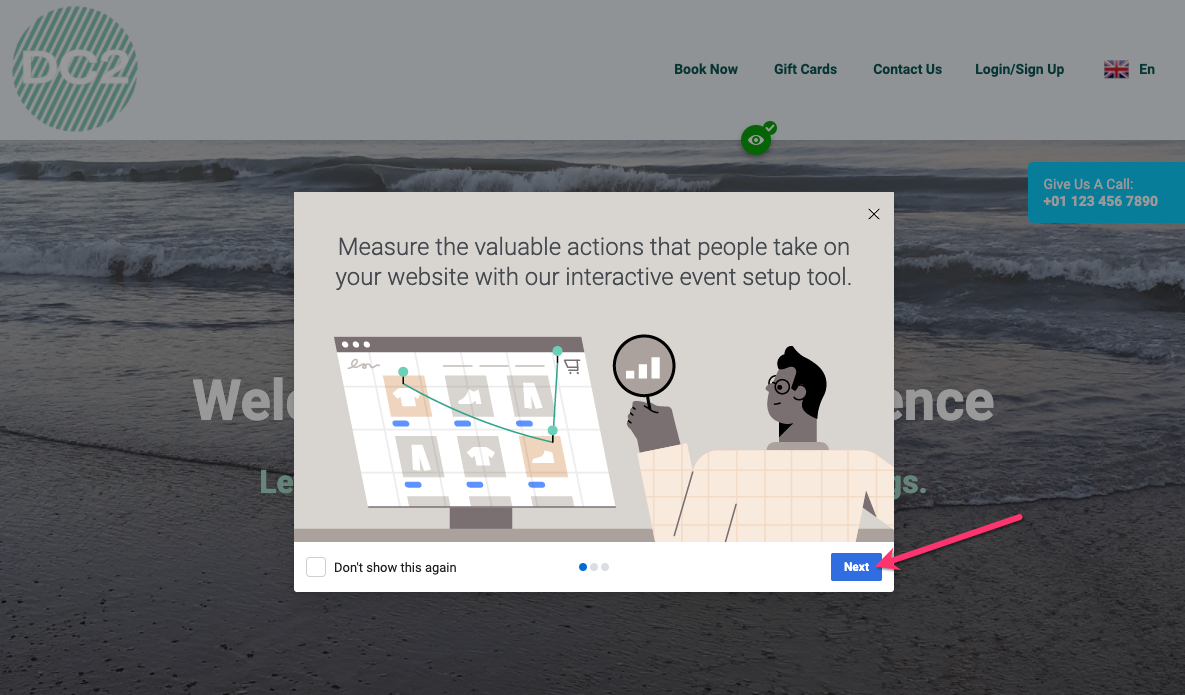
Click the "Next" button to go through a brief overview of how the tool works.
Click here to view Facebook's article on how to use the Facebook Event setup tool for web.
Manually Adding Event Codes in the Website Builder
If you'd prefer to manually set up your event codes, you can select the link that says "Install events using code"/"Manually add event code".
Select a category from the drop-down menu and then click on the Event Name to view the code.
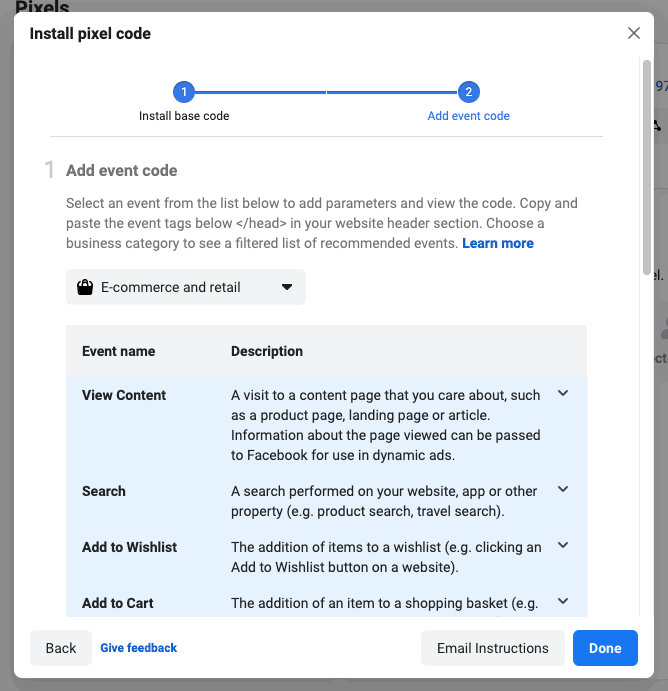
For example, if you want to track a purchase on a particular page, click on "Purchase" to expand that section. Scroll down until you see the box with the code's script and click it to copy the text.
Next, open your BookingKoala account and go to:
Settings > Design Forms and Website > Website Builder and Themes > Customize Theme
Click the "Page" menu at the top center of the page and a side menu will appear on the left.
Click the three vertical dots icon next to the page you'd like to edit, then click on "Settings".
A pop-up will appear displaying the various options for code you can place in this section for tracking.
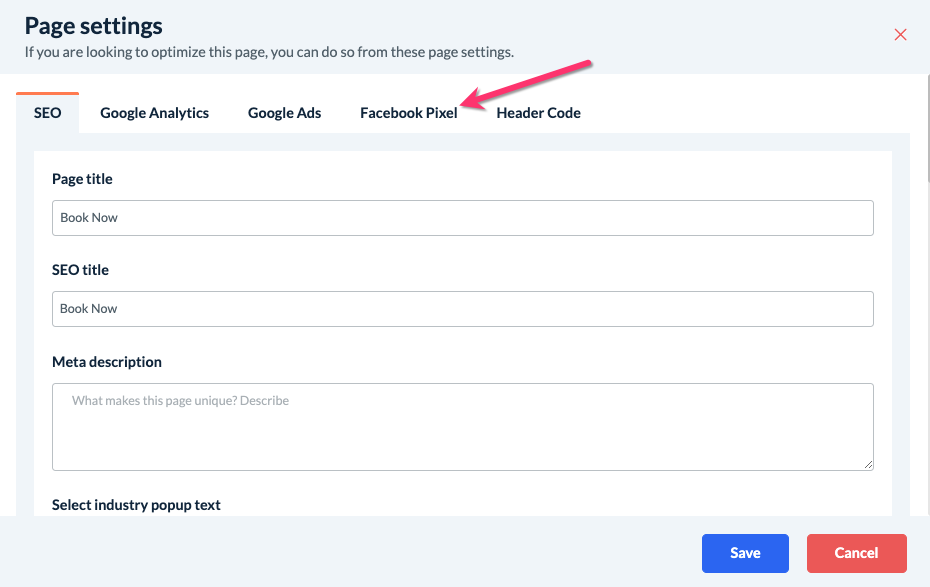
Click the "Facebook Pixel" tab and paste your event code into the box below.
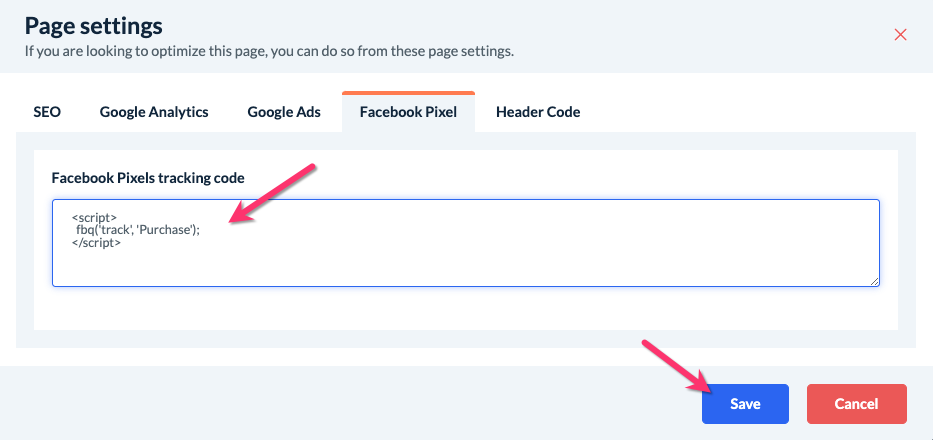
Click the blue "Save" button to close out the pop-up. Then, click the blue "Save and Publish" button in the top right-hand corner to push the code live.

A green system notification will appear in the top center of the page letting you know your site has been published. You have now successfully added your event pixel to this page.
As long as you also placed your Facebook Pixel code in the overall site settings in the previous steps, no matter which page is loaded, the pixel will "fire" and track where the visitor is.