The purpose of this article is to help you understand:
How to set up Facebook as a method of logging in for customers
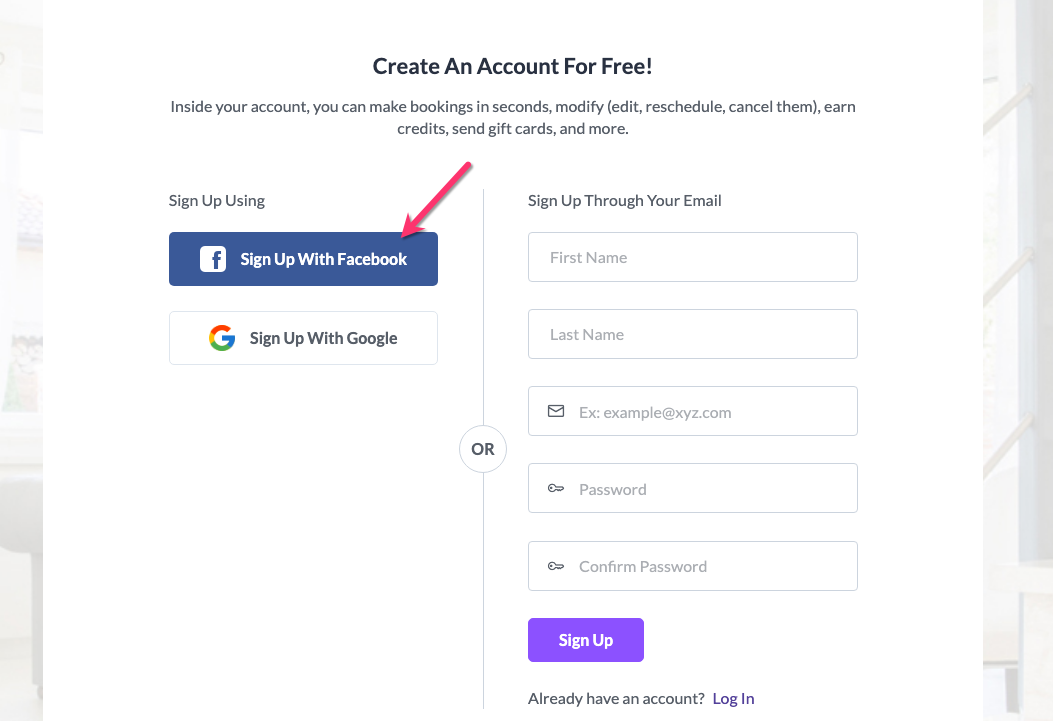
Log In/Sign Up Through Facebook
When a new customer creates an account with your business, you can offer the option for them to sign up with an existing Facebook account. This simplifies the account creation process for users who prefer to use a connected account instead of creating a new account.
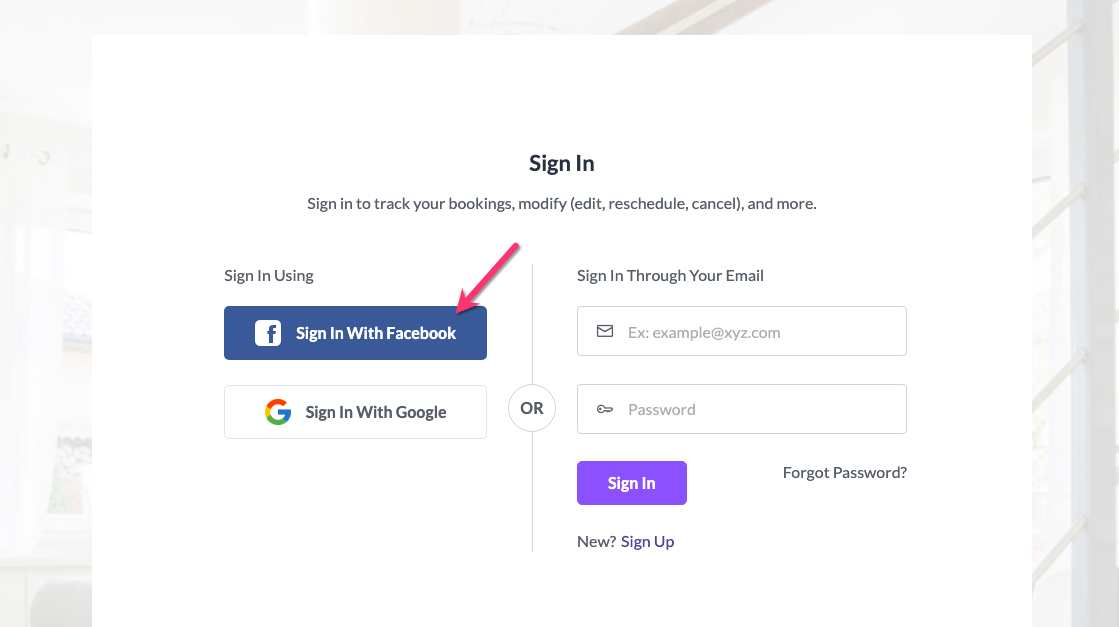
Once they have created an account using the Sign Up With Facebook button, they can log in using the same buttons on the "Sign In" page.
In order to activate this button, you will need to activate API keys for Facebook.
Activating Your Facebook API
In your BookingKoala dashboard, go to:
Settings > General > Apps & Integrations
Scroll down to the Facebook box and click the blue "Enable" button. A pop-up will ask if you are sure you want to enable it. Click "Yes" to proceed.
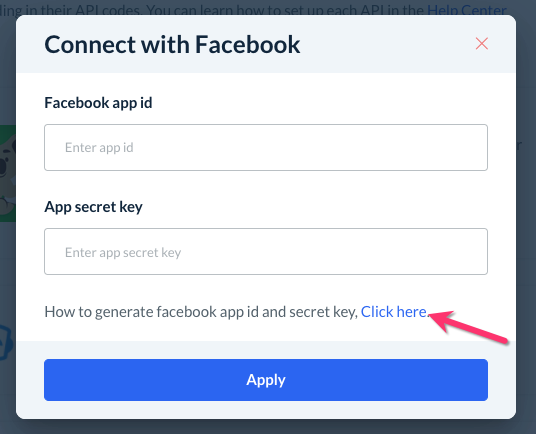
Next, click on the grey "Incomplete" button to the right of the "Disable" button.

A pop-up window will appear. Click the blue "Click here" link toward the bottom of the window.
This link will take you to a registration article. If you do not have one already, you will need to create a Facebook for Developers account.
Click on the Facebook for Developers link in Step 1, then click "Get Started" at the top right corner of the page.
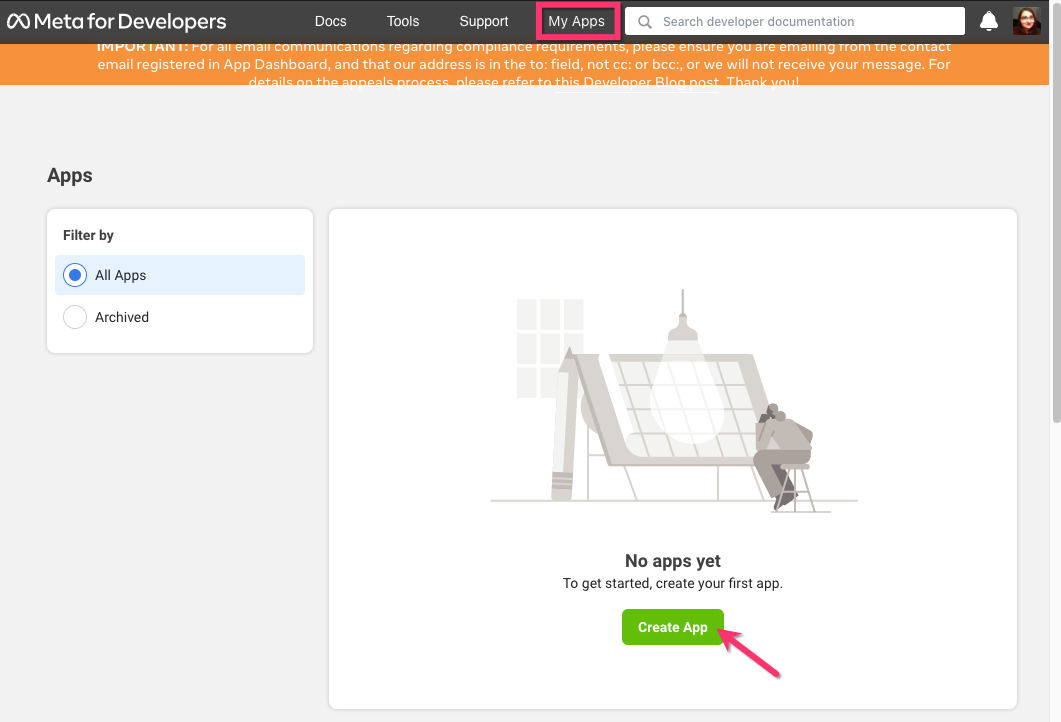
Once your account has been created, click "My Apps" from the top menu bar. Click the green "Create App" button in the middle of the page.
Next, select "Consumer" for the app type and click "Next".
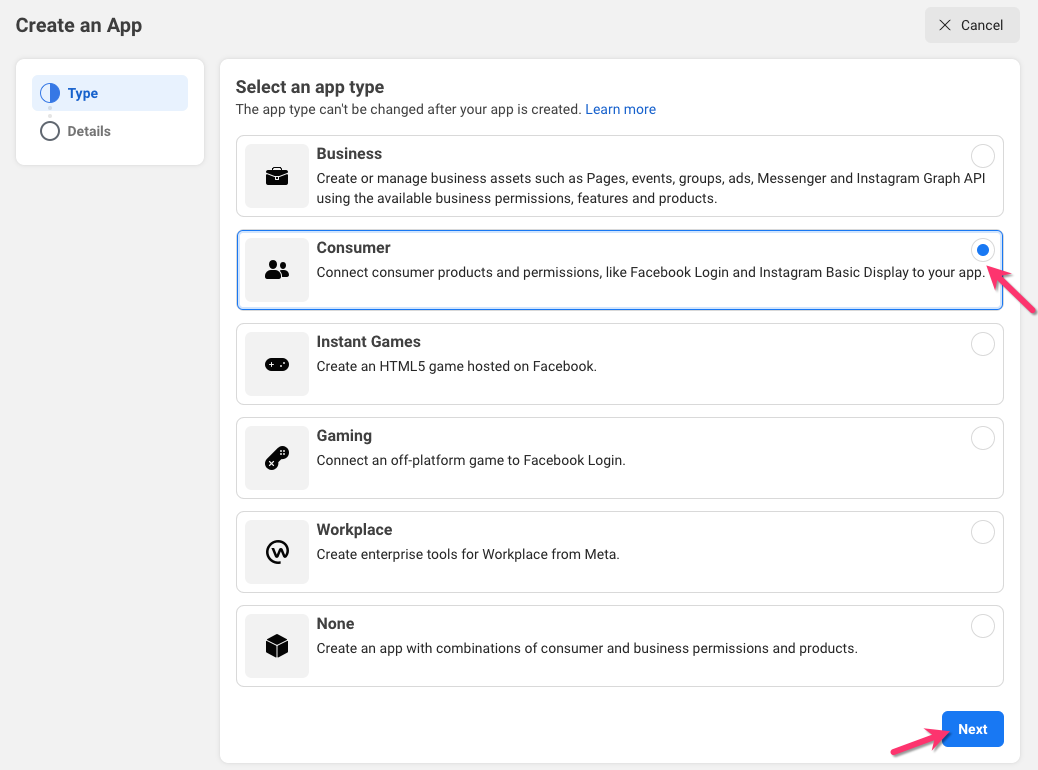
For the Display name, type in the name of your business. For the App contact email, enter the email address you would like to be contacted at for support purposes. Then, click the green "Create app" button.

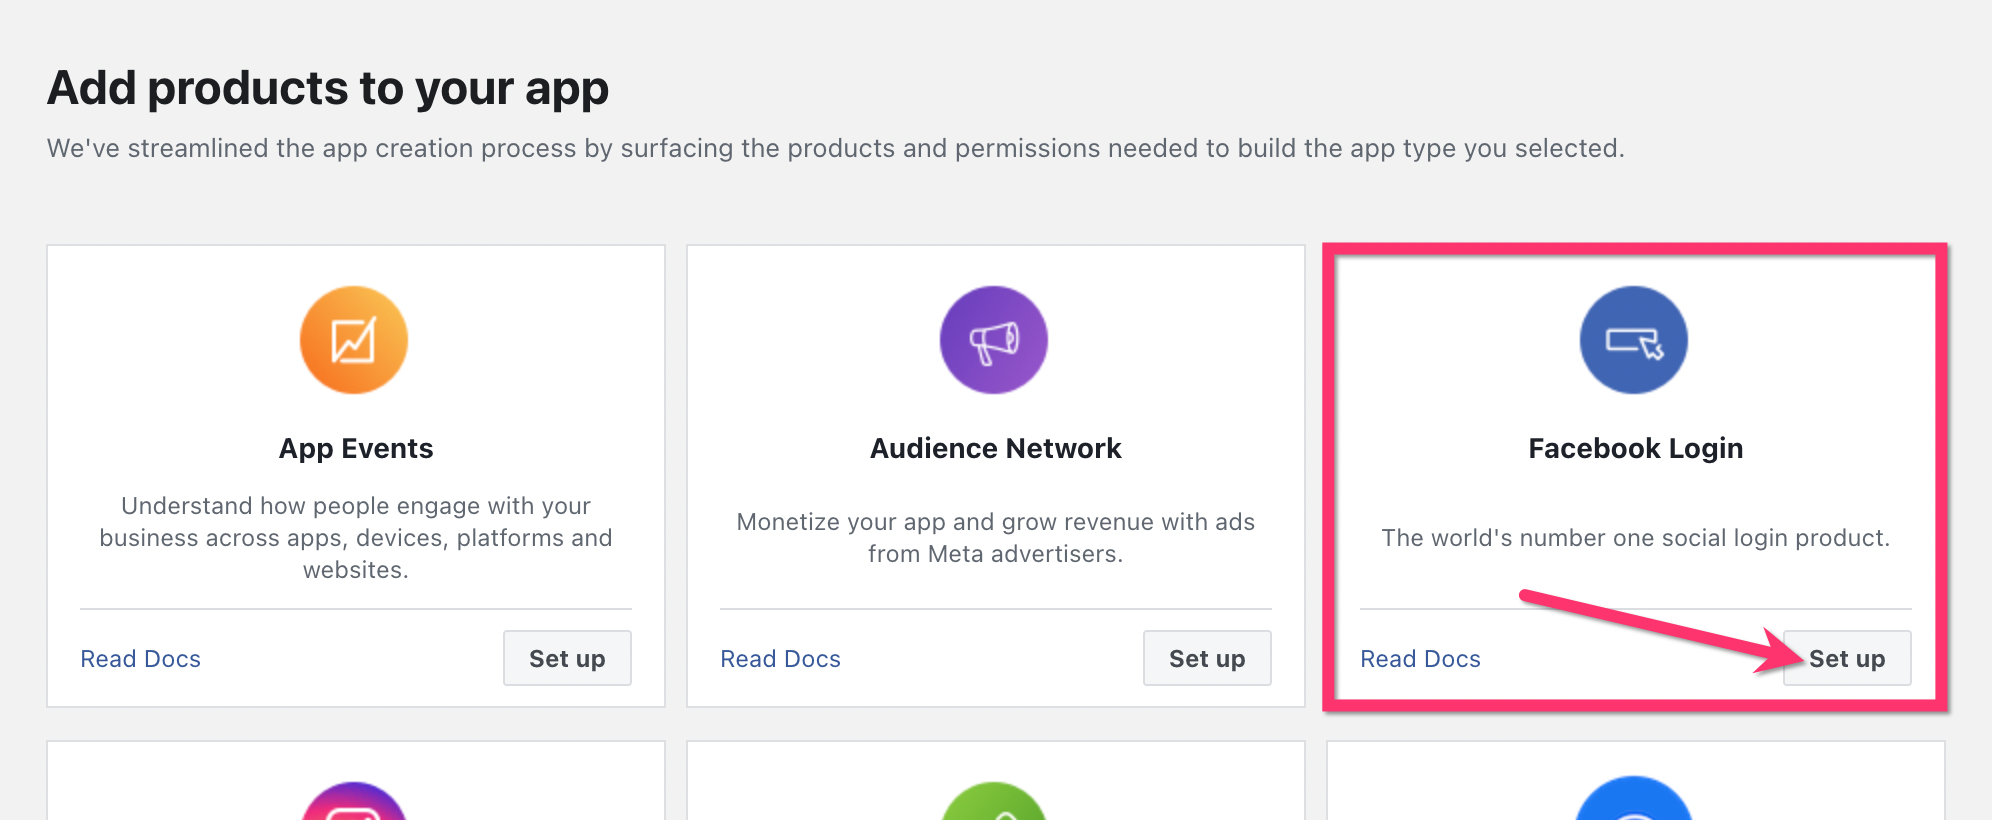
You will be directed to an "Add products to your app" page. Click the "Set Up" button inside the Facebook Login box.
The next page will show options to use for the "Quickstart" option. Unless you are a developer and are comfortable with code, you do not need to continue with the Quickstart steps.
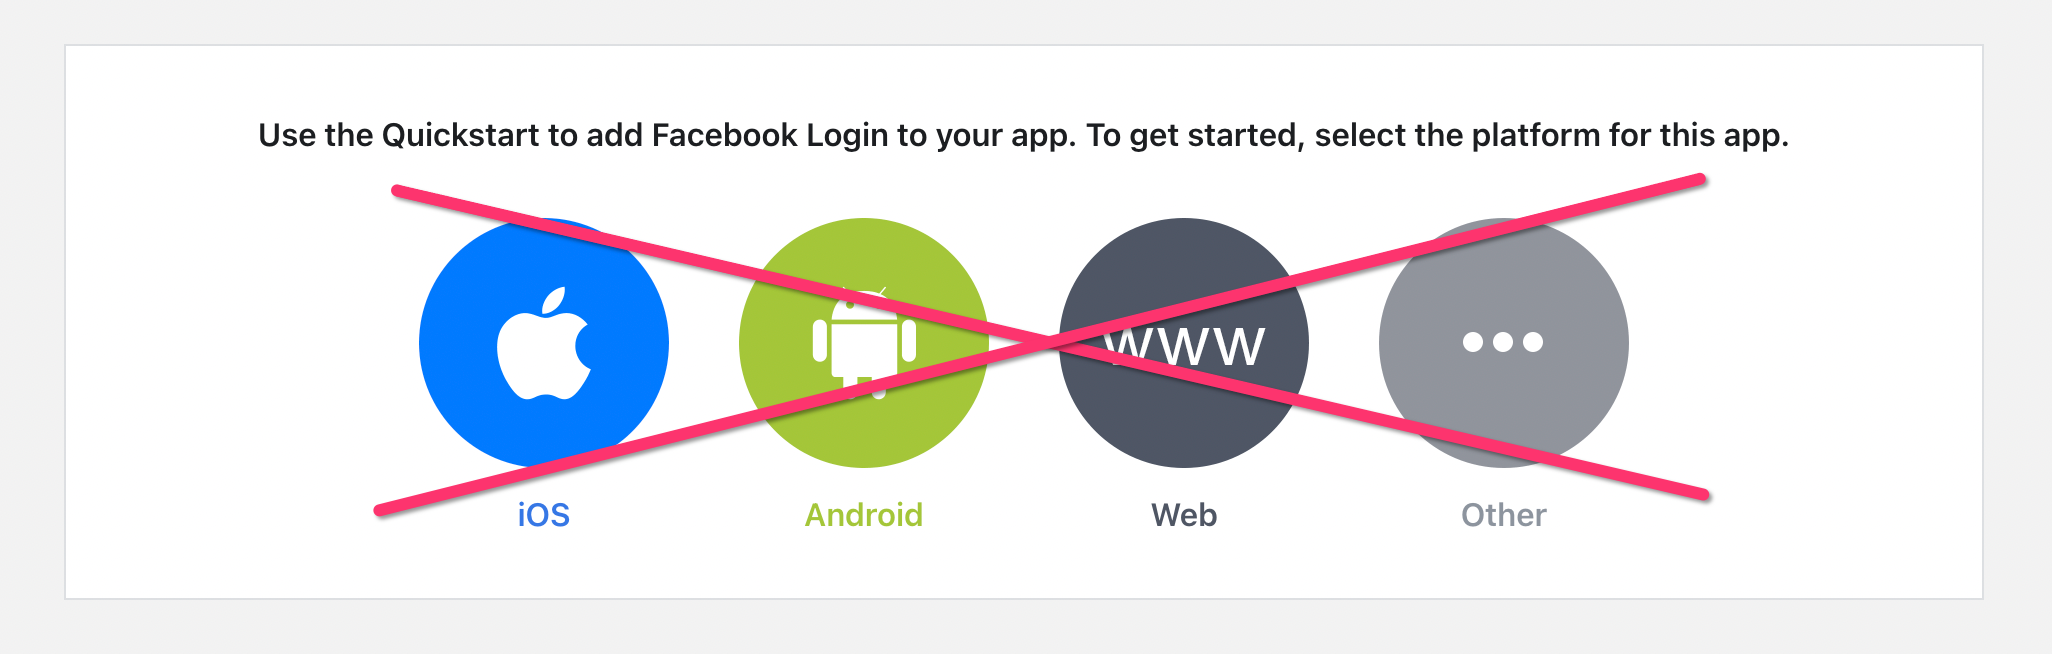
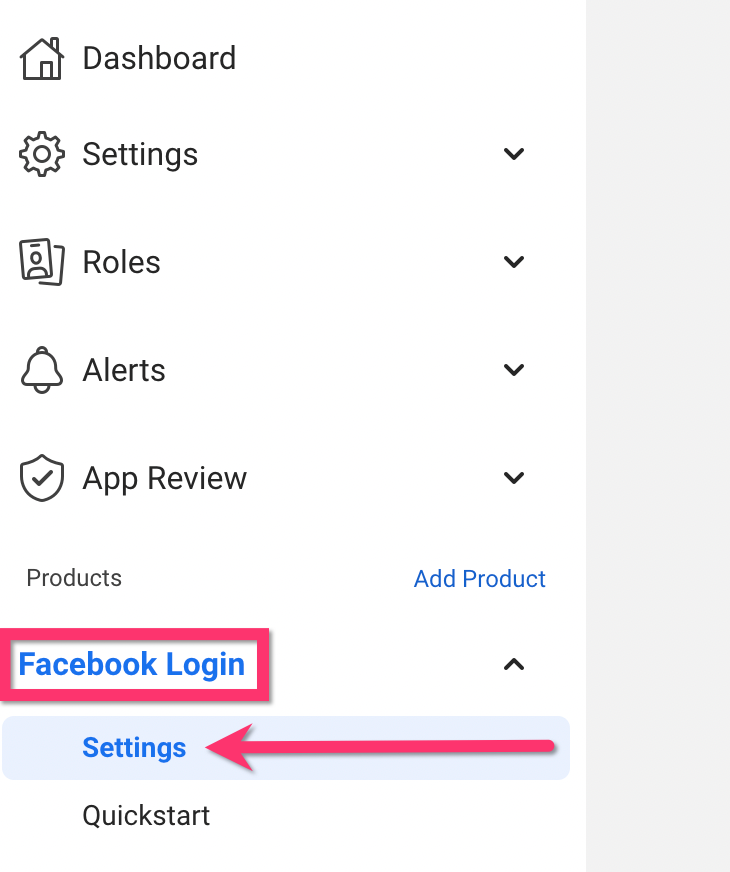
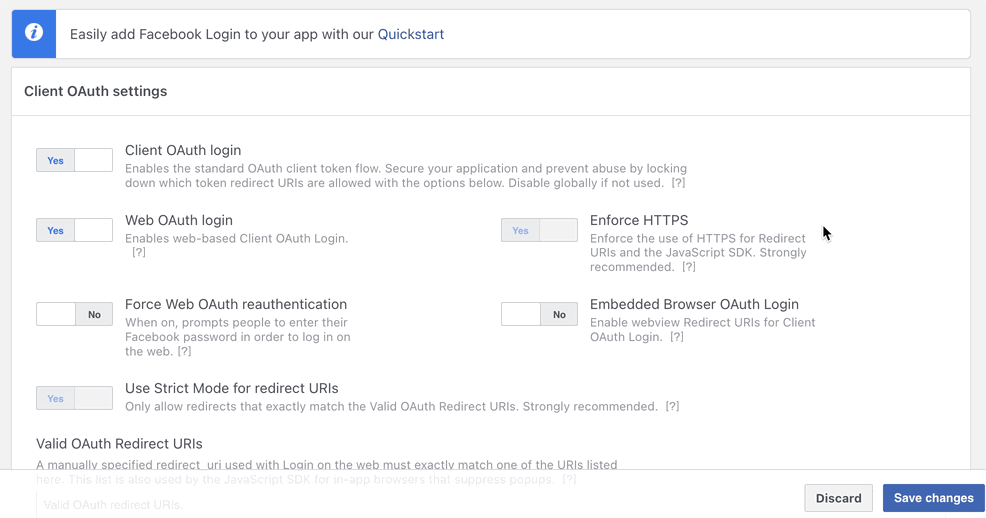
Instead, click on the "Settings" link just below where it says "Facebook Login".
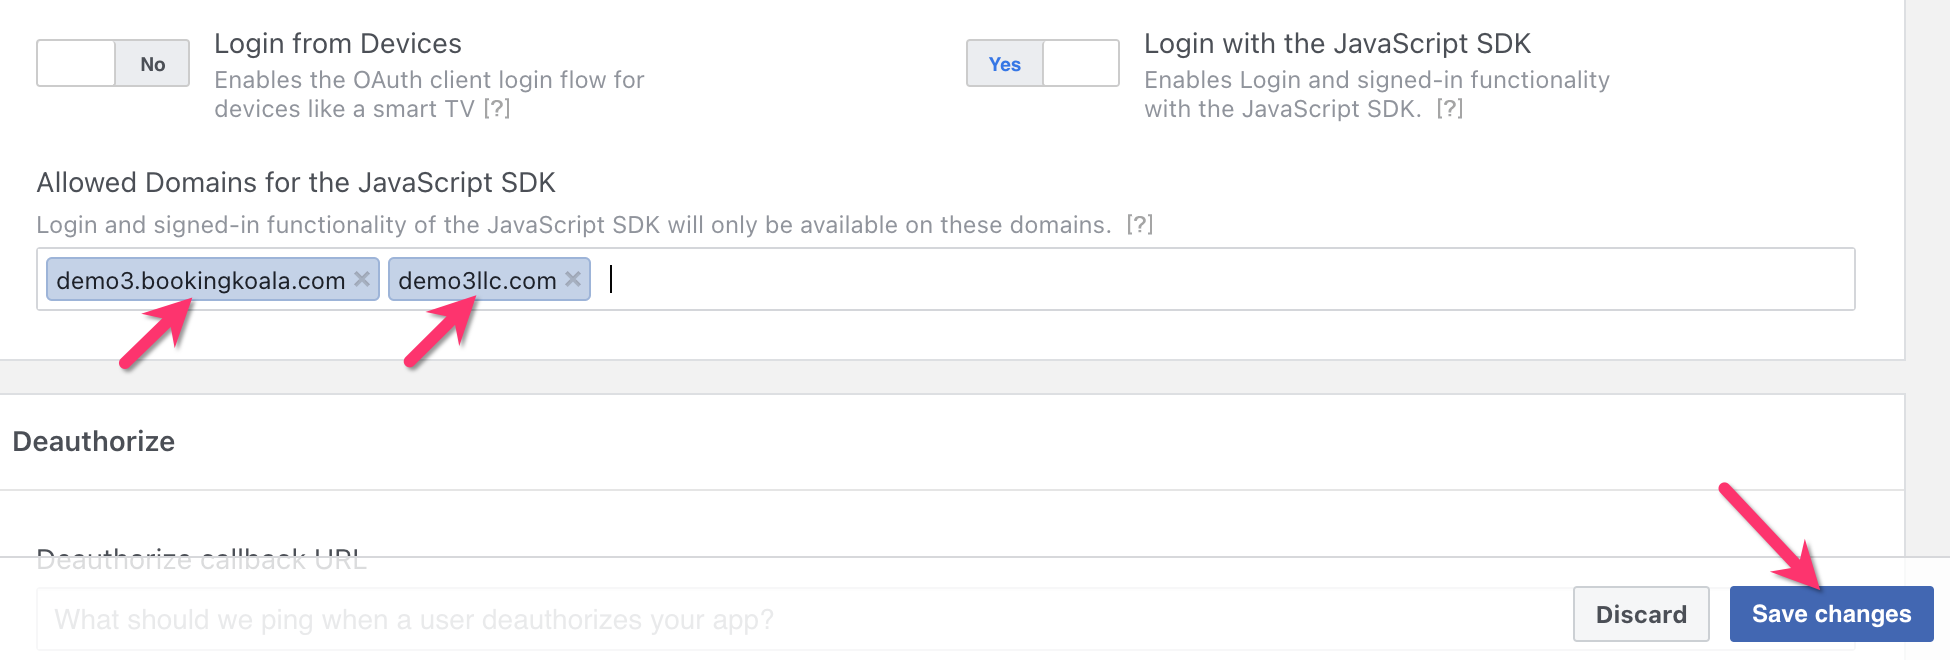
On the right side of the page, scroll down until you locate the "Login with the JavaScript SDK" option and toggle it to "Yes".
Right below where it says "Allowed Domains for the JavaScript SDK", type in your website's URL(s). You will have at least one URL to list, your BookingKoala subdomain. For example, if your store name is demo3, your URL would be "demo3.bookingkoala.com". Also list any custom domains that are linked with your account, like "demo3llc.com". Finally, click the "Save Changes" button at the bottom of the screen to save these settings.
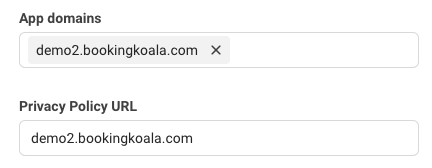
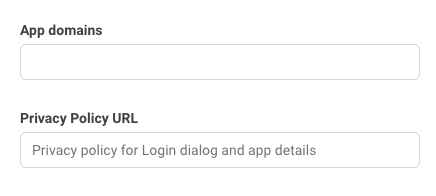
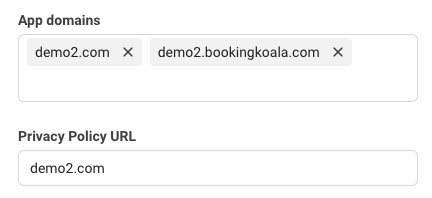
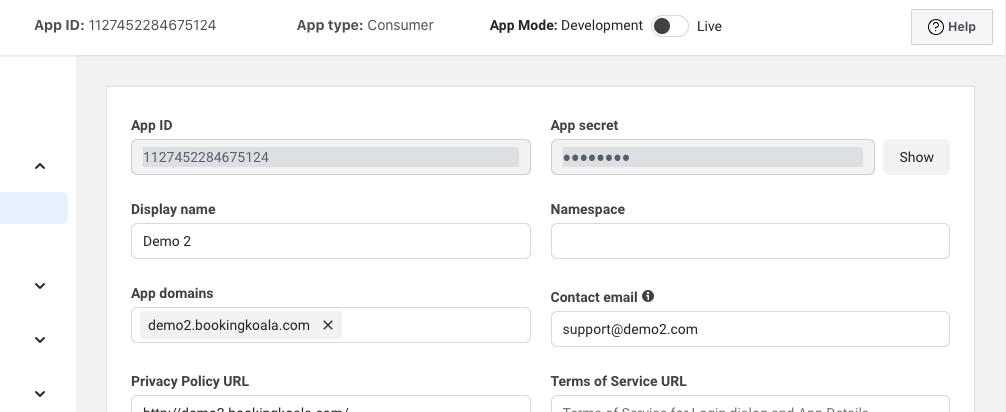
Next, navigate to the "Settings" page located just under the word "Dashboard". and click on "Basic". Paste your domain inside the boxes below "App Domains" and "Privacy Policy URL".
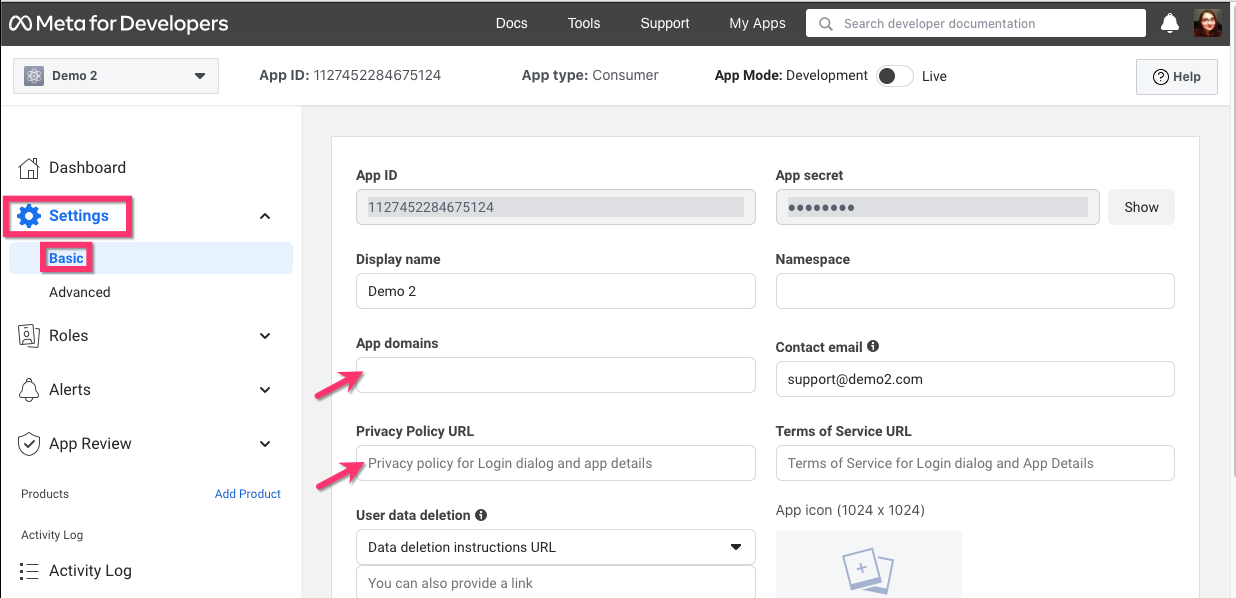
For example, if the URL is https://www.demo2.bookingkoala.com/, you would enter demo2.bookingkoala.com into each box.
When you add a domain to the App domains box, please click on the blue URL that pop-ups below to "select" it.
If you are using a custom domain for your business URL, please enter the custom domain's URL into the boxes. Add any other subdomains for the site to the App Domains box as well.
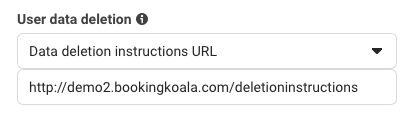
For "User Data Deletion", you will need to add a page to your website that includes the following instructions:
"[Business Name] Login" is a Facebook login app and we do not save your personal data on our server. According to Facebook policy, we have to provide Data Deletion Instructions. If you want to delete your activities for MySite Login App, you can remove your information by following these steps:
1. Go to your Facebook Account's Setting & Privacy. Click "Settings"
2. Look for "Apps and Websites" and you will see all of the apps and websites you linked with your Facebook.
3. Search and Click "MySite Login" in the search bar.
4. Scroll and click "Remove".
5. Congratulations, you have successfully removed your app activities.
Click here to learn how to add a new page using the BookingKoala website builder. Once you have created this page, copy the URL and paste it into the box below "Data deletion instructions URL"/
Then, click the blue "Save Changes" button at the bottom of the page.
Next, click on the "App Review" link from the left side menu and go to "Permissions and Features".

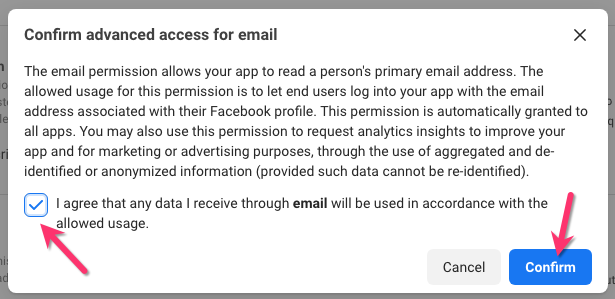
Check that the sections called "public_profile" and "email" are set to "Advanced Access".
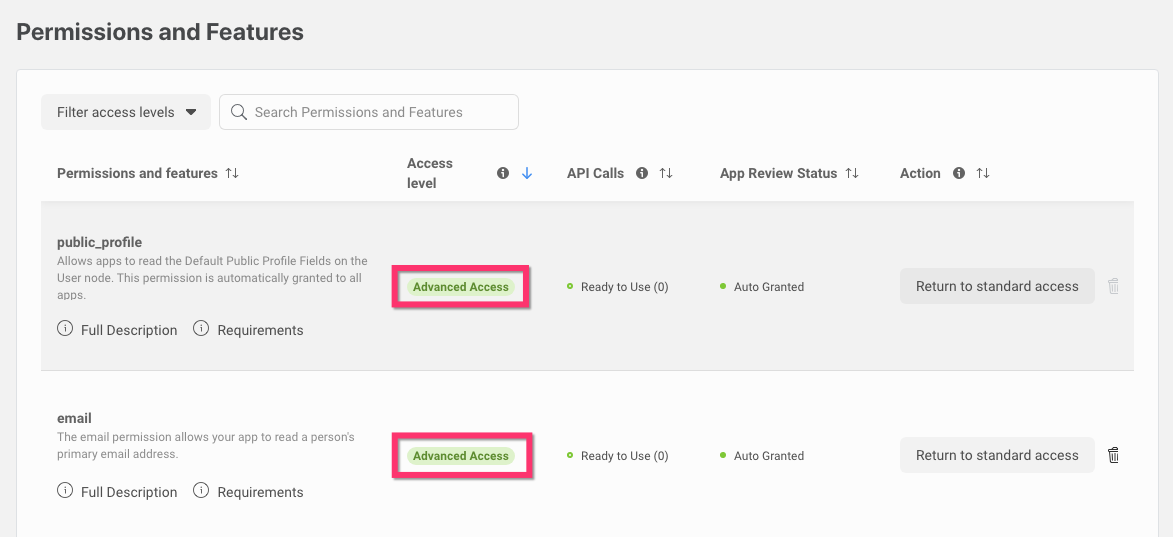
If these sections are set to "Standard Access" instead, click the "Get Advanced" access button all the way to the right of the row.

A pop-up window will appear. Check the box next to "I agree that any data I receive through Email will be used in accordance with the allowed usage" and then click the blue "Confirm" button.
Lastly, toggle the App Mode button at the top of the page to "Live".
Next, you will copy the App ID and App Secret into BookingKoala. To view the app secret key, click the grey "Show" button and enter your Facebook password.

Once entered, click the blue "Apply" button.
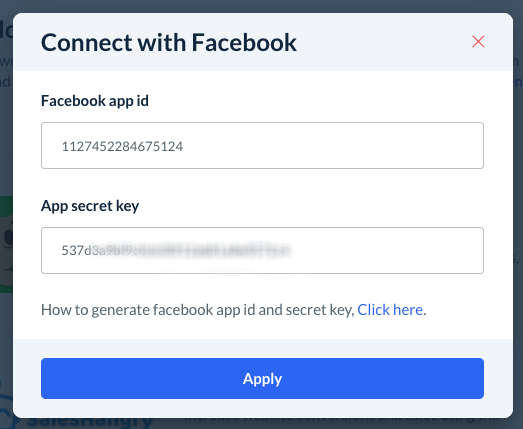
A green system notification will appear in the top right corner letting you know that Facebook has been connected successfully. You will also see that the grey "Incomplete" button now shows "Connected".

To check that the "Login with Facebook" button has been added successfully, open a private/incognito tab with your business URL and click on the "Log In" link from the top menu. When you click"Login with Facebook", a window will appear asking for the login credentials.