The purpose of this article is to help you learn:
- What is a custom section
- How to add a custom section
- How to add custom fields
- How to reorder your custom sections and fields
- How to edit, deactivate, reactivate, and delete custom sections and fields
What are custom sections?
Custom sections can be added to your booking form to gather or share specific information not covered in other sections of the form.
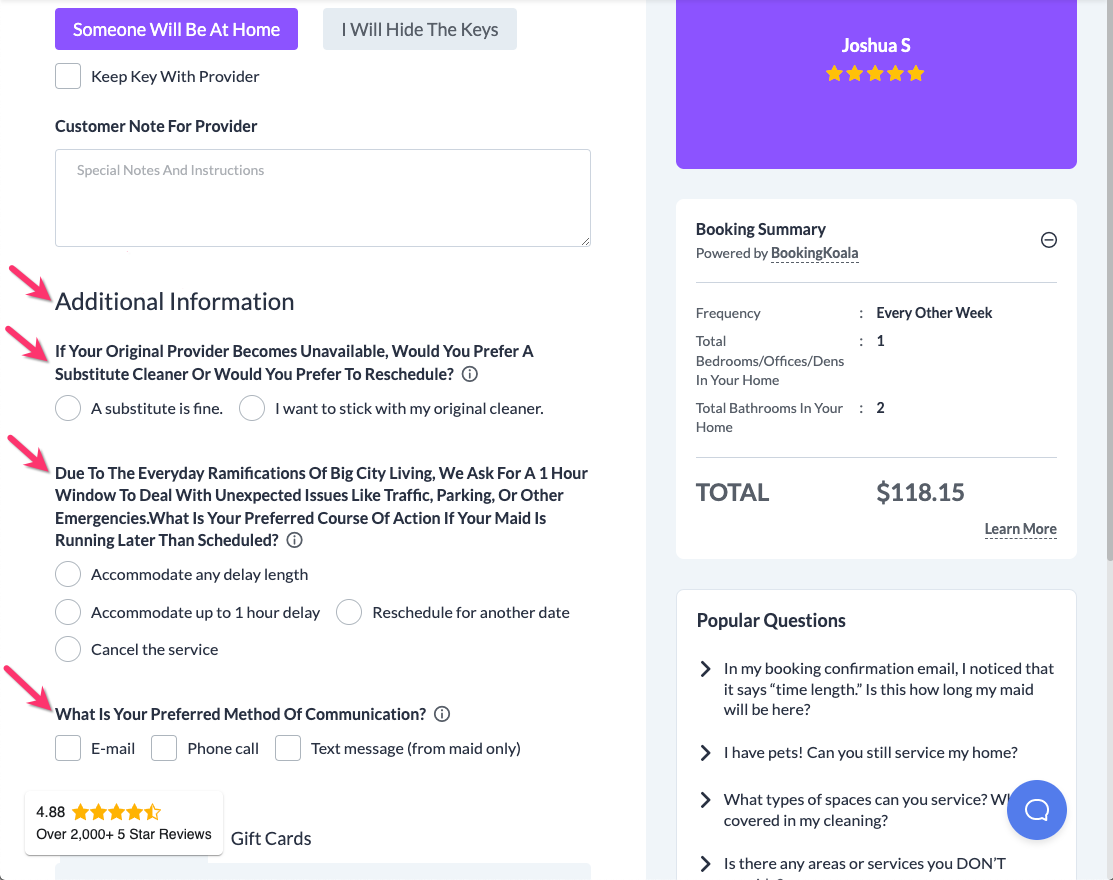
In the example above, the "Additional Information" area on this booking form is a custom section. In this section, there are several different questions for the customer to select as they fill out the form.
Custom sections can be inserted into almost any step of the booking form.
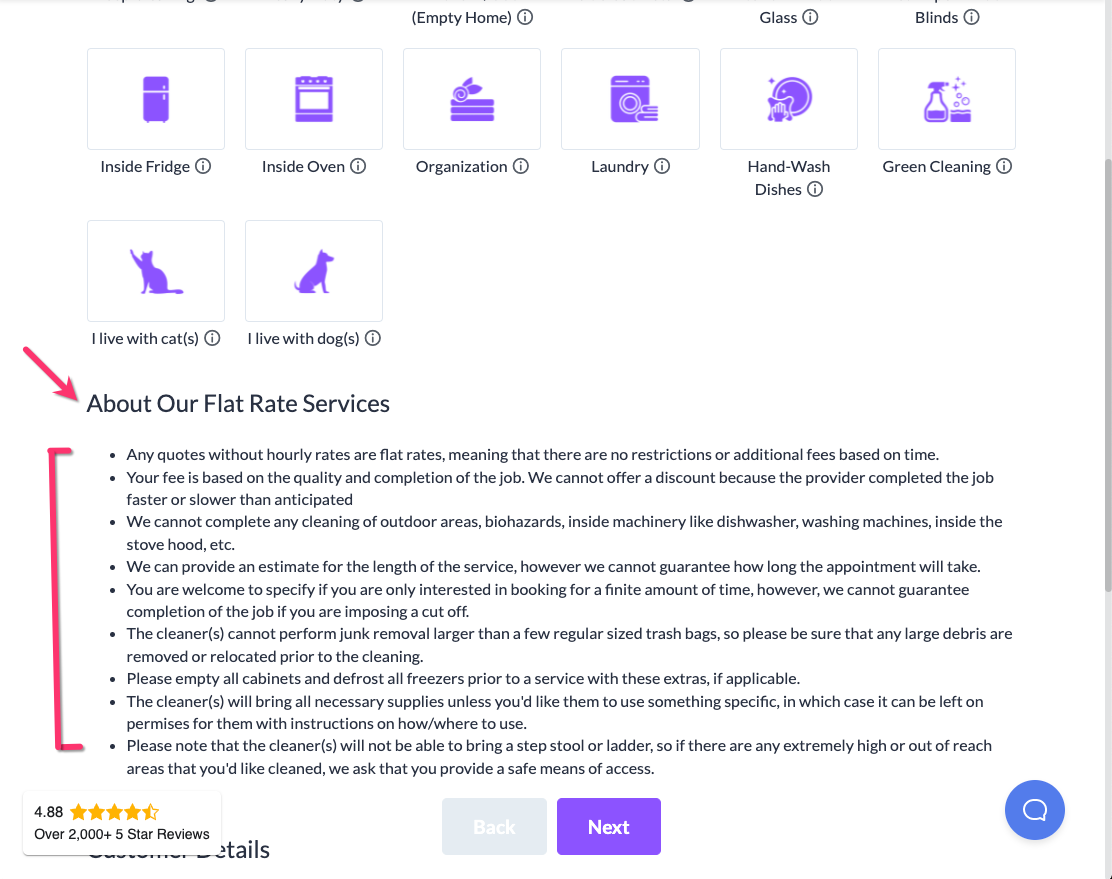
In the example above, a custom section was used to create "About Our Flat Rate Services". This custom section has been inserted below the Extras section and before the Customer Details section.
Adding In A Custom Section
To create a new custom section, go to:
Settings > Industries > [Industry Name] > Form [#] > Custom Sections
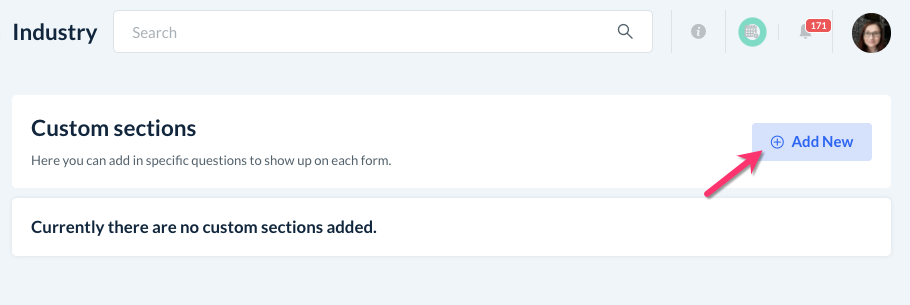
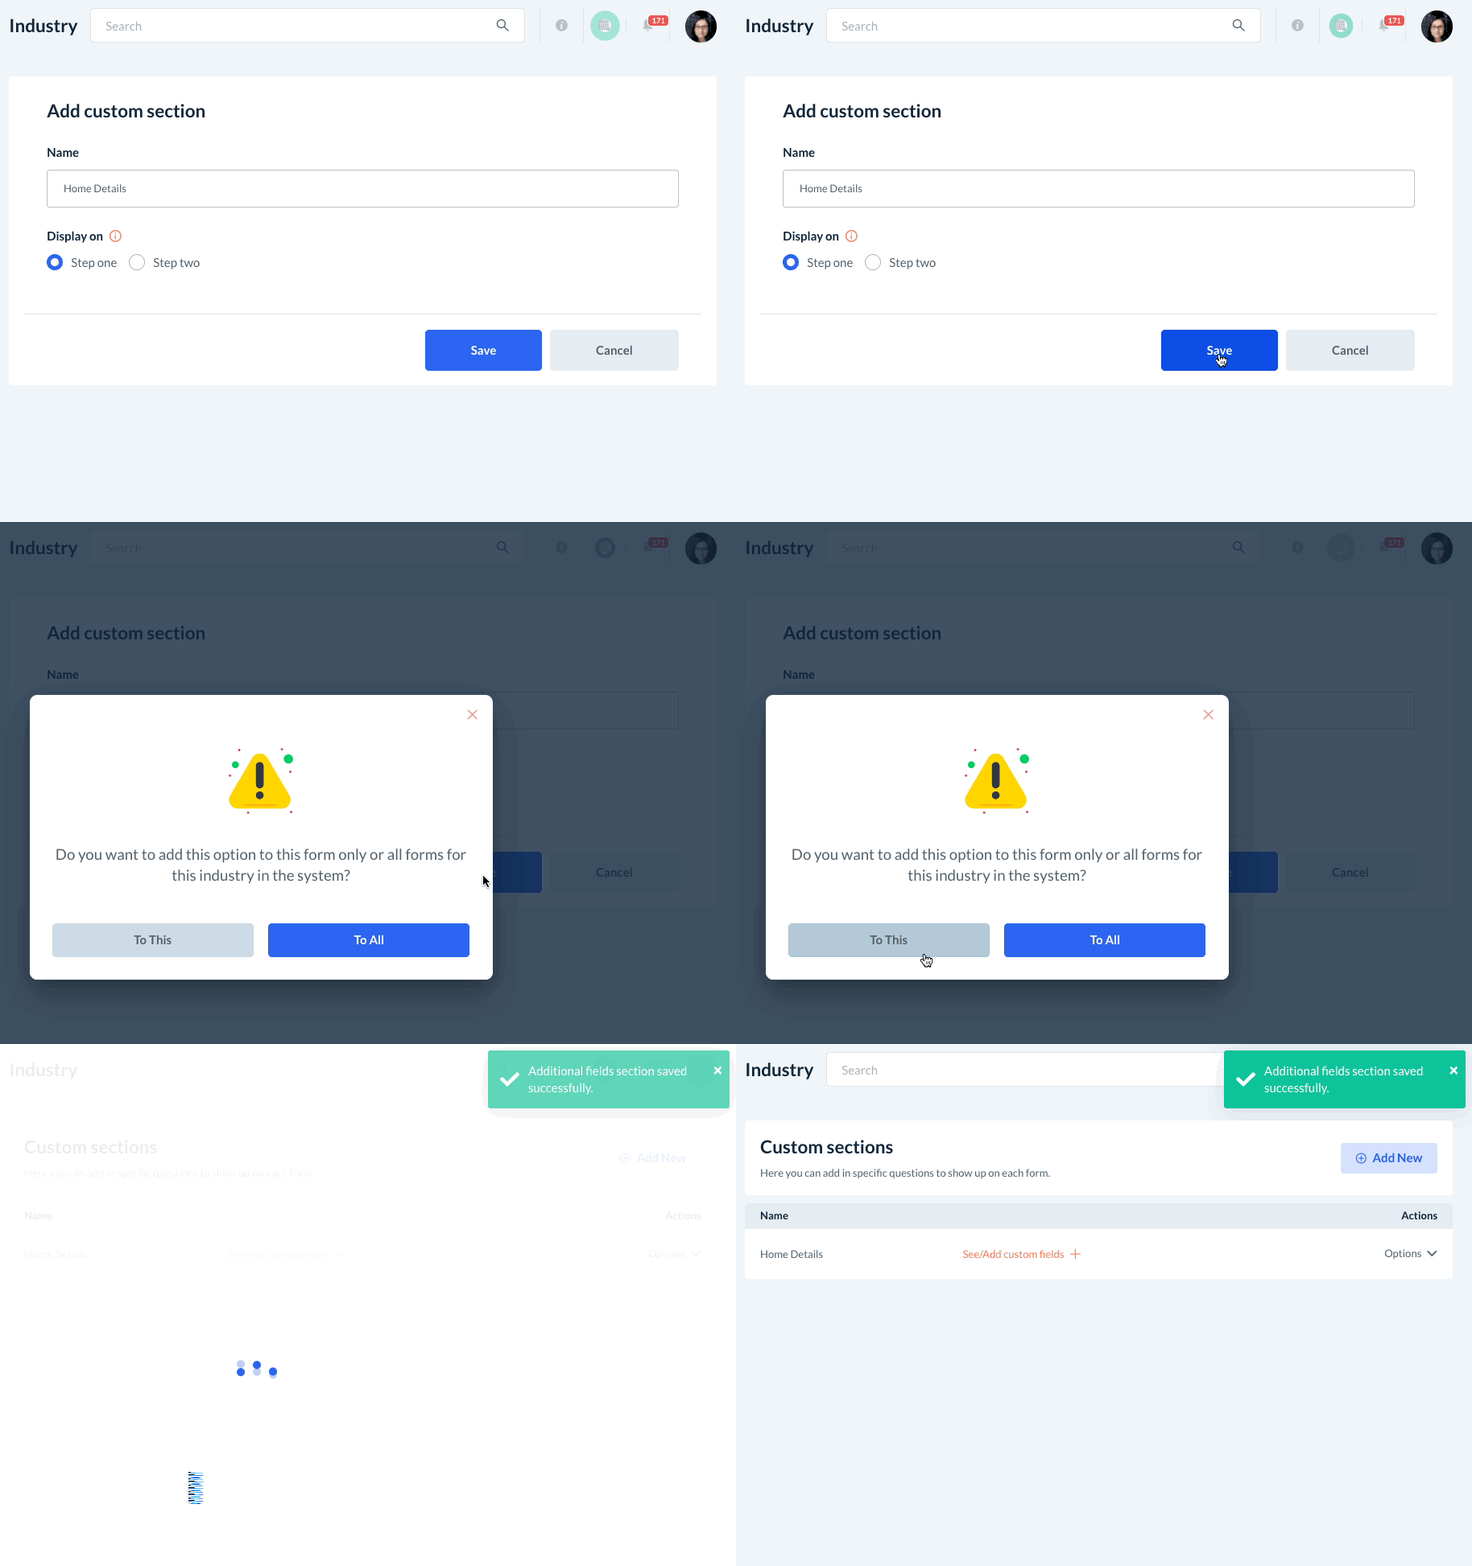
On the Custom Sections main page, click the blue "Add New" button at the top-right corner of the screen.
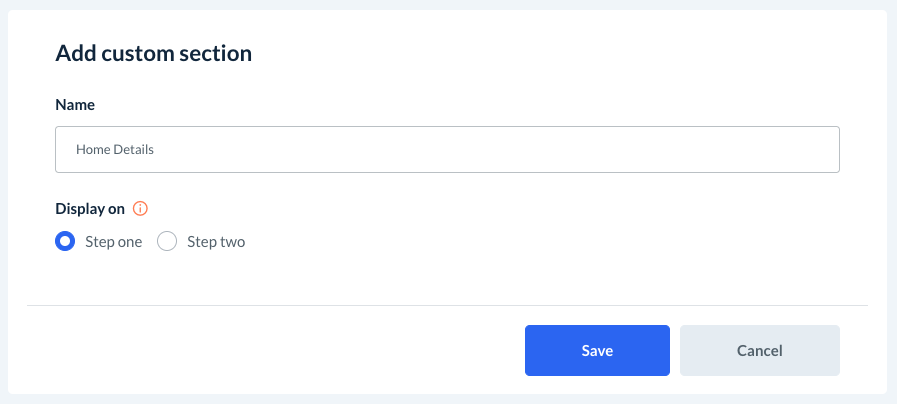
You will be redirected to an Add Custom Section page.
Enter the Name of the new section and select whether you'd like this section to Display on Step One or Step Two.
Click the blue "Save" button at the bottom of the page to continue. A pop-up will appear, stating "Do you want to add this option to this form only or all forms for this industry in the system?"
- To This - If you select this option, the custom section will be added to this form only.
- To All - If you select this option, the custom section will be added to all forms within this industry.
Once you select your preferred option, a green system notification will let you know that the section has been added successfully. You will now see the new section's name listed on the main page.
Add Custom Fields
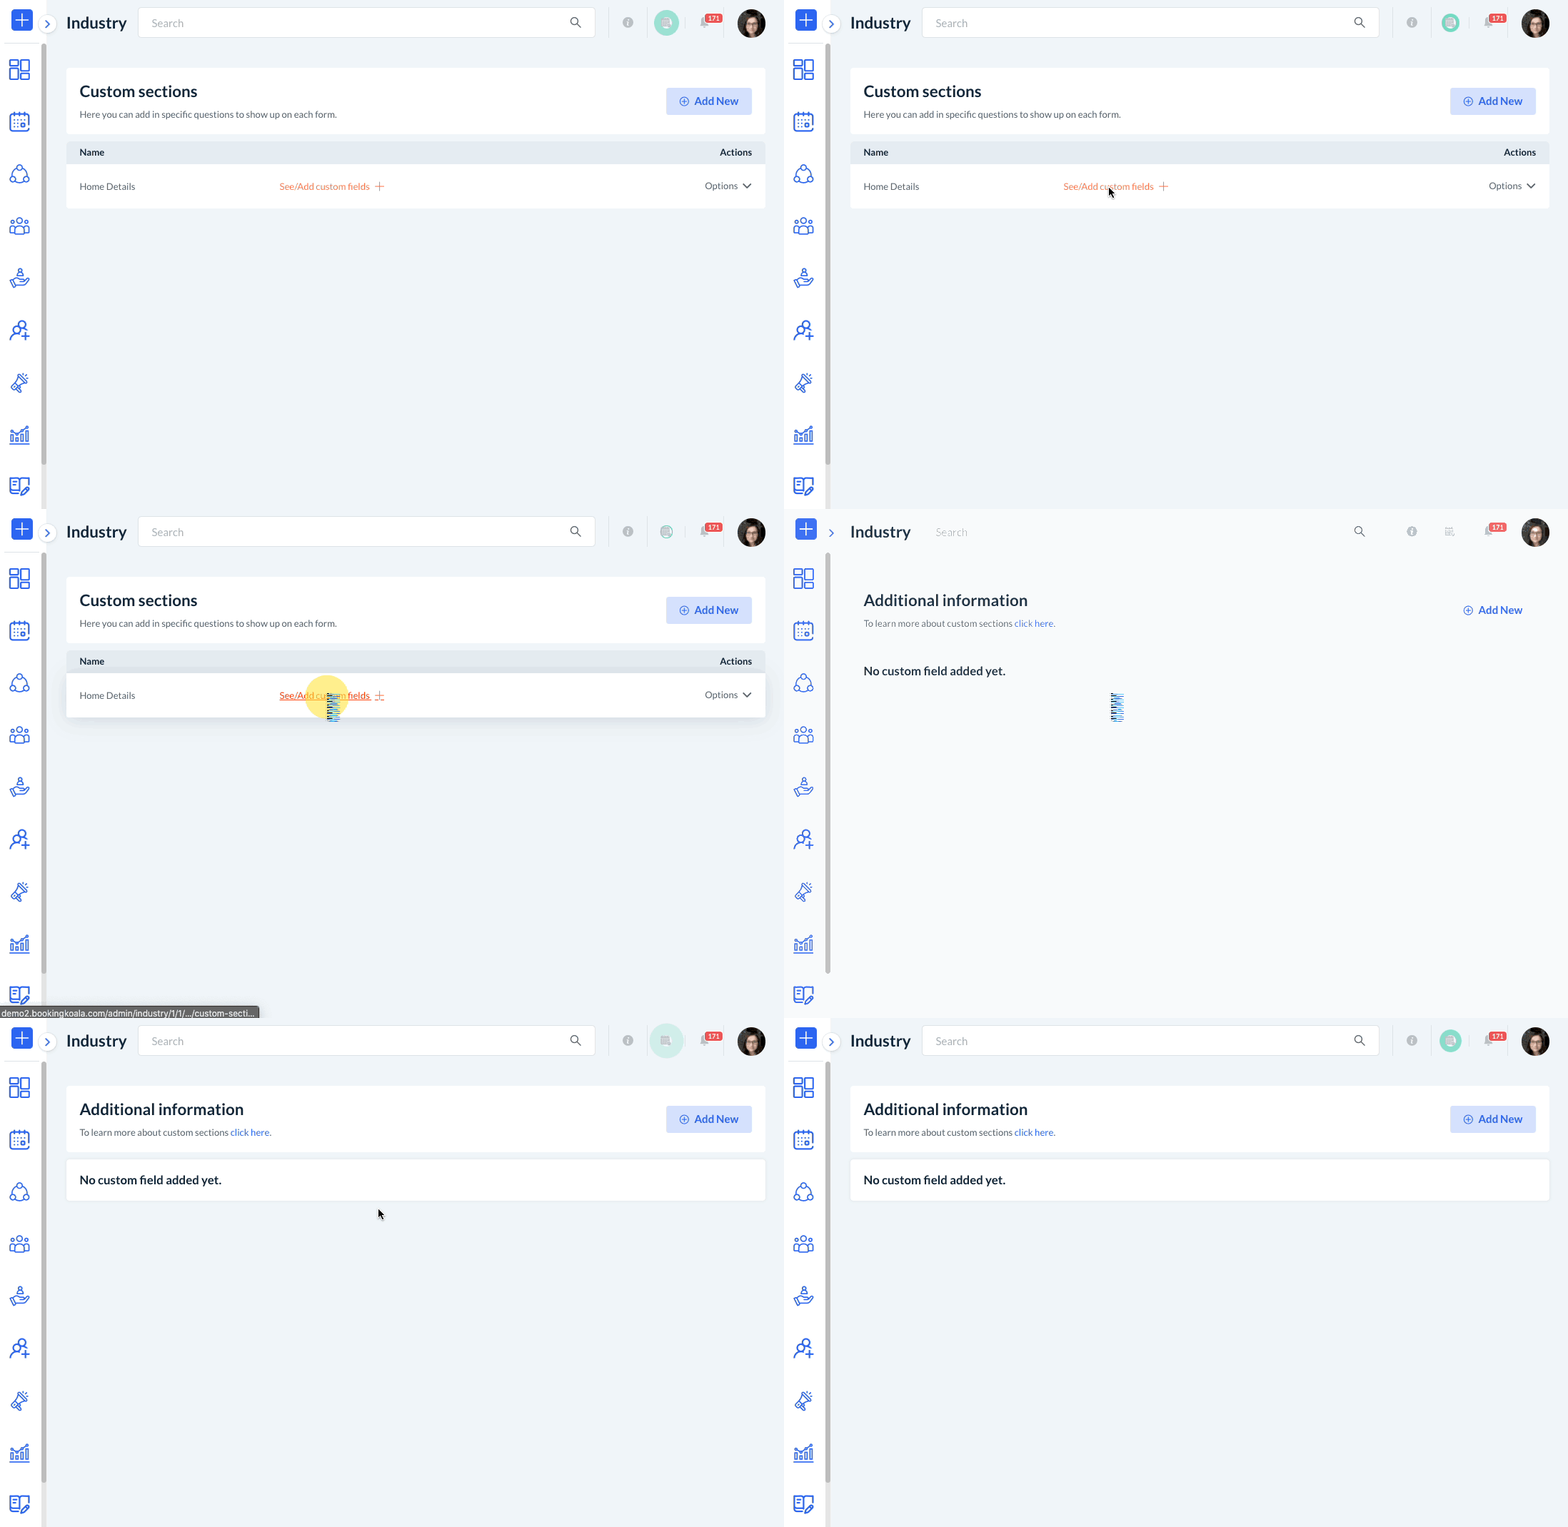
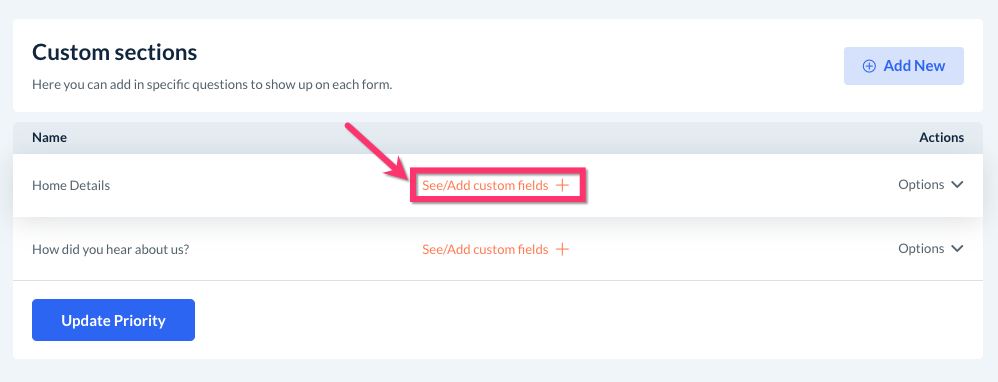
Next, you will need to add fields to your custom section. A field is each question or piece of information listed under your section. Next to the custom section's name, click the orange text that says "See/Add Custom Fields".
Click the blue "Add New" button in the top-right corner of the page to add a new field.
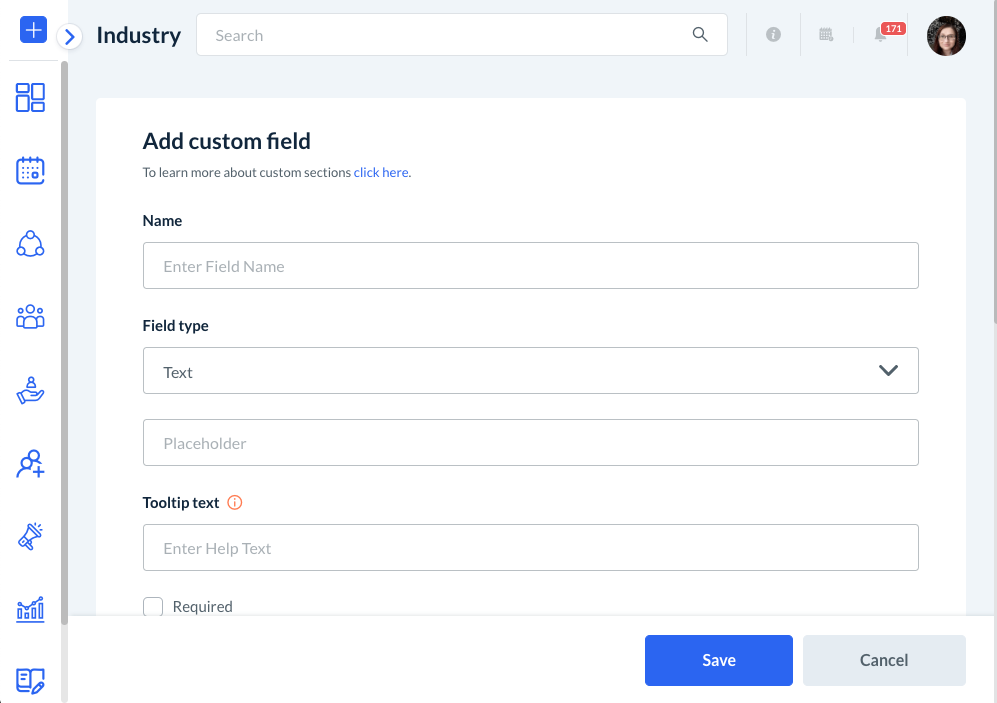
You will be redirected to an "Add Custom Field" page.
Name
Enter the field content into the Name box.
If you are gathering more information from the customer, you would enter the question into this box.
If you are looking to share additional information about your services or business, you would also enter the information into the "Name" box.
Field Type
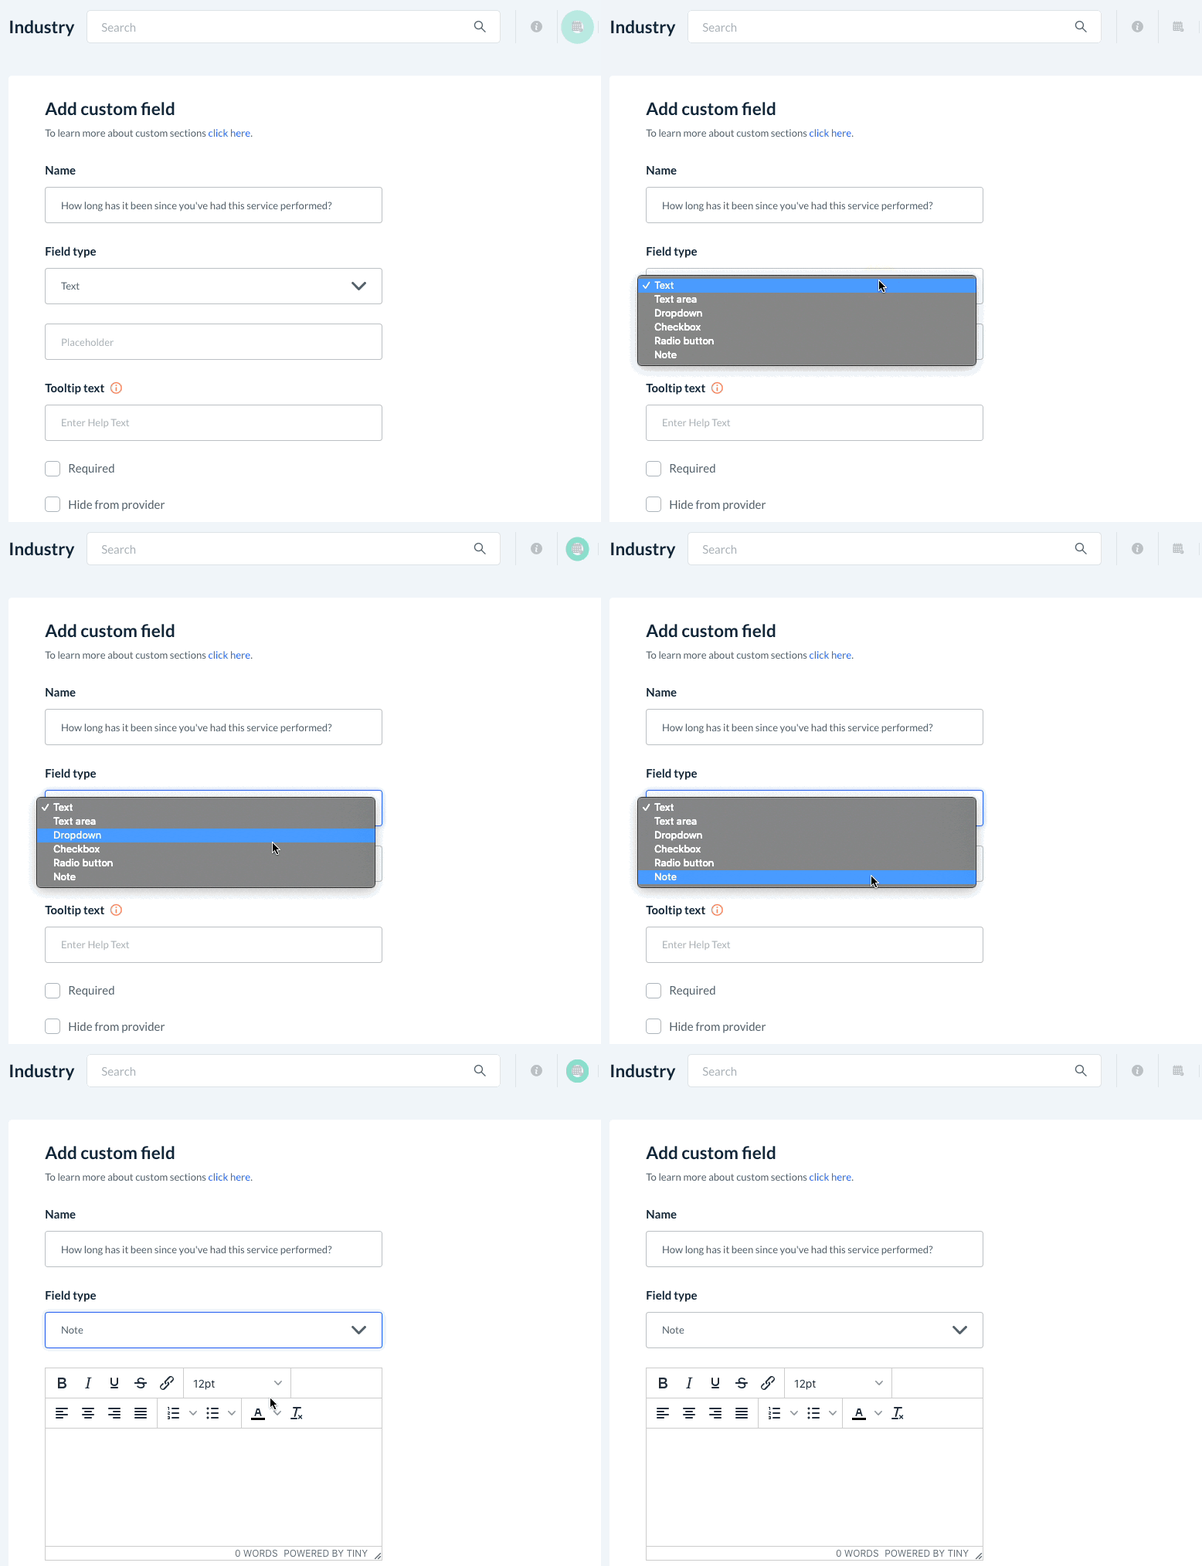
Under the Field Type drop-down menu, select how you would like this custom field to be displayed.
The options are text, text area, drop-down, checkbox, radio button, and note.
- Text - Inserts a small text box for the customer to type in a short written answer
- Text Area - Inserts a large text box for the customer to type a longer written answer.
- Drop-Down - Inserts a drop-down menu with multiple options for the customer to select from.
- Checkbox - Inserts multiple options with boxes, in which the customer can select one or more options
- Radio Button - Inserts multiple options with radio buttons, in which the customer can select one option only
- Note - Inserts a text box that the admin can enter information into. There is no option for customers to input any information for note-type fields.
Placeholder
If the customer must type their response into a box, this option allows you to have something written in light grey text to give them an example of what information should be provided.
For example, if your custom field is text and the question is "What is the name of your pet?", you could enter "Ex: Beatrice" into the placeholder box.
Tooltip Text
This option allows you to insert a "tooltip" next to this custom field. The tip will appear as a small icon after the field name. When the customer hovers over the icon with their curser, they will see whatever information you have provided for them.
Required
Check the box next to "Required" to make this custom field mandatory. The client will have to provide input before they can proceed with the booking.
Hide From Provider
This option allows you to hide this section from the provider if the customer is giving sensitive information only allowed for the admin and office staff to see.
Where Would You Like To Include This Custom Information For Your Notifications?
This option allows you to decide who will see the information entered into a custom section in their notifications.
When you uncheck a box, the custom information entered into this section will be hidden for that type of user's notifications.
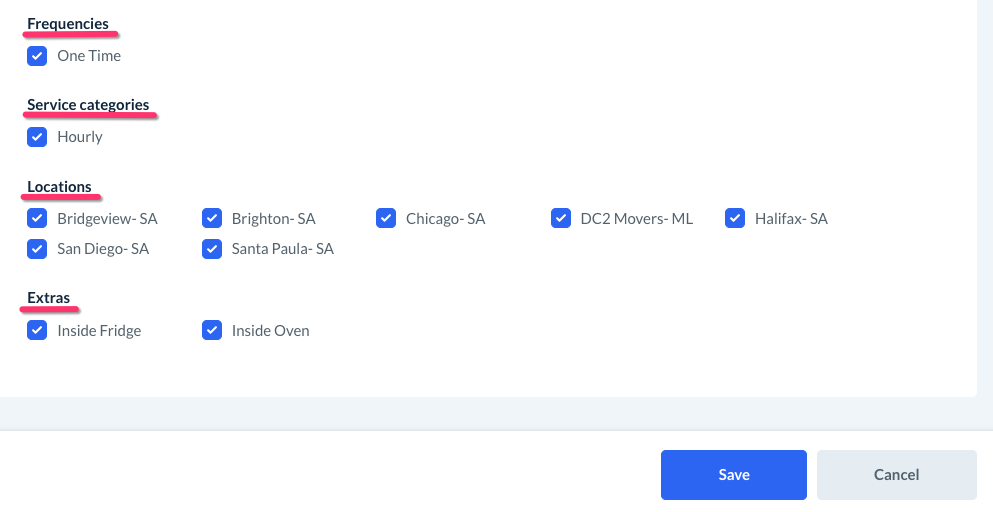
Dependencies
The final section of the Add Custom Field page contains the other sections in your booking form to set up dependencies for when this section will be displayed.
All custom sections will have options for Locations (if you use them), Frequencies, Service Categories, and Extras.
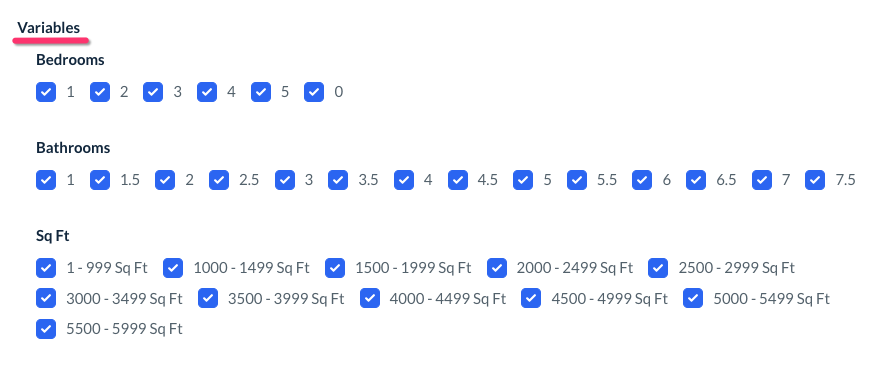
If you use form 1 or 4, your Pricing Parameters/Variables will be displayed in this section.
If you use form 2 or 3, your Items will be displayed.
If you use form 2 or 3, your Add-Ons will be displayed.
If you use form 2, your Packages will be displayed.
Once you are finished setting up the field, click the blue "Save" button at the bottom of the page.
Changing the Custom Section Order
If you have added multiple custom sections, you can change the order in which they are displayed on your booking form. Go to:
Settings > Industries > [Industry Name] > Form [#] > Custom Sections
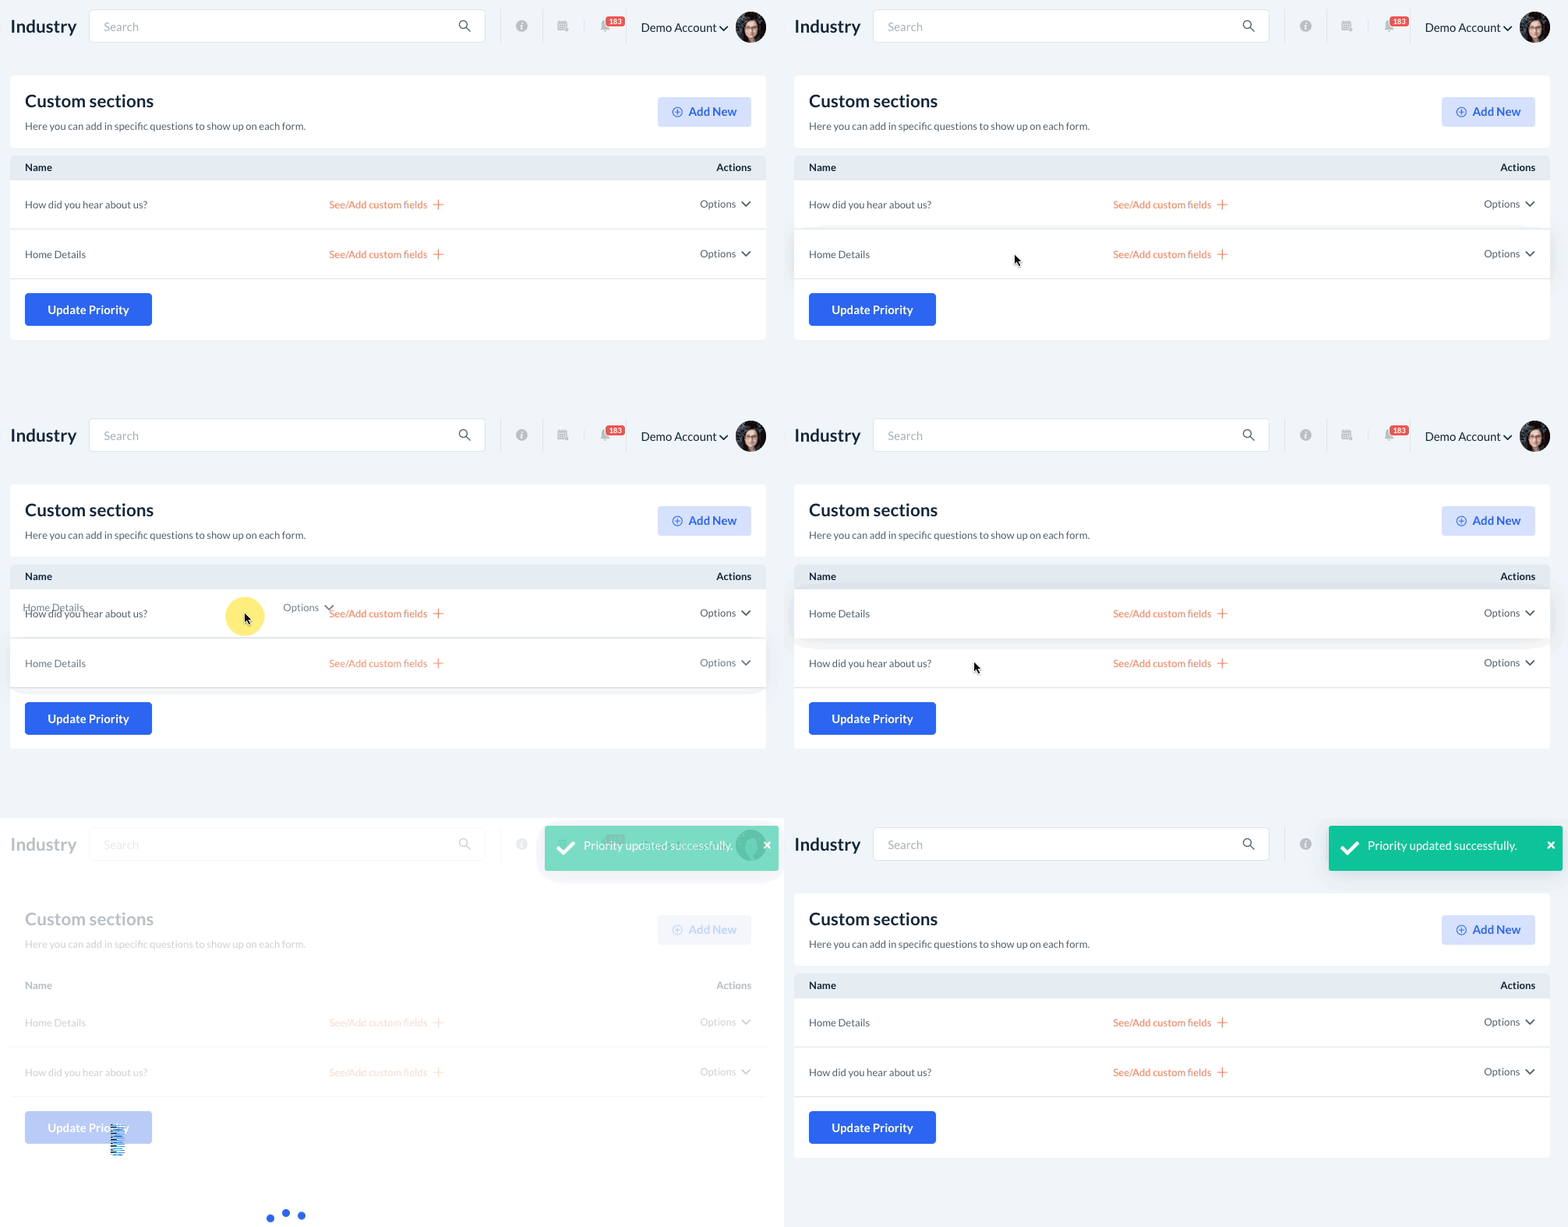
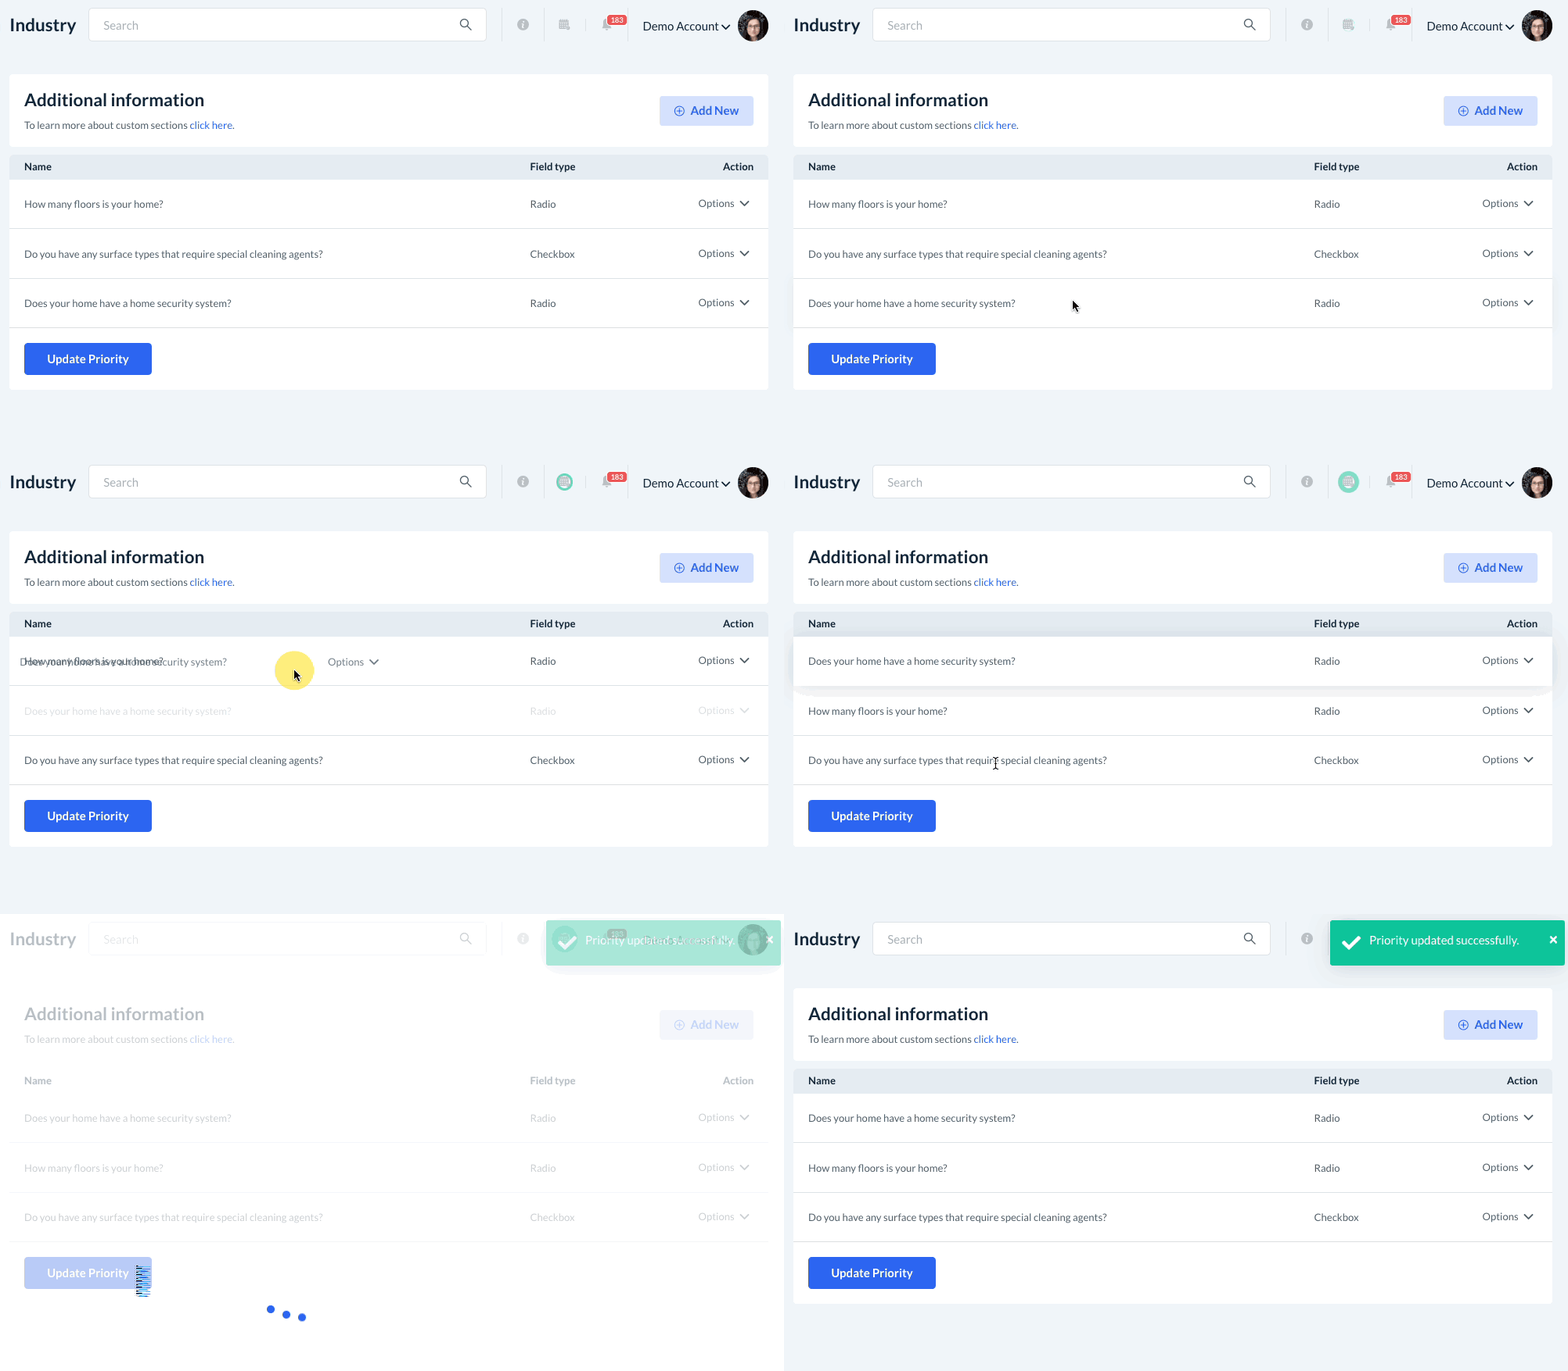
To change the order, click and hold the section to drag and drop it into a new position in the list.
Once you are satisfied with the order, click the blue "Update Priority" button at the bottom of the page.
A green system notification will appear in the top-right corner of the page, letting you know the priority has been updated successfully.
Changing the Custom Fields Order
If you have multiple fields within a custom section, you can also change the order in which they are displayed in that section. Go to:
Settings > Industries > [Industry Name] > Form [#] > Custom Sections
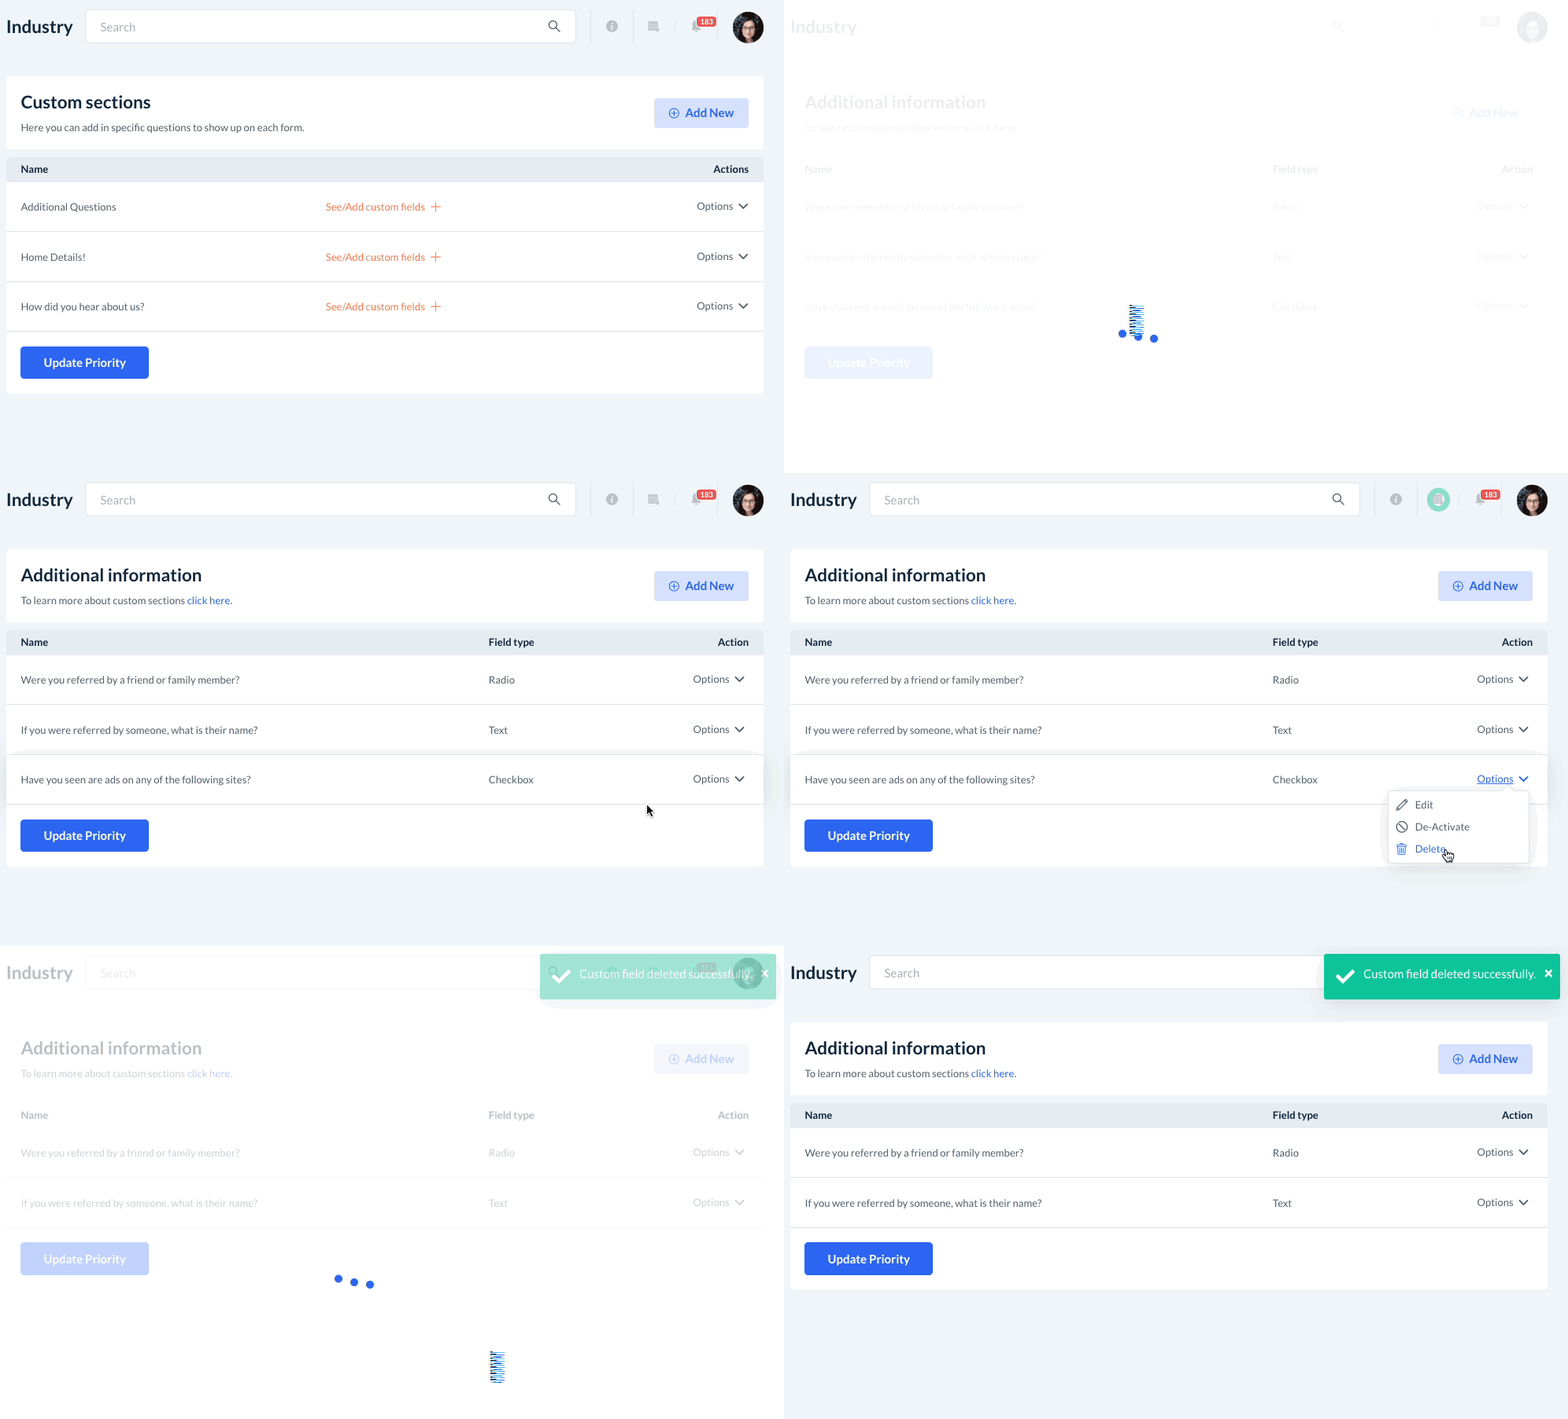
Click on the orange text that says "See/Add custom fields" to view your fields.
You will be brought to the Additional Information page. To change the order of the fields, click and hold a field to drag and drop it into a new position in the list.
Once you are satisfied with the order, click the blue "Update Priority" button at the bottom of the page.
A green system notification will appear in the top-right corner of the page, letting you know the priority has been updated successfully.
How to Modify Custom Sections and Fields
If you ever want to make further adjustments to your custom sections or fields, you can always go to:
Settings > Industries > [Industry Name] > Form [#] > Custom Sections
Edit Custom Sections and Fields
Custom Section
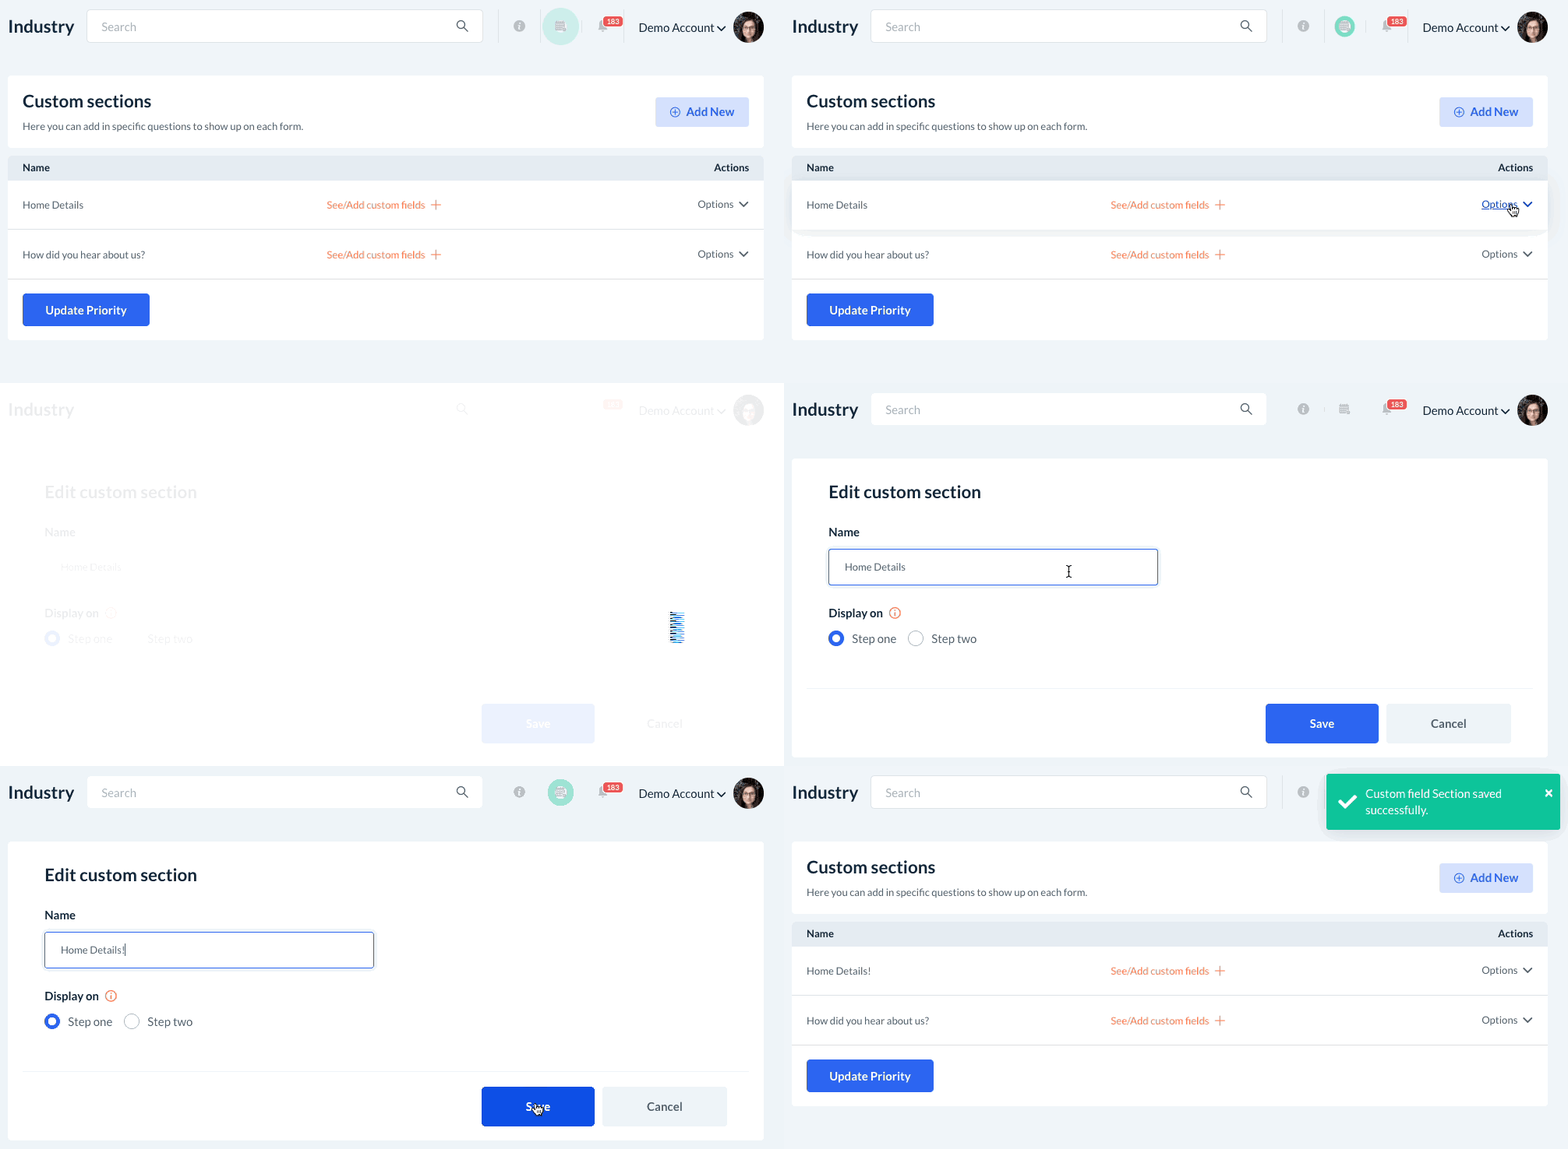
To edit a custom section, click on "Options" and select "Edit".
You will be brought to the Edit Custom Section page where you can modify the name. Just be sure to click the blue "Save" button to save your changes.
A green system notification will appear in the top-right corner of the page, letting you know the custom section has been updated successfully.
Custom Field
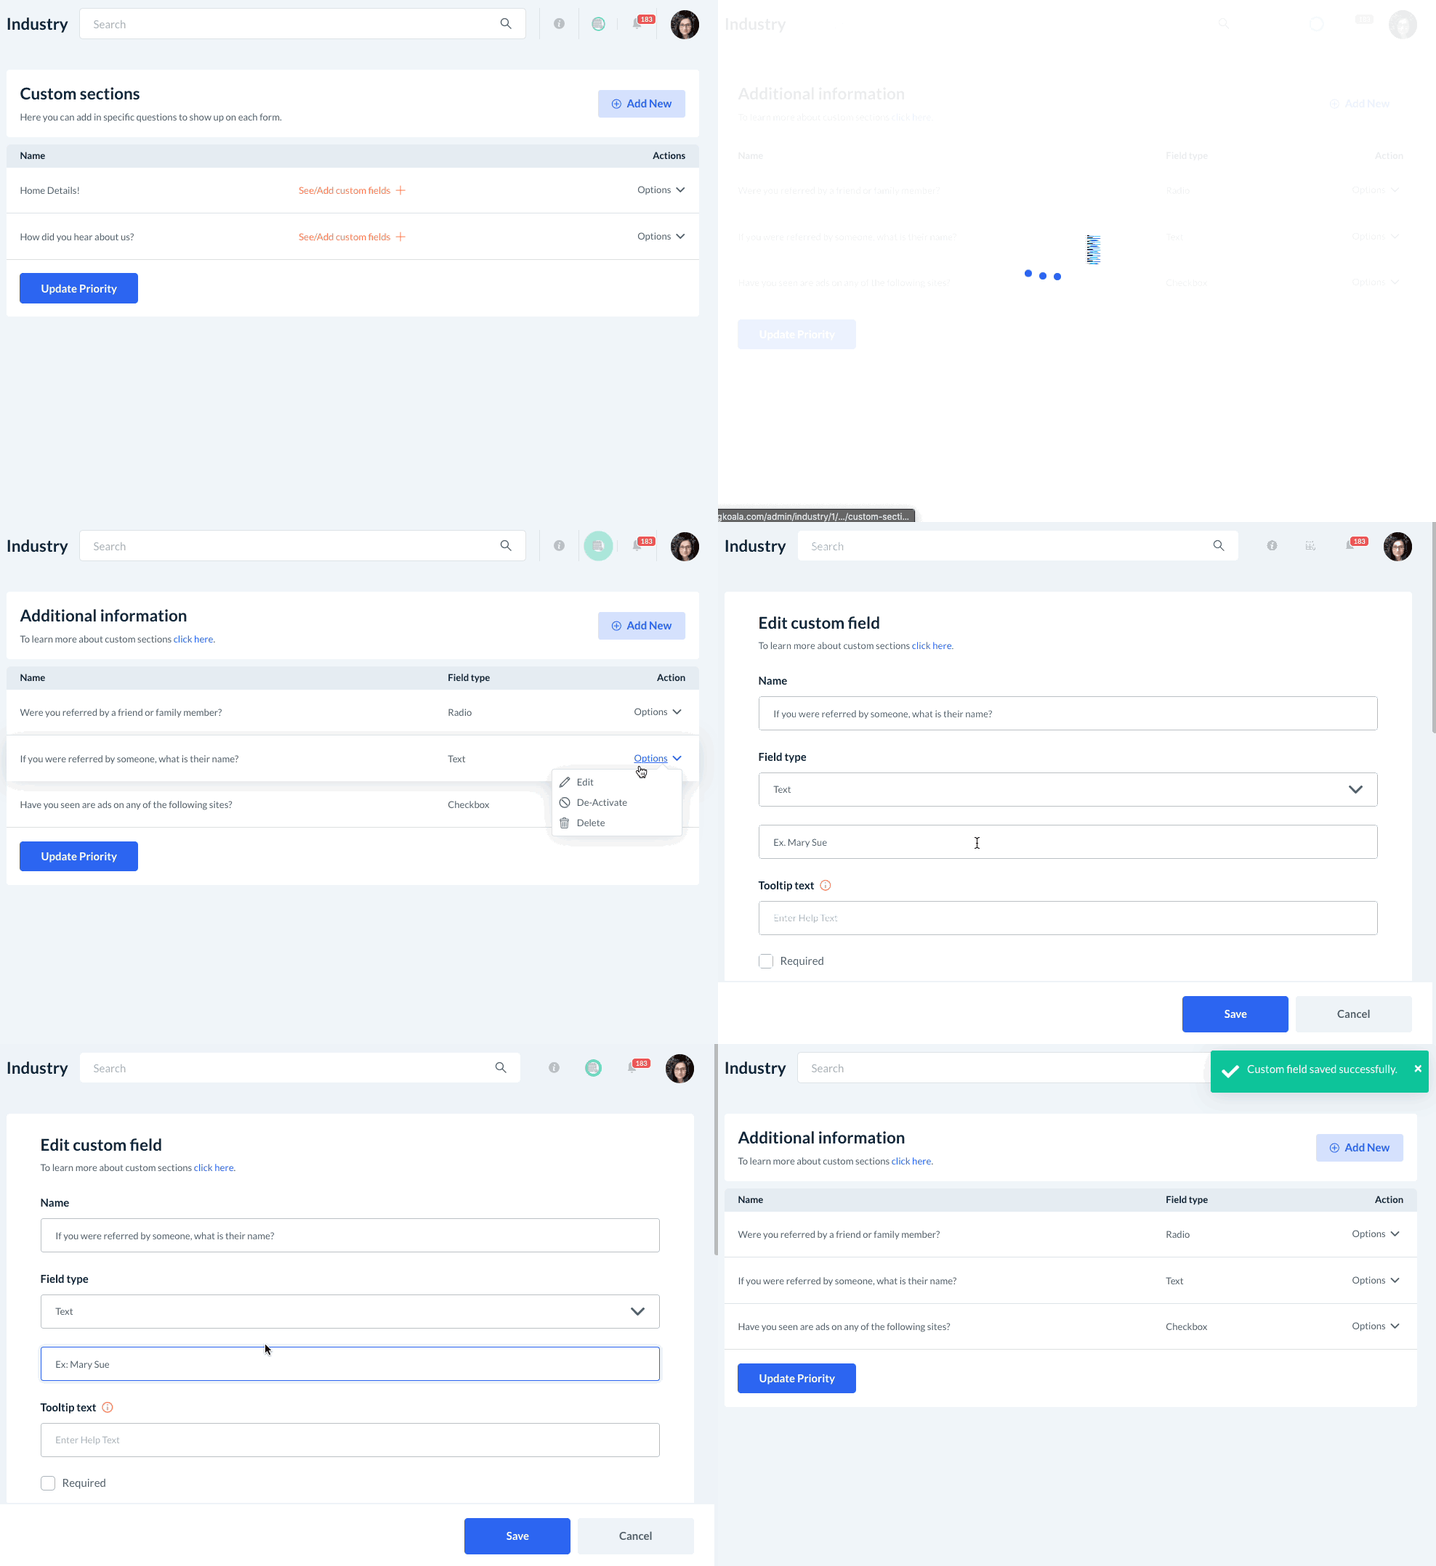
To edit a custom field, click on the orange "See/Add custom fields" link. Then, click on "Options" and select "Edit".
You will be brought to the Edit Custom Field page where you can modify any of the settings you'd like. Just be sure to click the blue "Save" button to save any changes.
A green system notification will appear in the top-right corner of the page, letting you know the custom field has been updated successfully.
Deactivate and Reactivate Custom Sections and Fields
Custom Section
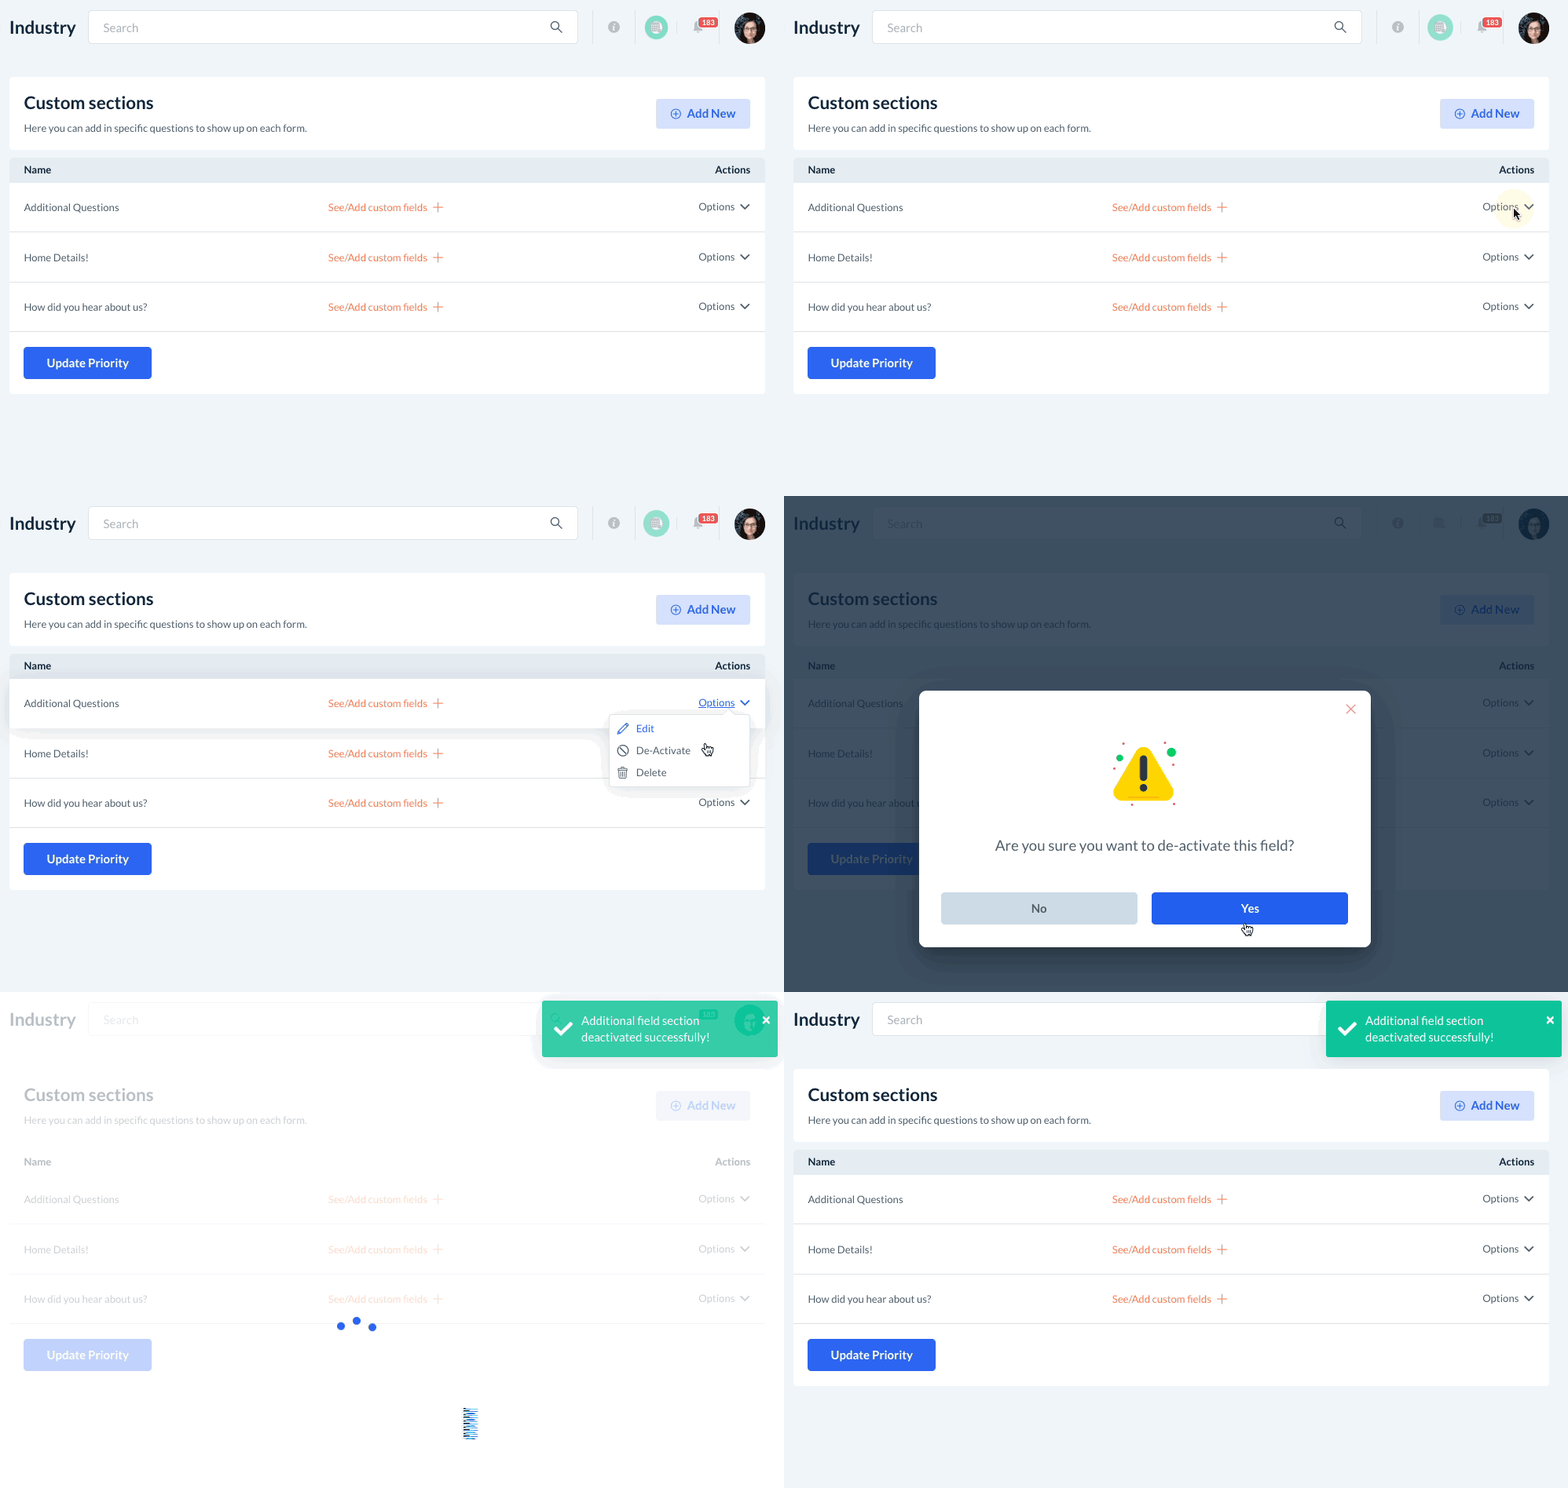
To deactivate a custom section, click on "Options" and select "De-Activate". A pop-up window will ask if you are sure you want to deactivate this field. Click "Yes" to proceed.
A green system notification will appear in the top-right corner of the page, letting you know the section has been deactivated successfully. The section will now be hidden from your booking form.
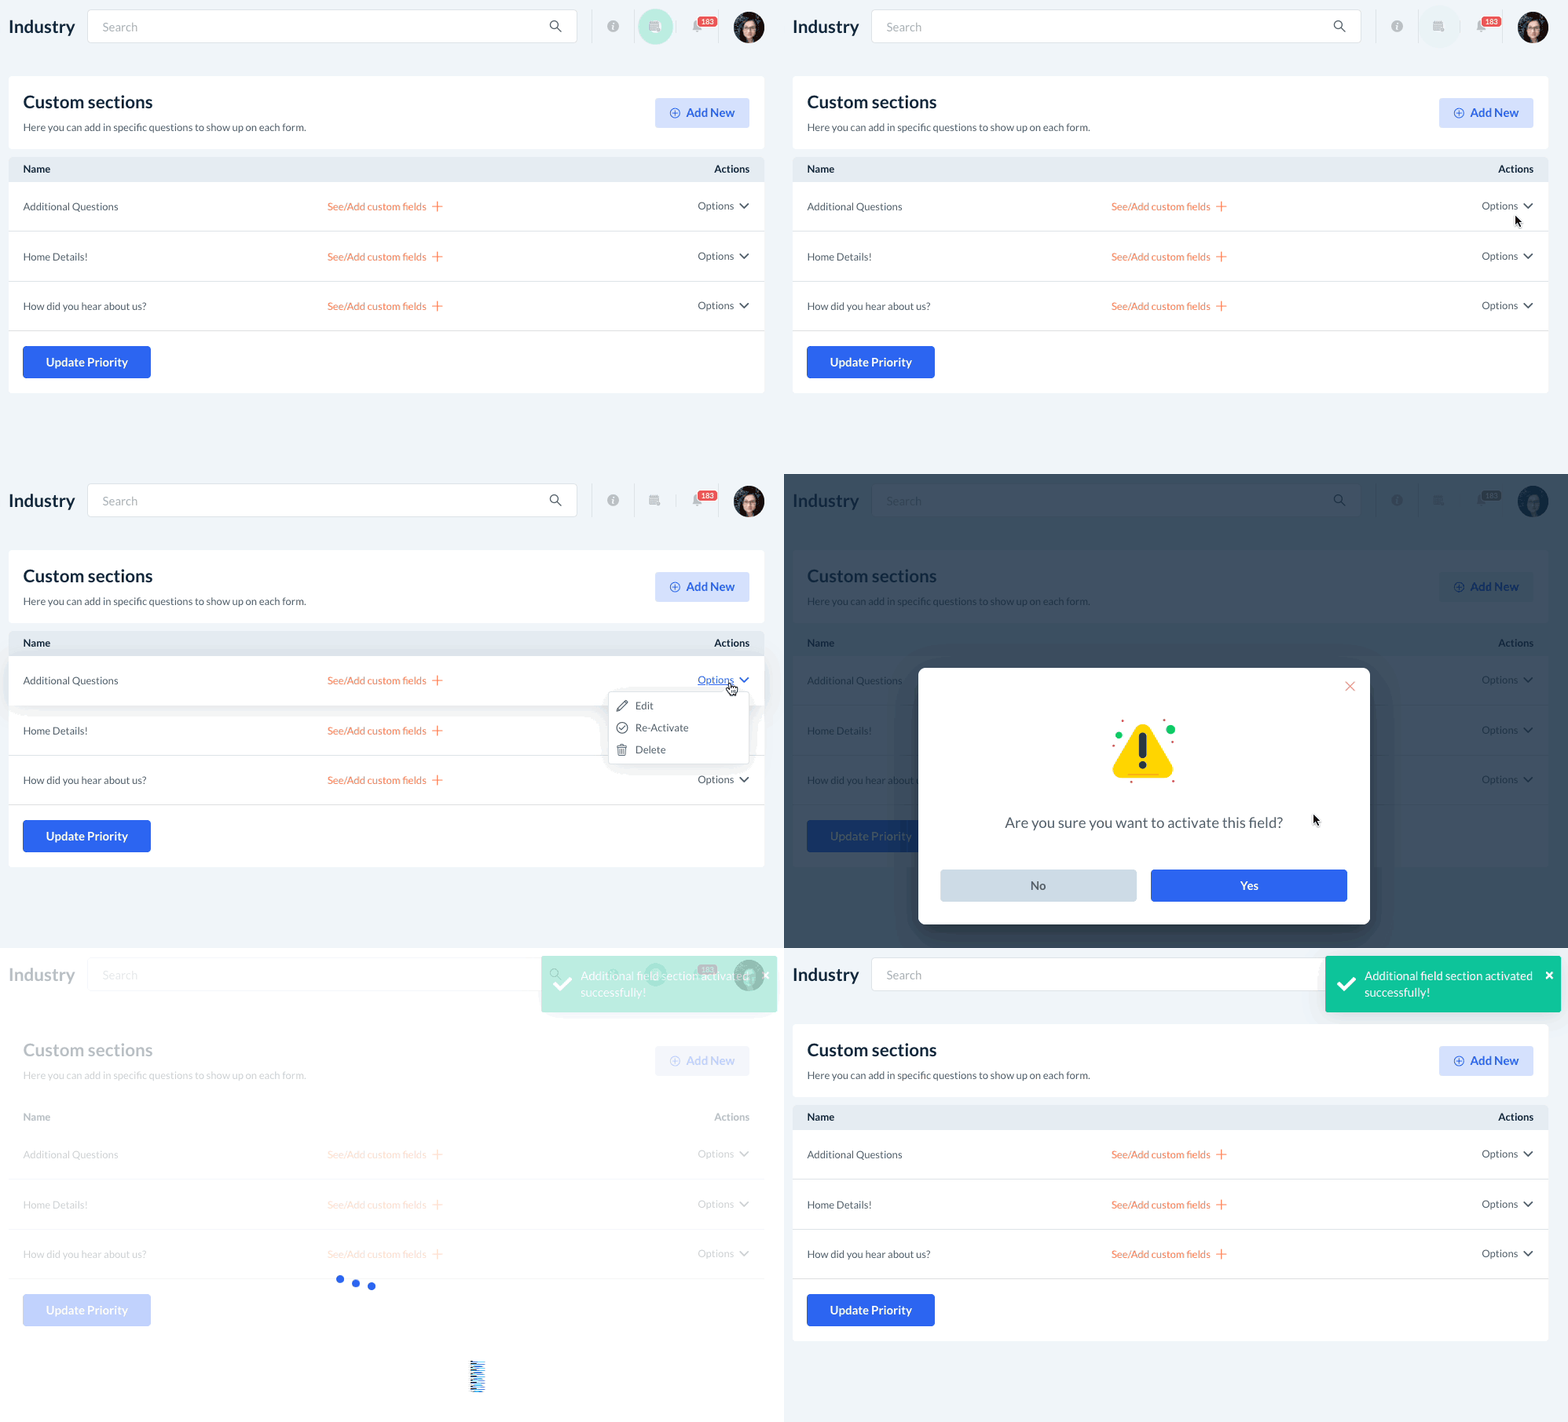
If you would ever like to start using a deactivated custom section again, you can easily reactivate it. Click on "Options" next to the section you would like to resume using and select "Re-Activate".
A pop-up window will ask if you are sure you want to activate this field. Click "Yes" to proceed.
A green system notification will appear in the top-right corner of the page, letting you know the custom section has been activated successfully. The section will now be displayed on your booking form again.
Custom Field
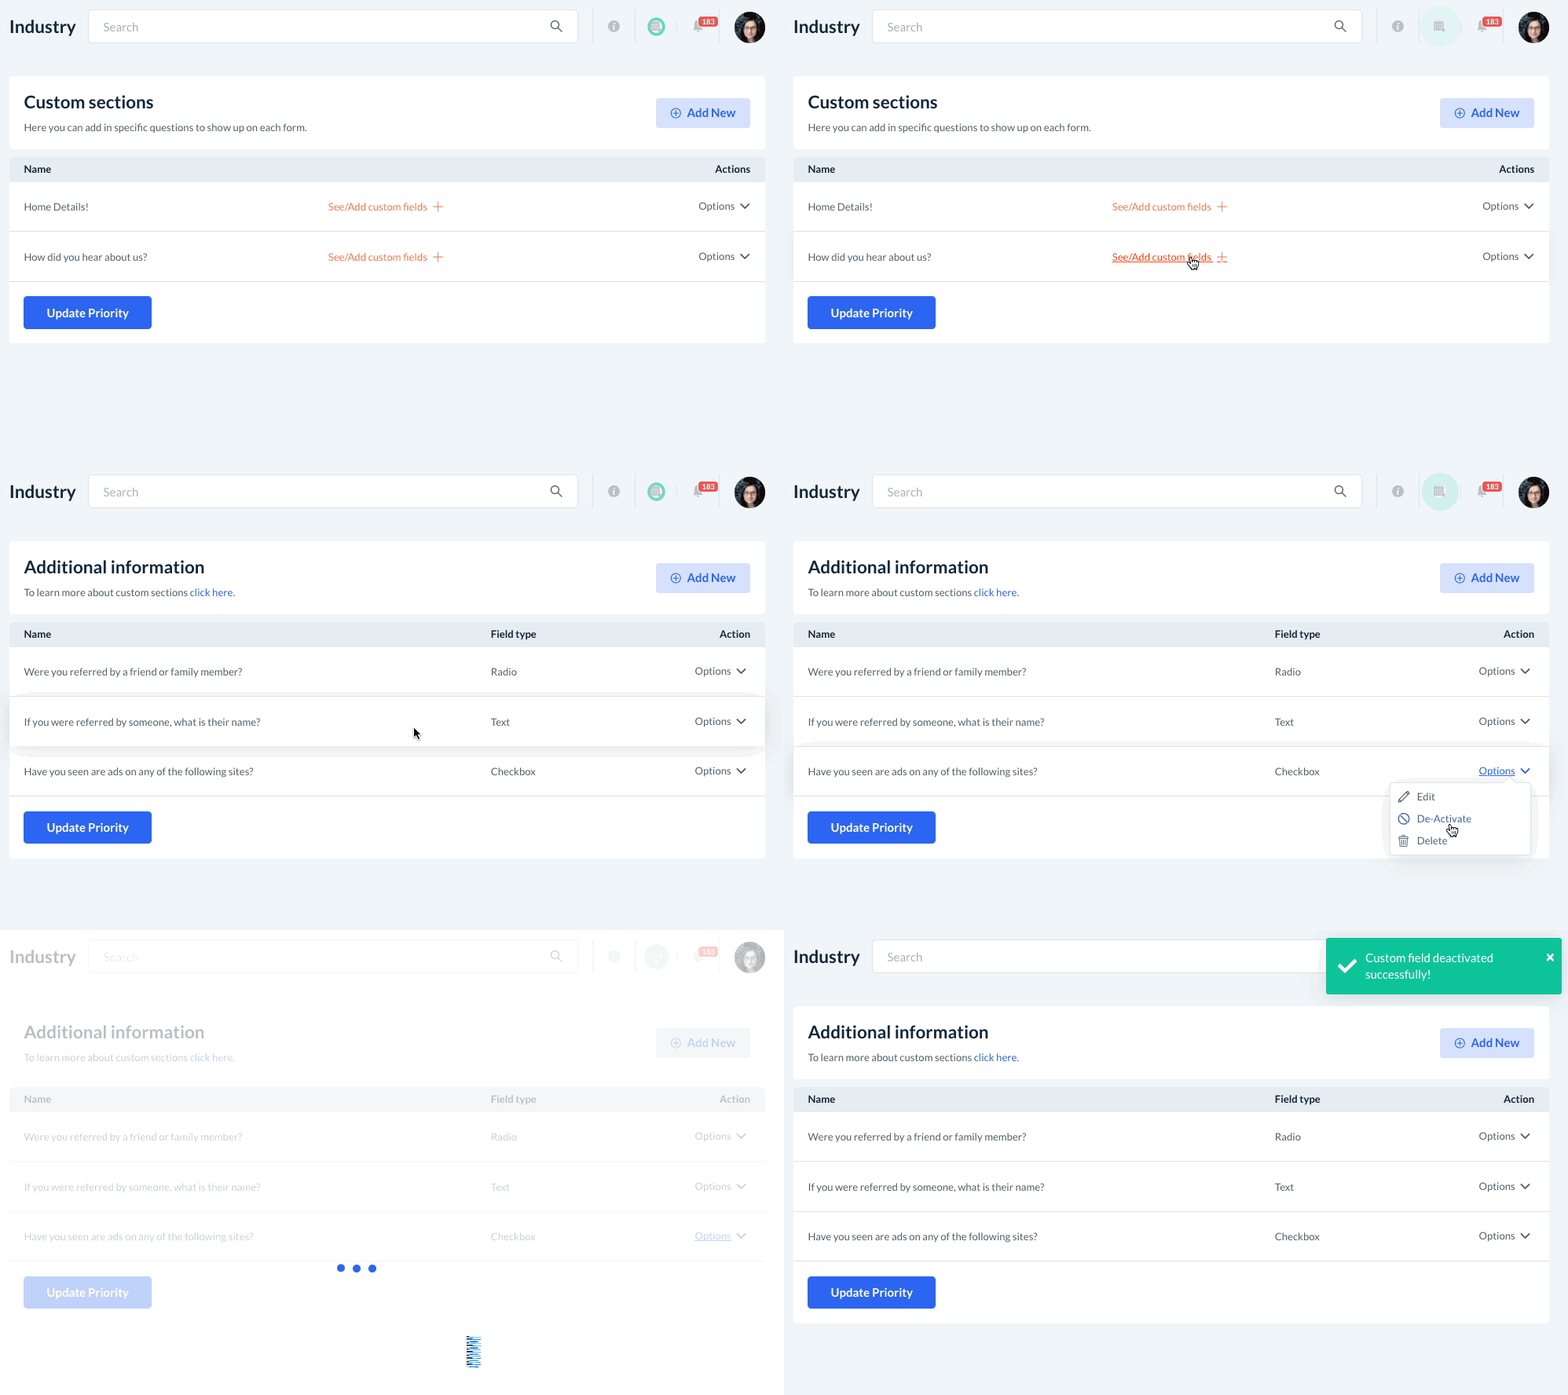
To deactivate a custom field, click on the orange "See/Add custom fields" link. Then, click on "Options" and select "De-Activate". A pop-up window will ask if you are sure you want to deactivate this field. Click "Yes" to proceed.
A green system notification will appear in the top-right corner of the page, letting you know the field has been deactivated successfully. The field will now be hidden from your booking form.
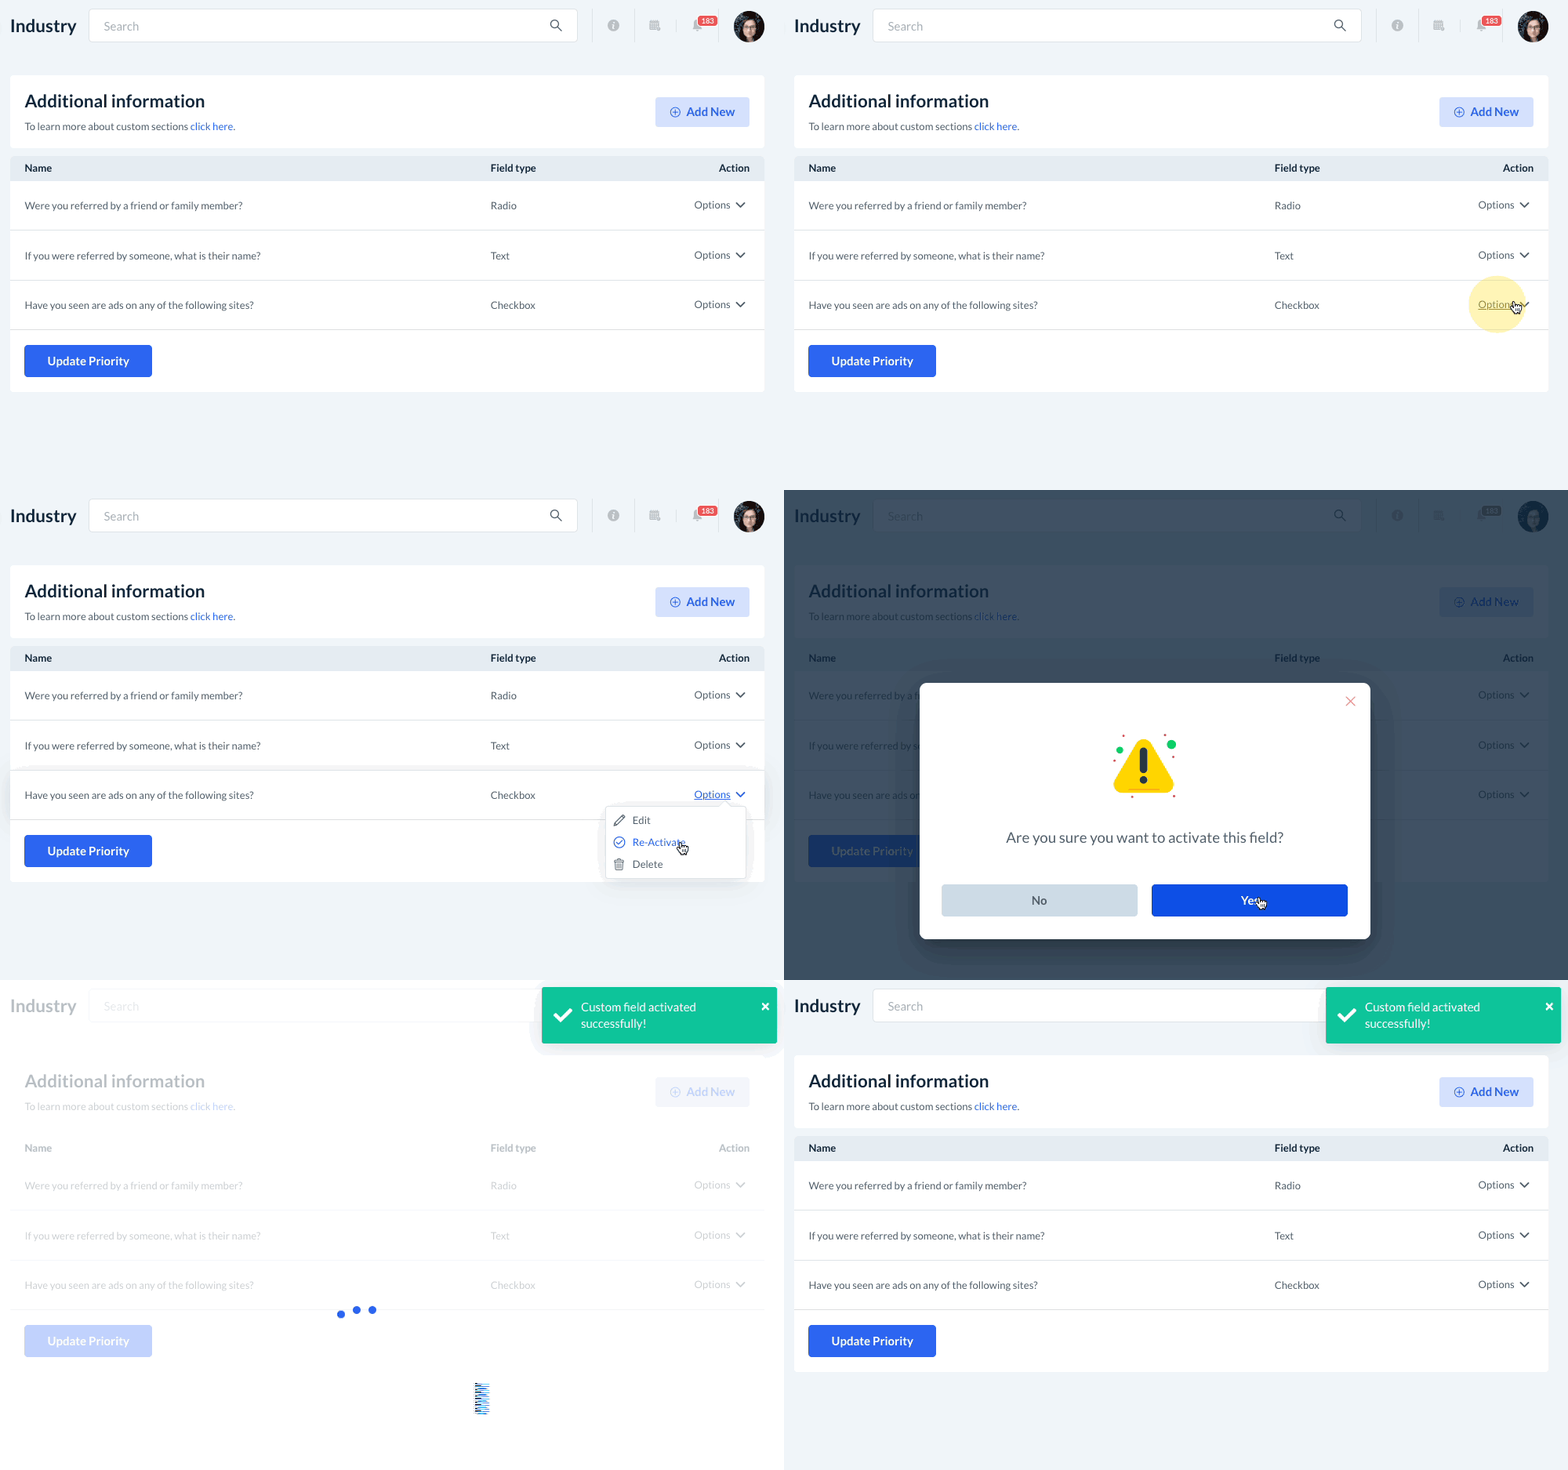
If you would ever like to start using a deactivated field again, you can easily reactivate it. Click on "Options" next to the field you would like to resume using and select "Re-Activate".
A pop-up window will ask if you are sure you want to reactivate this field. Click "Yes" to proceed.
A green system notification will appear in the top-right corner of the page, letting you know the field has been reactivated successfully. The field will now be displayed on your booking form again.
Delete Custom Sections and Fields
Custom Section
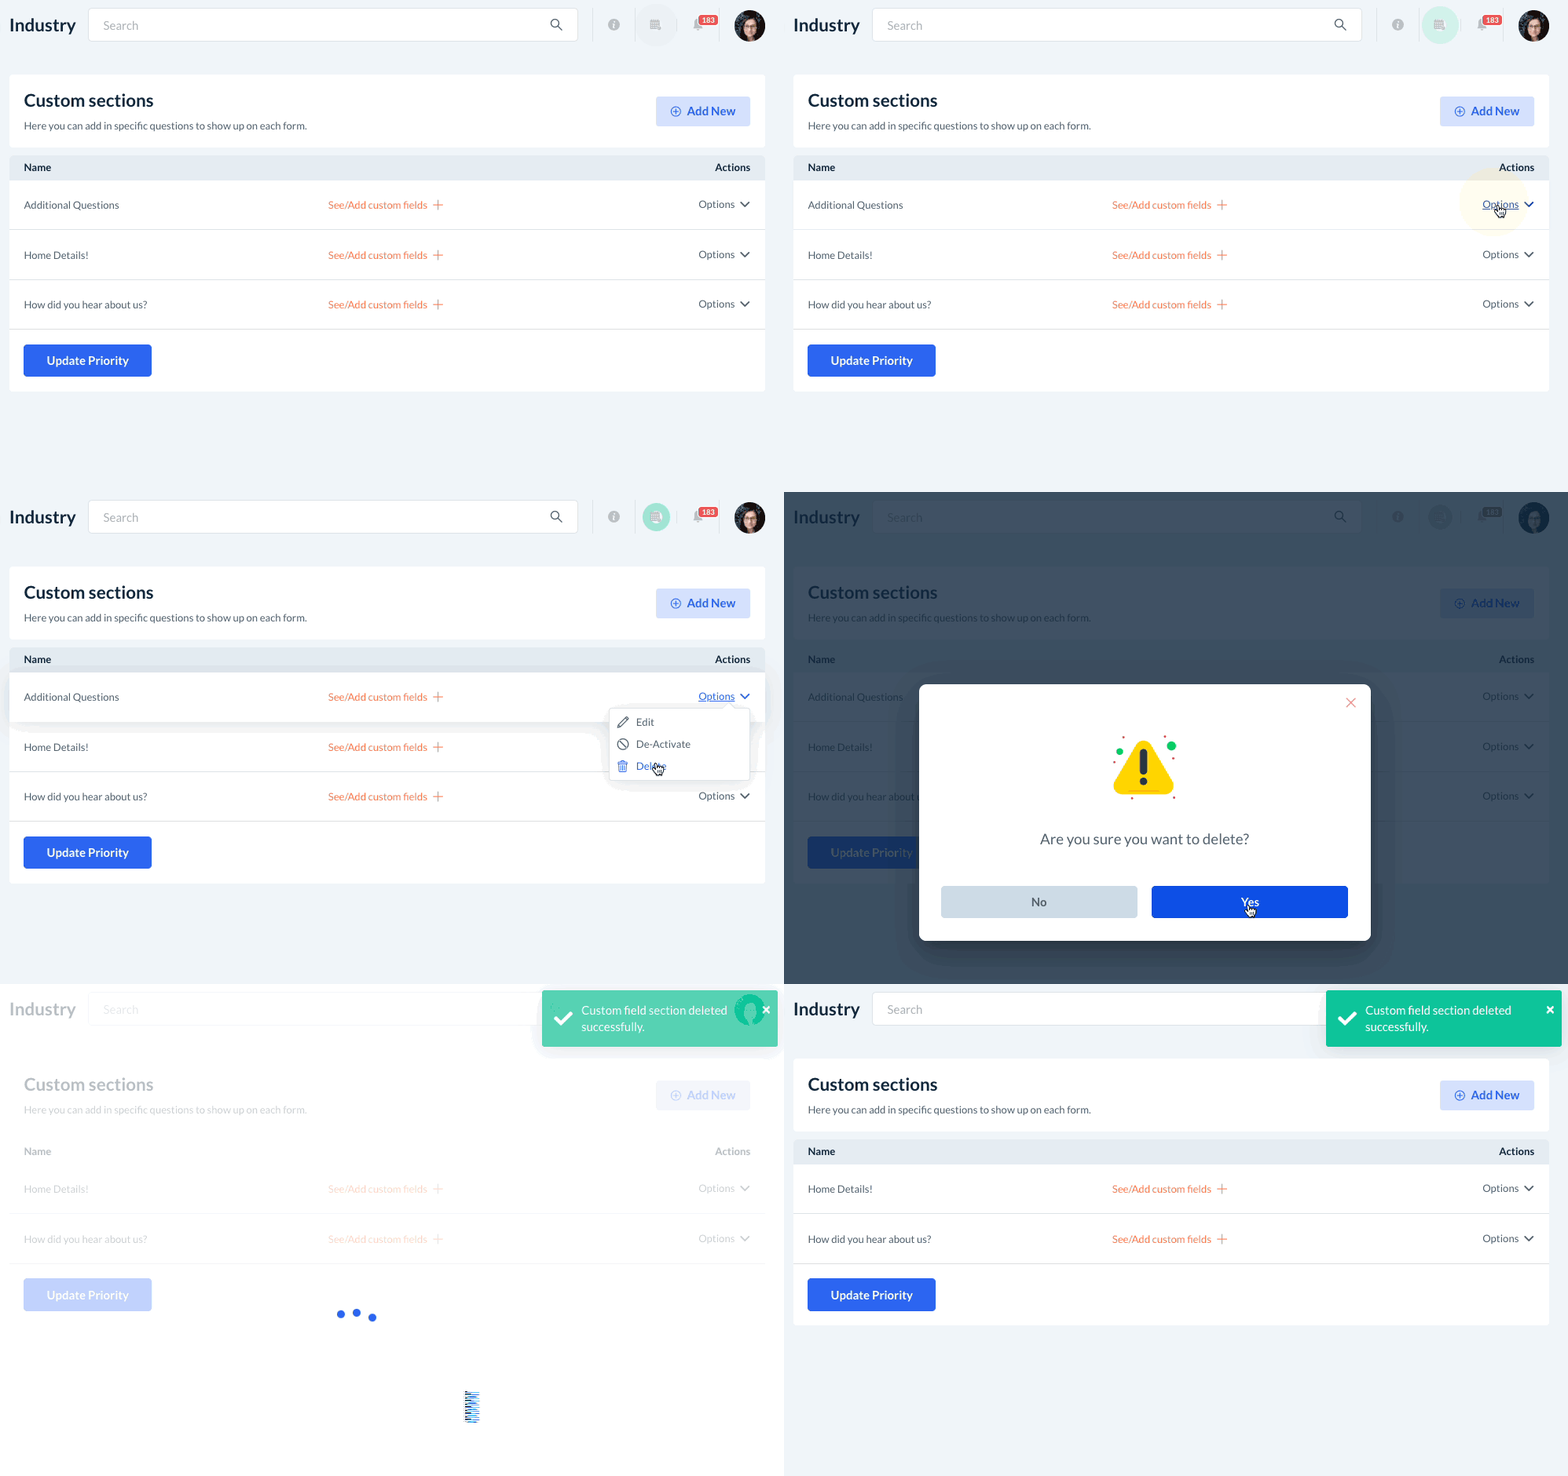
To delete a custom section, click on "Options" and select "Delete". A pop-up window will ask if you are sure you want to delete this field. Click "Yes" to proceed.
A green system notification will appear in the top-right corner of the page, letting you know the section has been successfully deleted.
Custom Field
To delete a custom field, click on the orange "See/Add custom fields" link. Then, click on "Options" and select "De-Activate". A pop-up window will ask if you are sure you want to deactivate this field. Click "Yes" to proceed.
A green system notification will appear in the top-right corner of the page, letting you know the field has been successfully deleted.

