The purpose of this article is to help you learn how to:
Create a PayPal/Braintree account
Flush out any test data
Connect PayPal as your payment processor
Creating a BrainTree account
First, you will have to create a BrainTree account, a service by PayPal.
For questions about setting up your Braintree account, please contact BrainTree Support for more information.
Flush Your Test Data
Next, if you haven't done so already, you will need to flush the test data out of the system. Every new BookingKoala account includes a few fake customers, providers, and bookings to better help you understand the system and test your settings. It is important to flush the test data before incorporating your payment processor, as any existing bookings with payment options may affect the accuracy of your revenue and earnings reports.
Click here to learn how to remove the test data from your account.
Find Your Paypal API Keys and Tokens
Click here to view a Braintree article on how to find and/or generate your PayPal/Braintree tokens. These will be used in the following step to link your account to BookingKoala.
Please note: Braintree allows you to use "test" details to test fake customer payments. If you would like to do this before connecting your account, make that you are in the "sandbox" to use test keys. When you are ready to start accepting real credit and debit card payments, switch to "production" to use your live keys instead.
Merchant ID
Log into the production Control Panel or the sandbox Control panel (depending on whether you are connecting a live account or a test account).
Click on the gear icon in the top right corner of the page.
Select "Business" from the dropdown menu.
Your merchant ID will be located at the top of this page. Copy the ID for future use.
Public Key
Log into the production Control Panel or the sandbox Control panel (depending on whether you are connecting a live account or a test account).
Click on the gear icon in the top right corner of the page.
Select "API" from the drop-down menu.
Scroll down to the "API Keys" section.
If you do not see any API keys, click the "Generate New API Key" button to create a new one. Once you've created this key, please copy it down to use during the connection process.
Private Key
Log into the production Control Panel or the sandbox Control panel (depending on whether you are connecting a live account or a test account).
Click on the gear icon in the top right corner of the page.
Select "API" from the drop-down menu.
Scroll down to the "API Keys" section.
Click the "View" link in the "Private Key" column. This will reveal your private key in the column on the next page. Copy the private key for later use but be careful not to share it with anyone else.
Tokenization Key
Log into the production Control Panel or the sandbox Control panel (depending on whether you are connecting a live account or a test account).
Click on the gear icon in the top right corner of the page.
Select "API" from the drop-down menu.
Scroll down to the "Tokenization Keys" section.
If you do not see tokenization keys, click the "Generate New Tokenization Key" button to create a new one. Once you've created this key, please copy it down to use for the connection process.
Connecting your BrainTree Account to BookingKoala
Once you have created your Braintree account and flushed any test data, you are now ready to connect the account to BookingKoala. To do this, you will need to capture and save all the necessary keys and tokens located in your Braintree account. To see which keys and tokens are required, please go to:
Settings > General > Store Options > Admin
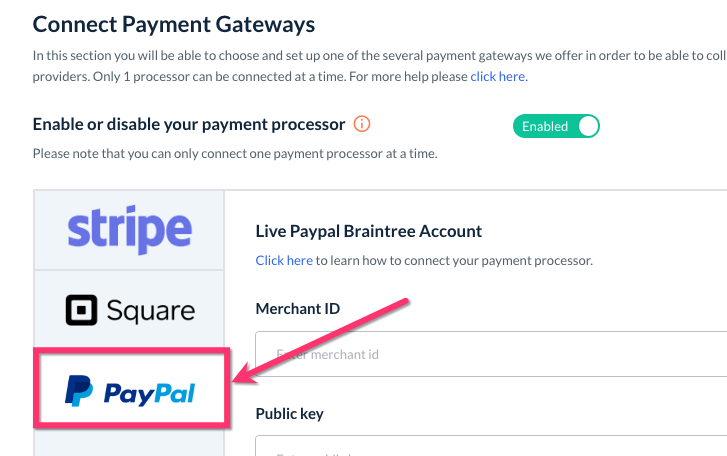
Scroll down to the "Connect Payment Gateways" section. To the right of "Enable or disable your payment processor" make sure the toggle button is set to "Enabled" (green). If it shows "Disabled", click the button and select "Yes" in the resulting pop-up window.

Next, click on Paypal on the left side of the page.
Here, paste your API keys and tokens into the corresponding boxes. Enter your merchant ID into the Merchant ID box, the public key into the Public Key box, the private key into the Private Key box, and the tokenization key into the Tokenization Key box.
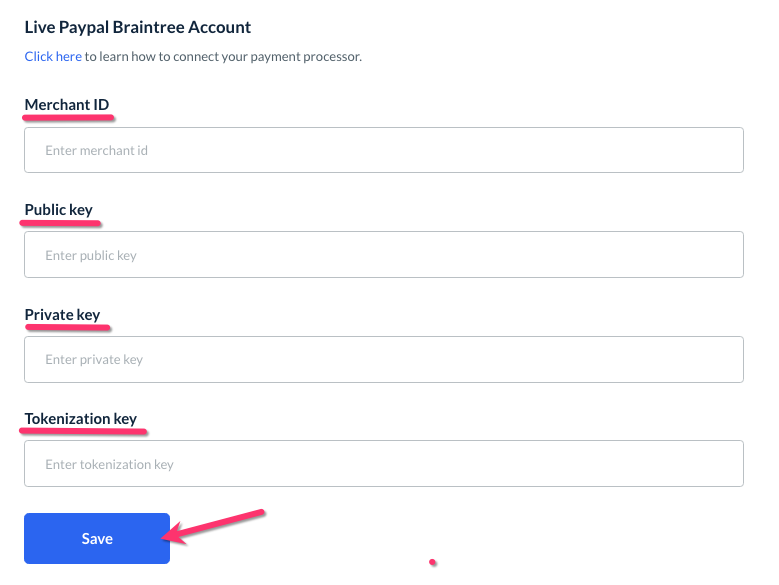
Once each key has been entered, click the blue "Save" button at the bottom of the page to connect your account.
Now that your BrainTree account is connected, you can begin accept credit and debit card payments from your customers. Each time a user is charged, that amount will be deposited into your BrainTree account.
From here you can decide which account funds will get deposited in. To connect your bank account(s) so funds will transfer from BrainTree to your desired bank account, please click here.
Linking Braintree to Multiple Locations
Unlike Square and Stripe, PayPal/BrainTree does NOT allow for multiple locations. This means you will nobe able to collect cards under different accounts per location. If this will be necessary for your business, we recommend using Stripe or Square instead.
Click here to learn how to create and connect a Stripe account.
Click here to learn how to create and connect a Square account.
Are you ready to start sending payments to providers?
Click here to visit our guide on connecting Paypal to send out provider payments and linking existing provider accounts for deposits.