The purpose of this article is to help you learn how to:
Create a new automated email campaign
What are automated campaigns?
Automated campaigns are SMS or email campaigns that are sent based on specific triggers. Typically, once your automated campaign is set up, no further action is required unless you want to turn it off.
Automated campaigns can be used in a variety of situations. For example, if a customer entered their email but left the booking page before checking out, you can create an automated campaign that is sent once every week until the customer returns to book a service.
Create an Automated Email Campaign
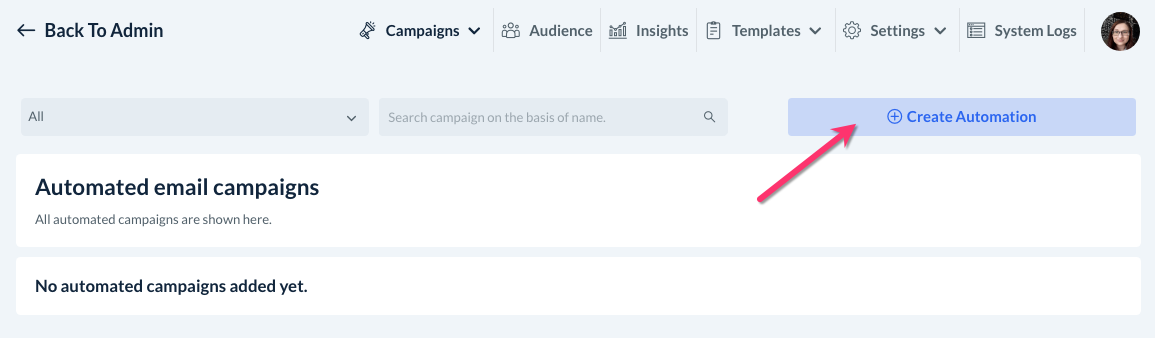
To begin, you will need to access the Marketing Module. From the left-side menu, click on:
Marketing > Campaigns
Click on the "Campaigns" drop-down menu at the top of the page and select "Email", then "Automated".
Click the blue "Create Automation" button in the top-right corner of the screen.
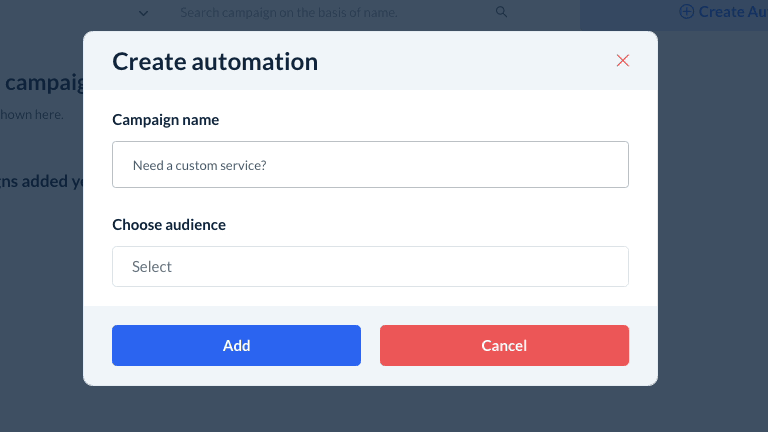
Enter the Campaign Name into the first box, and then select which Audience(s) you will connect to this campaign. Click here to learn how to create and edit audience lists. Click the blue "Add" button to generate the campaign.
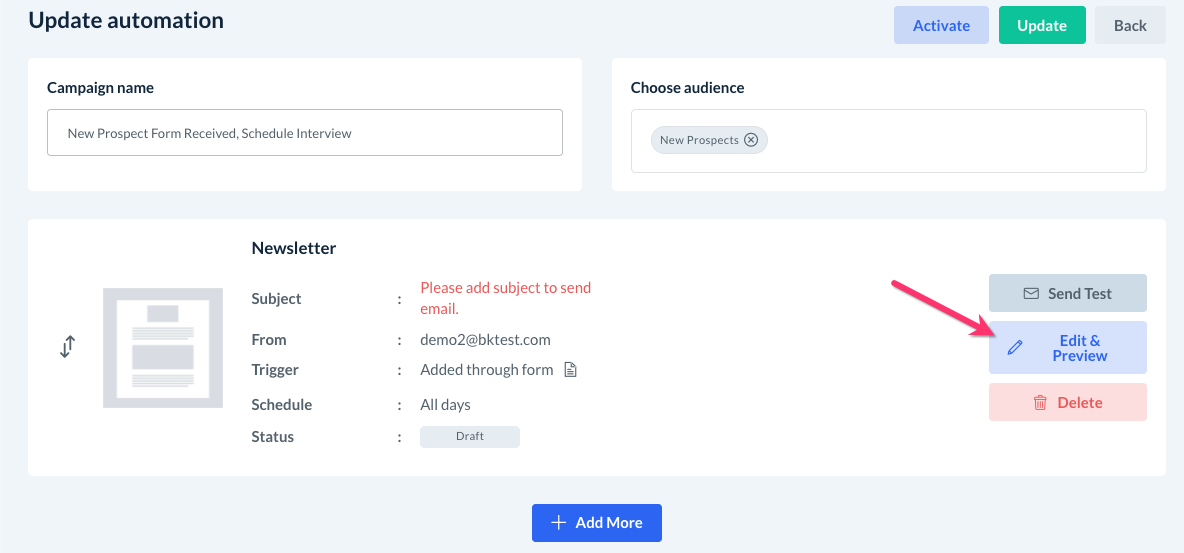
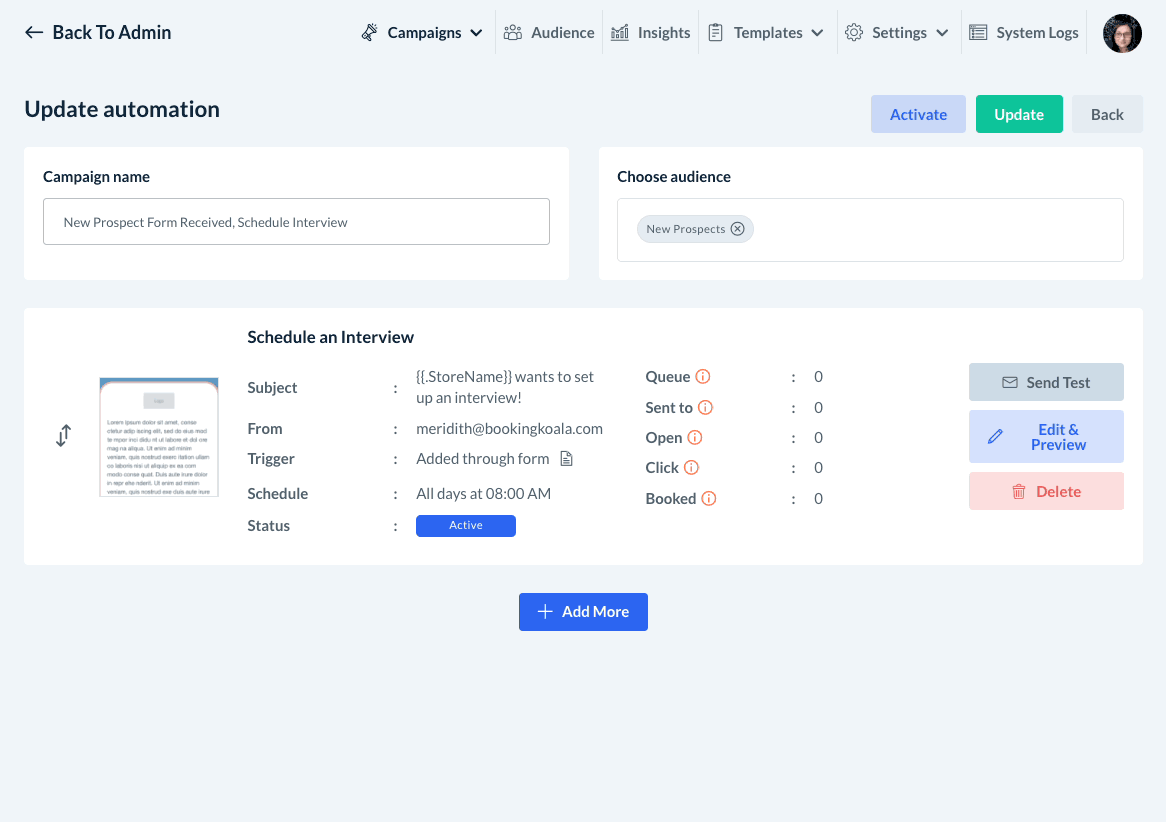
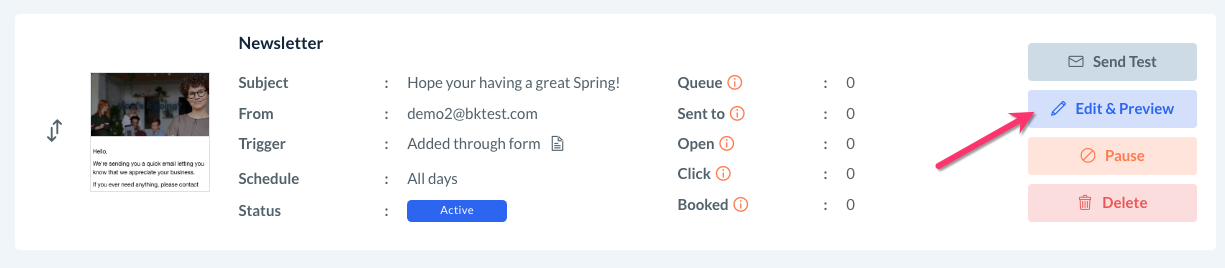
You will be brought to the "Update Automation" page. To begin setting up your automation triggers and email, click the blue "Edit & Preview" just below where it says "Send Test".
Basic Information
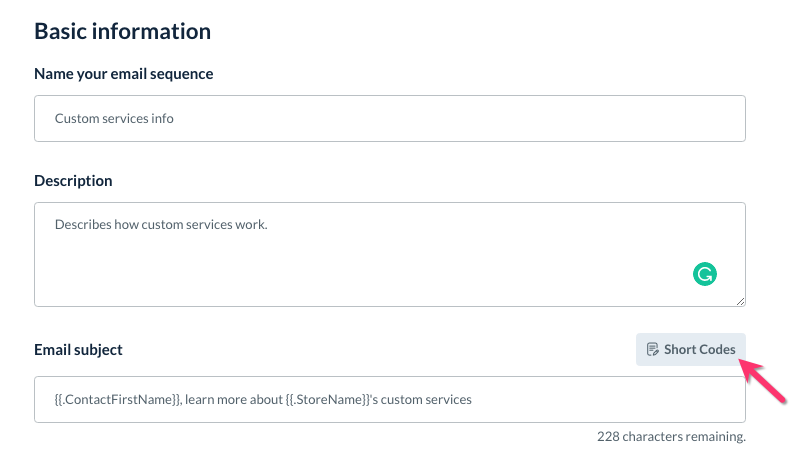
On the "Basic Information" page, enter a Name for your email sequence. This will only be seen by you. You can also add a Description for your own reference.
Next, enter the Email Subject into the box below. If you'd like, you can use shortcodes in the email subject to populate a field with custom information. You can insert any of these shortcodes by clicking the copy button and then pasting them into the Subject line.
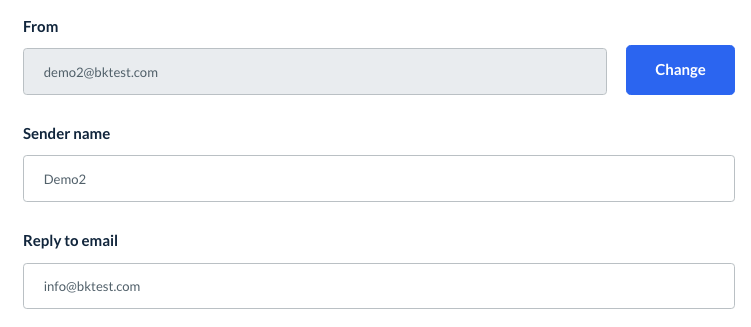
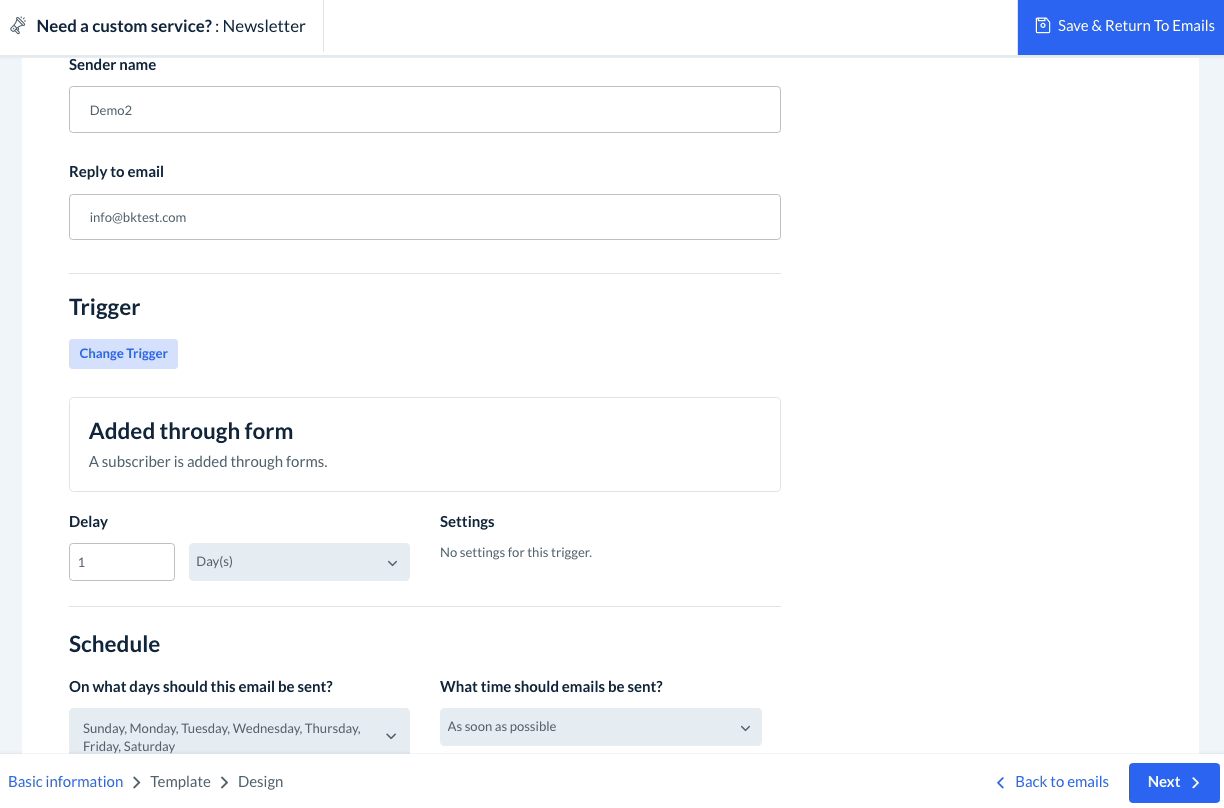
Below, confirm the "From" sender email. Click the blue "Change" button to use a different email address to send out this campaign email. You can also enter a "Sender Name" and list a separate "Reply-To" email if you desire.
Trigger
Next, select a Trigger for the campaign. Click the blue "Change Trigger" button to see a list of all possible triggers for this first campaign sequence.
The triggers you can select for your first email sequence are as follows:
Manual Add: A subscriber is manually added by the admin to an audience list.
Added Through Form: A subscriber is automatically added to an audience after completing a booking, lead, or hiring form.
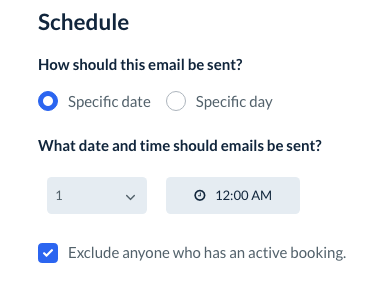
Monthly Recurring Campaign: The subscriber is sent the first sequence on a specific date every month.
When you select this trigger, you have the option of sending the email out on a specific day or date. If you'd like to exclude anyone with an active booking, check the box next to this option.
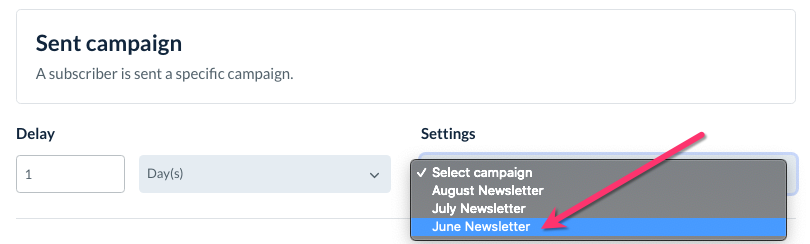
Sent Campaign: A subscriber is sent another specific campaign.
Under "Settings", select another campaign to trigger your automated campaign.
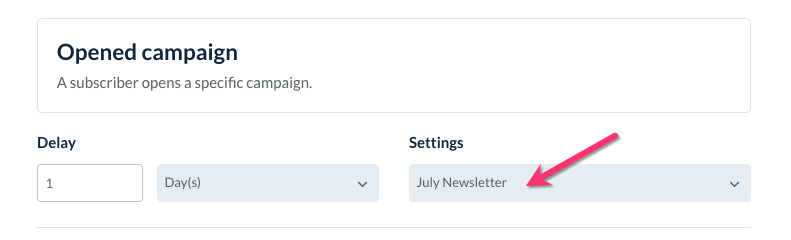
Opened Campaign: A subscriber opens another specific campaign.
Under "Settings", select another campaign to trigger your automated campaign.
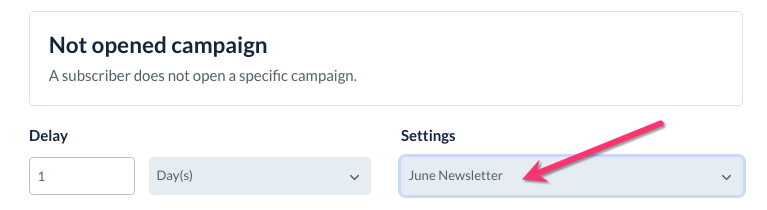
Not Opened Campaign: A subscriber does not open another specific campaign.
Under "Settings", select another campaign to trigger your automated campaign.
Clicked Campaign: A subscriber clicks any link in a specific campaign.
Under "Settings", select another campaign to trigger your automated campaign.
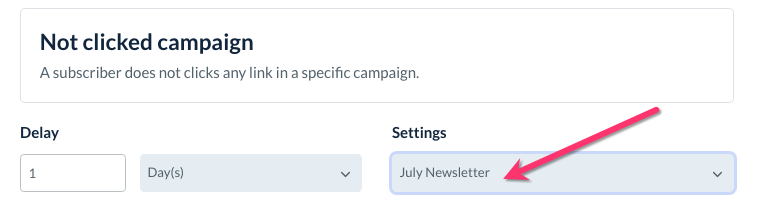
Not Clicked Campaign: A subscriber does not click any link in a specific campaign.
Under "Settings", select another campaign to trigger your automated campaign.

Later on, if you set up additional emails in your sequence, there are a few more triggers available:
Previous Email Sent: A subscriber is sent the previous email in this sequence.
Previous Email Opened: A subscriber opens the previous email in this sequence.
Previous Email Not Opened: A subscriber does not open the previous email in this sequence.
Previous Email Clicked: A subscriber clicks any link in the previous email in this sequence.
Previous Email Not Clicked: A subscriber does not click any link in the previous email in this sequence.
Most triggers have an option under "Delay". Click the grey drop-down box to select when you would like the campaign to be sent out.

Select "Immediately" for the campaign to be sent out to the customer or lead as soon as their email is added to the audience list.
Select "Hour(s)" to delay sending out the email by a set number of hours.
Select "Day(s)" to delay sending out the email by a set number of days.
Select "Week(s)" to delay sending out the email by a set number of weeks.
Most businesses will likely want the email to be sent immediately upon adding the lead to the audience.
Schedule
Next, select which days the email will be sent out. If you want the email to be sent whenever it had been added, select "Sunday, Monday, Tuesday, Wednesday, Thursday, Friday, Saturday".
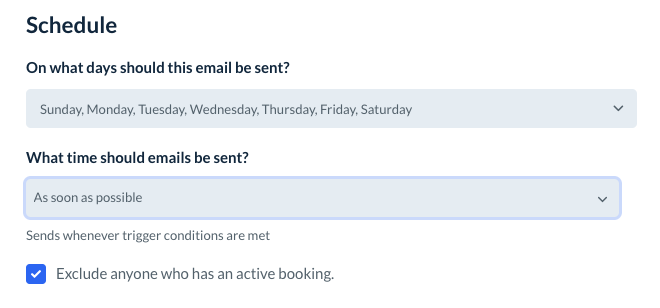
Under "What time should emails be sent?", you can select one of the following options:
"As soon as possible" - The system will send out the emails immediately.
"Send at" - The system will send the emails out starting at a specific time.
If you select this option, pick which time the system should start processing your campaign emails.
The checkbox next to "Exclude anyone who has an active booking" can be left checked or unchecked depending on your preference. If checked, any existing customers with active bookings will not be sent this campaign email.
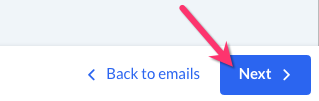
At the bottom of the page, click the blue "Next" button to proceed to the next section.
Choose Template
In the next section, choose a template for your email. Hover over each layout type and click the blue "Preview" to see an example of how it looks.
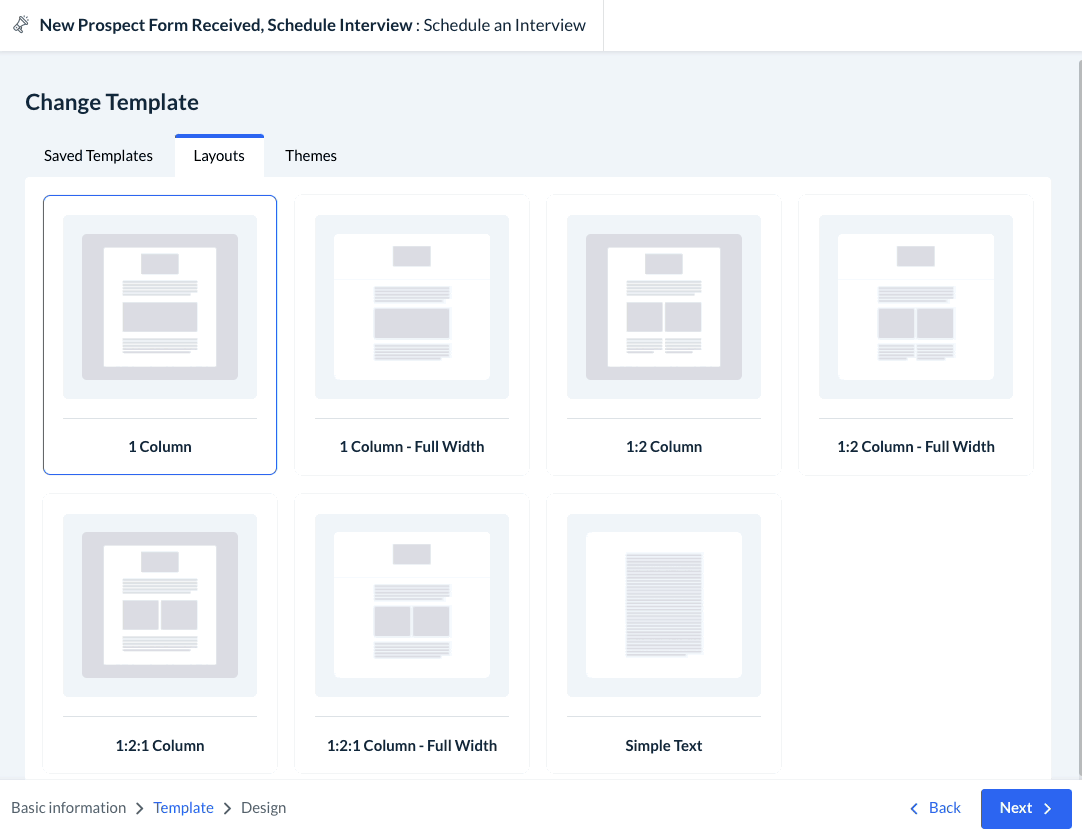
If you have created a master template, you can select it by clicking on the "Saved Templates" tab at the top of the page.
Once you have selected which template or layout you'd like to use, click the blue "Next" button at the bottom right of the screen.
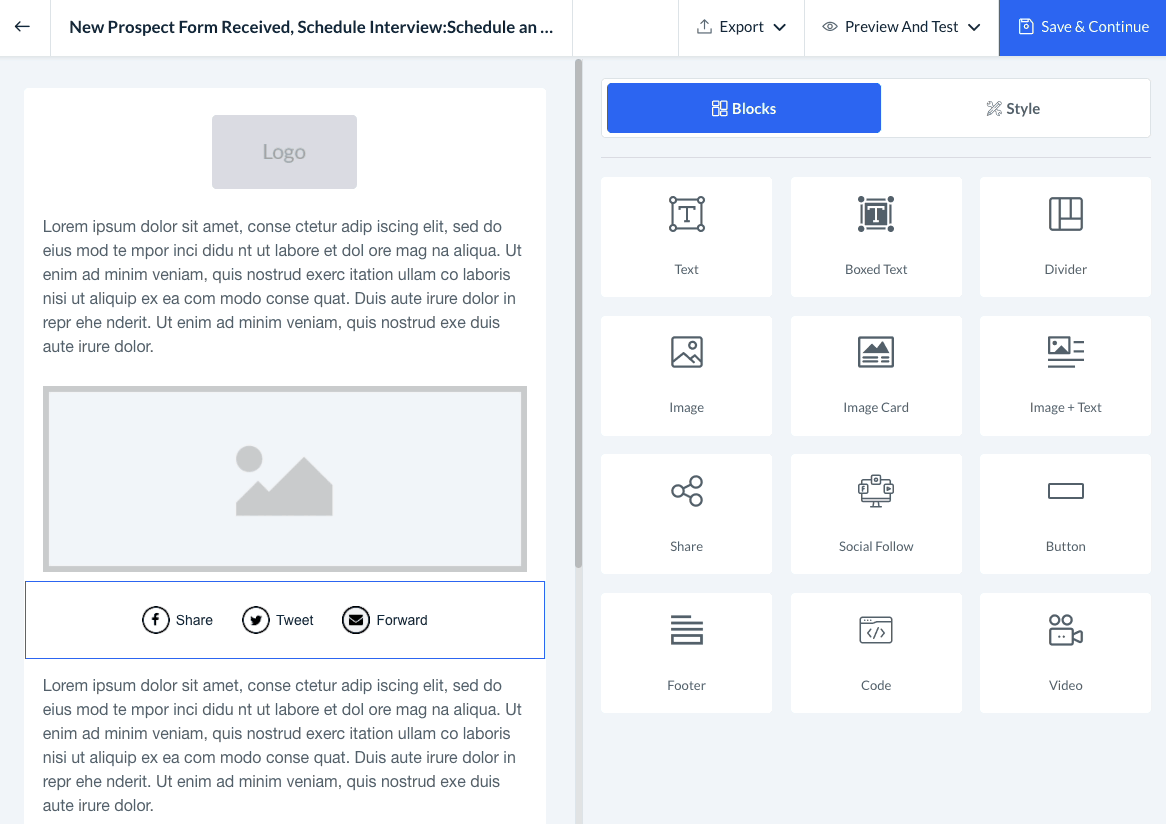
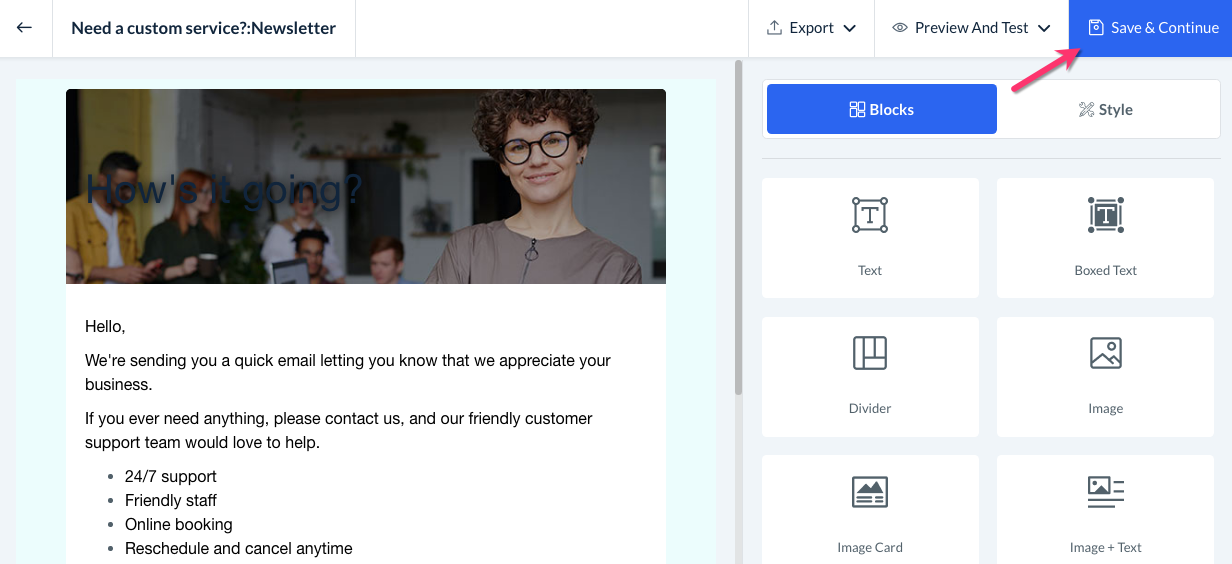
Email Editor
In this section, you can edit the content of your campaign email.
Drag and drop blocks into the body of the email to insert different types of elements including text, boxed text, dividers, images, image cards, image + text, share bar, social follow, button, footer, custom code, and video.
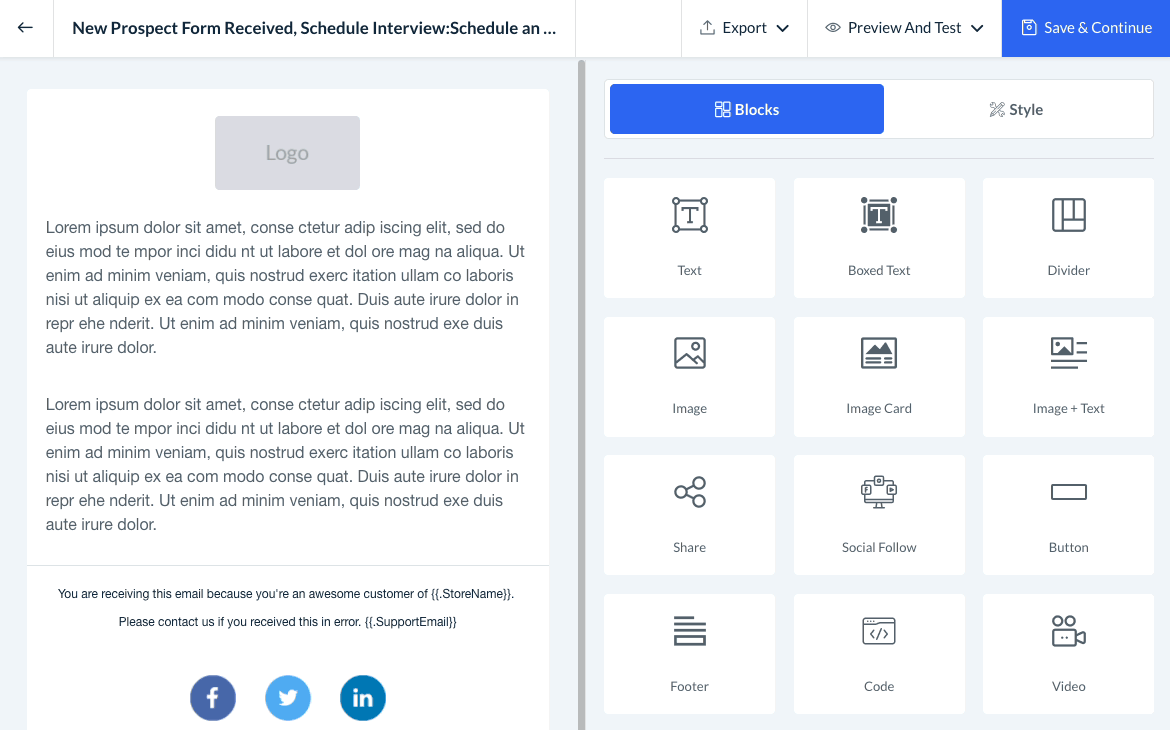
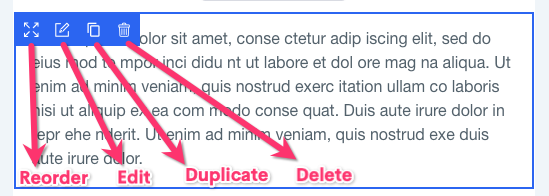
Click/hover over on any block in the email body to view its action buttons.
Switch into the "Style" tab to control the font size, color, and general appearance of your email's sections.
Final Steps
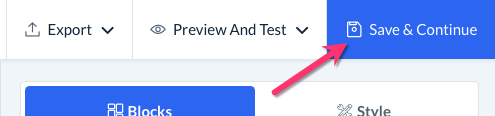
Once you are done creating the campaign email, click the blue "Save and Continue" button at the top right side of the screen. Your campaign will be saved and you will be brought back to the Update Automation page.
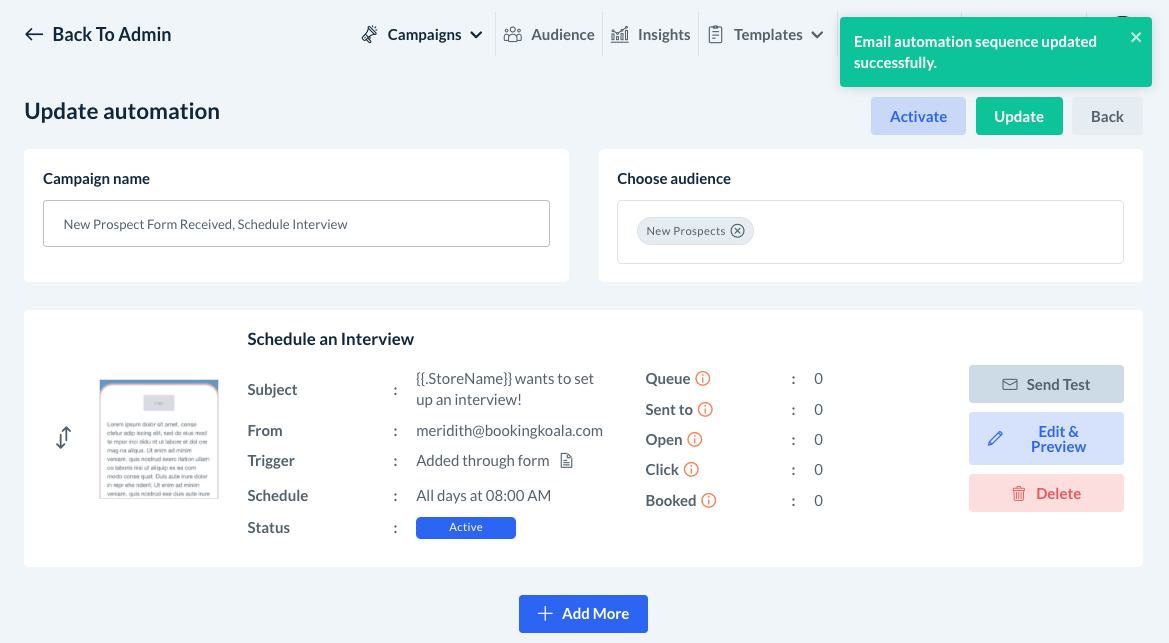
If you finished all of the setup steps, the status for the campaign will say "Active". This means that this segment of the campaign is ready to be sent out once it has been activated.
Adding Additional Emails
You can add additional campaign emails to any sequence by clicking the blue "Add More" button below your first email.
If you need to save your work before finishing a new sequence, click the blue "Save & Return to Emails" button at the top right corner of the page and this will save the sequence as a draft.
Export
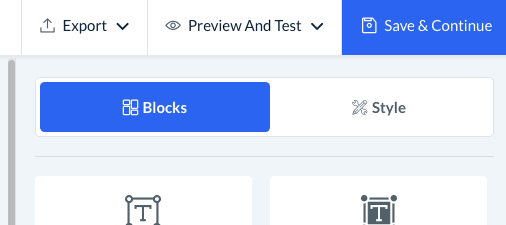
If you would like to export your template, click the white "Export" button at the top right side of the page.
Choose "Export As HTML" to export the template as an HTML file. The file will begin to download automatically.
Choose "Export Template" if you'd like to export the template as a JSON file. The file will begin to download automatically.
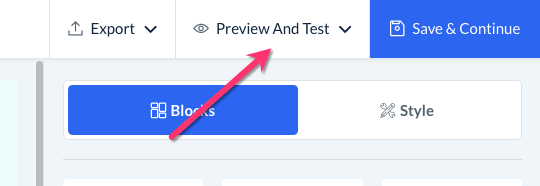
Preview and Test
Once you are finished formatting the email, you can click the white "Preview And Test" button at the top right corner of the page.
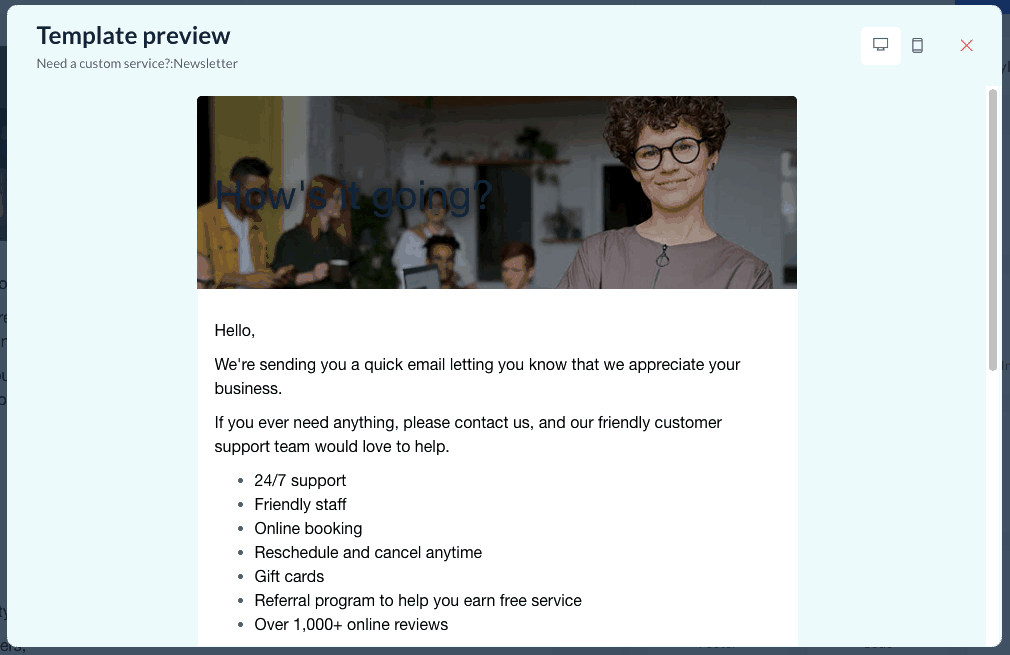
Select "Enter Preview Mode" to preview your email for desktop and mobile devices. Click the red X icon in the top right corner of the box to exit the preview pop-up.
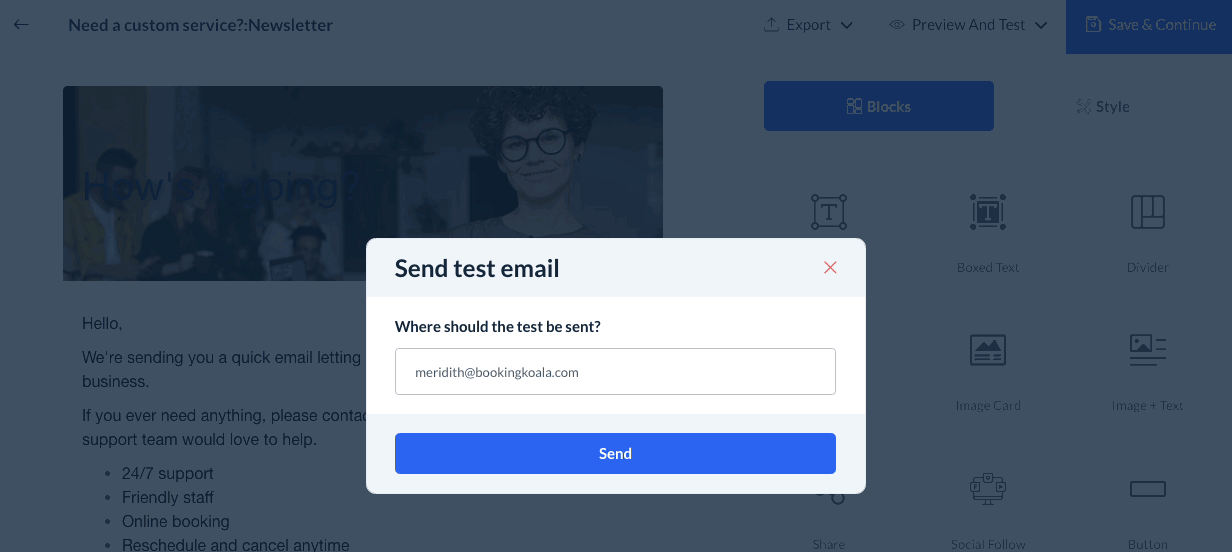
Select "Send Test Email" to email the template to yourself or another interested party. Enter the email address into the box and then click the blue "Send" button. If successful, you will see a green system alert in the top right corner letting you know the test email has been sent.
If you receive a red error message, the email address you entered has not been verified in the Campaign Module. Once you've saved your draft, go back to the campaign dashboard and select Settings > Notifications.
Scroll down to the "Default Send Out Email" and click the blue "Change" button.
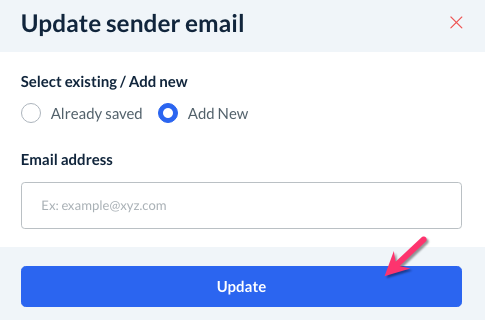
A pop-up window will appear. If you have verified other email addresses in your BookingKoala account, you can select "Already Saved" to switch to an existing sender email and click "Update".
If you need to add a new email address, select "Add New" and enter the email into the box below. Click the blue "Update" button to proceed.
A green system notification will appear in the top right corner letting you know a verification email has been sent to the new email address. Visit your inbox and complete the process by clicking the link in the email.
Click here for more detailed instructions on how to verify sender email addresses,

Save and Activate Your Campaign
Once you have finished building your full campaign sequence, you save it as a draft or activate it right away.
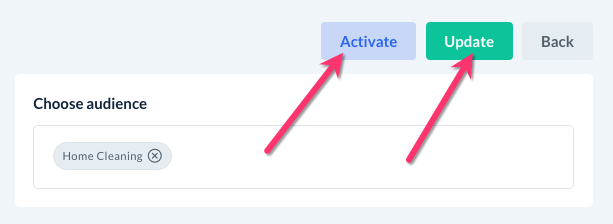
First, click the blue "Save & Continue" button in the top-right corner of the page.
You will be redirected to an "Update Automation" page. Click the light blue "Activate" button to activate the campaign, or select the green "Update" button to save it as a draft.
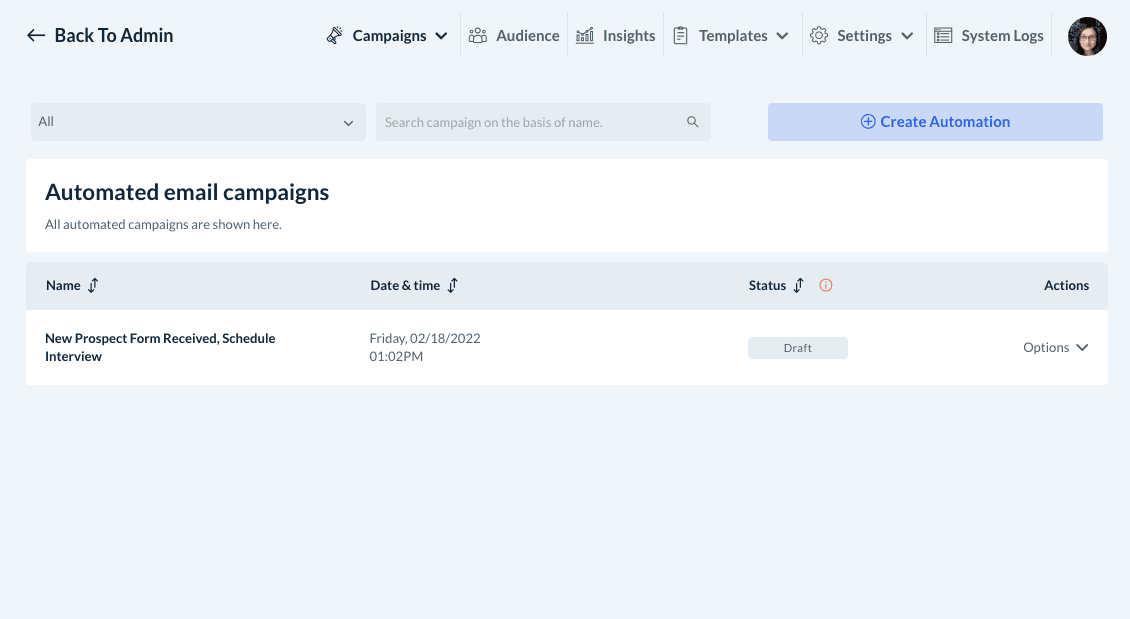
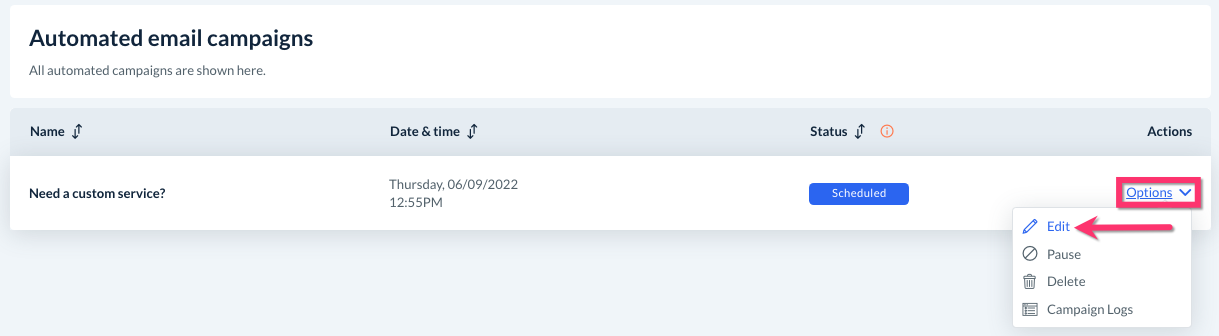
If you have saved the campaign as a draft, you can activate it later on from the Automated Email Campaigns list. Inside the Campaign Module, go to:
Campaigns > Email > Automated
Under the "Actions" column on the right, click "Options", then "Activate". A pop-up window will ask if you are sure you want to activate this campaign. Click "Yes" to proceed.
A green system notification will appear in the top right corner of the page letting you know the campaign has been activated successfully.
Your campaign is live and will send out your campaign email(s) once triggered!
Additional Actions
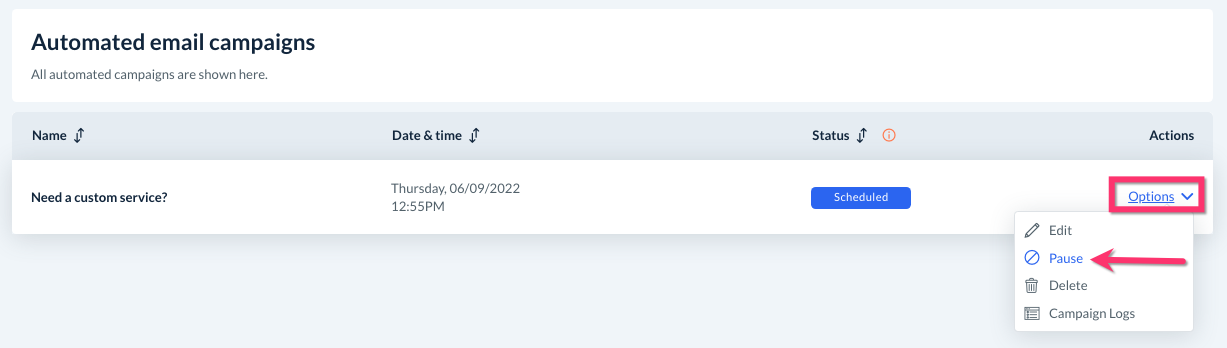
Once you've activated your campaign, it will continue operating based on the triggers you have selected during the creation process. However, there may be times when you'd like to edit, pause, or even delete an email sequence or the entire campaign. All of these actions can be completed in the Campaign Module by going to:
Campaigns > Email > Automated
Pausing a Campaign or Campaign Sequence
If you need to pause the entire campaign for any reason, select "Options" under the "Actions" column and click "Pause".
A pop-up window will appear, asking if you are sure you want to pause this campaign. Click the blue "Yes" button to proceed. This will stop all segments from being sent out until the campaign is resumed.
To resume the campaign, select "Options" and click on "Resume".
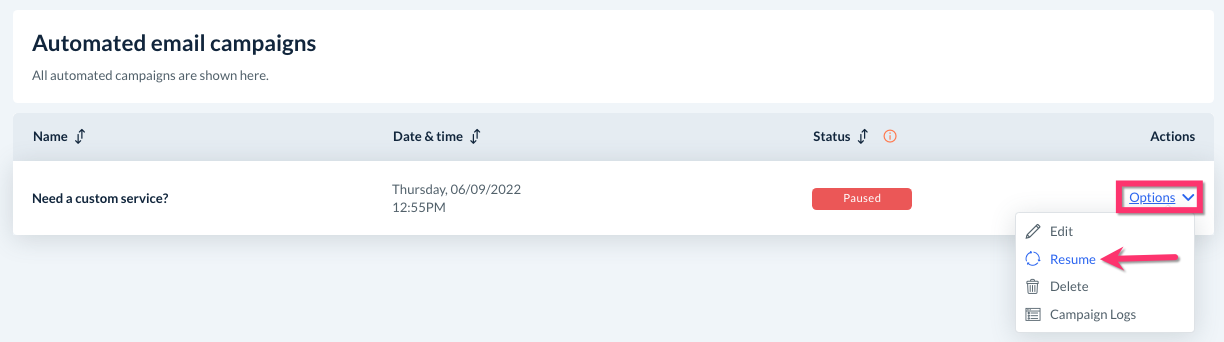
Again, a pop-up window will appear asking if you are sure you want to resume the campaign. Click the blue "Yes" button to resume the entire campaign.
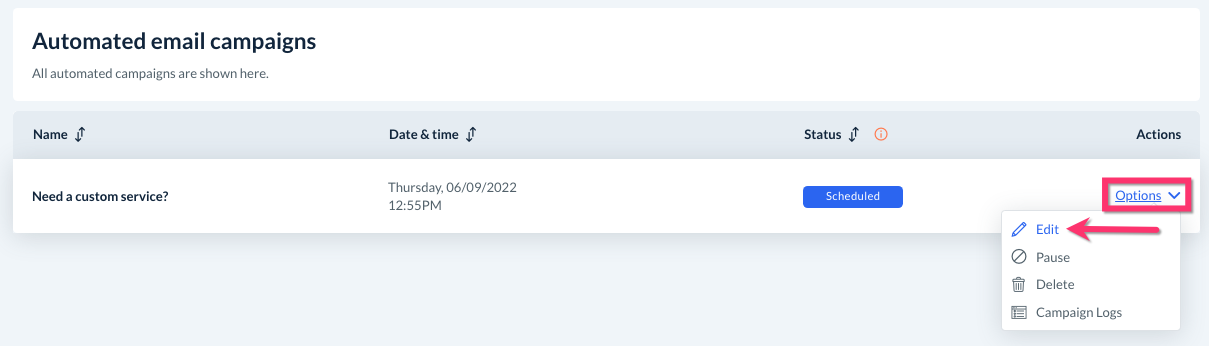
If you would like to pause a specific sequence in your SMS campaign, select "Options" then "Edit" to open the "Update Automation" page.
From here, locate the sequence you would like to pause and click the orange "Pause" button.
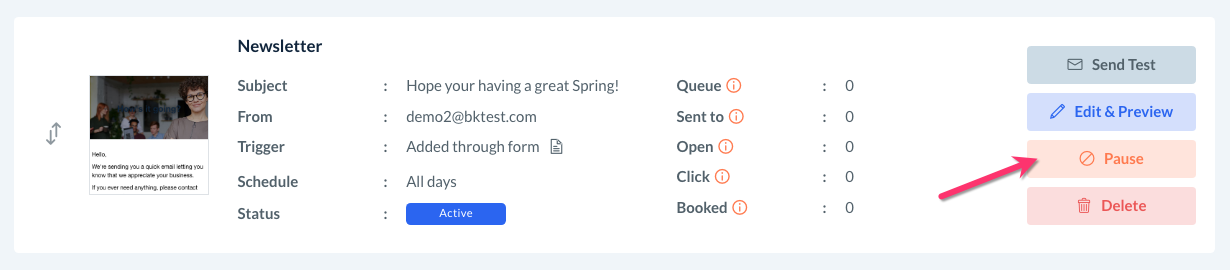
A pop-up window will appear, asking if you are sure you want to pause this segment. Click the blue "Yes" button to proceed. This will stop that particular segment from being sent out until it has been resumed.
Once you are ready to resume the sequence, simply click the orange "Resume" button and click "Yes" in the following pop-up to proceed.

Editing an Active Campaign or Campaign Sequence
To edit an SMS campaign that has already been activated, you will first need to Pause the campaign (or segment) you would like to update by going to Campaigns > SMS. Automated.
Next, select "Options" and click "Edit" to open the "Update Automation" page.

When you have paused the entire campaign, this allows you to add new messages to the sequence using the blue "Add More" button.
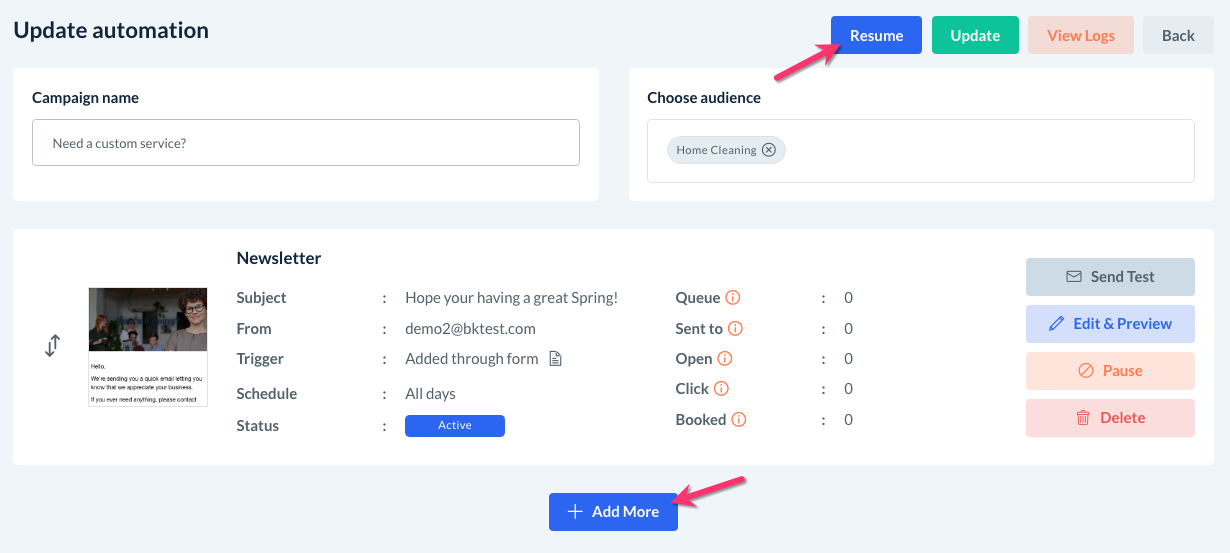
Once you are finished adding sequences, click the blue "Resume" button at the top of the page. A pop-up window will ask if you are sure you are ready to resume the campaign. Click the blue "Yes" button to proceed.
You do not need to pause the campaign or a sequence to edit it. Simply click the blue "Edit & Preview" button next to the campaign segment.
Once you are finished making any changes, be sure to click the blue "Save & Return To Emails" button at the top right side of the page.
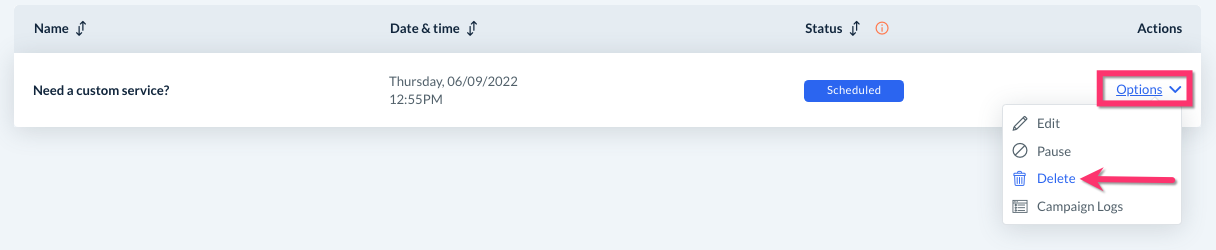
Deleting a Campaign or Campaign Sequence
To delete an entire SMS campaign, go to the Campaigns > SMS > Automated. Select "Options", then "Delete".
A pop-up will ask if you are sure you want to delete this campaign. This means you will no longer be able to access this campaign or its logs again. If you are sure, click the blue "Yes" button to proceed.
If you would like to delete a specific sequence in your SMS campaign, select "Options" then "Edit" to open the "Update Automation" page.
From here, locate the sequence you would like to pause and click the red "Delete" button.
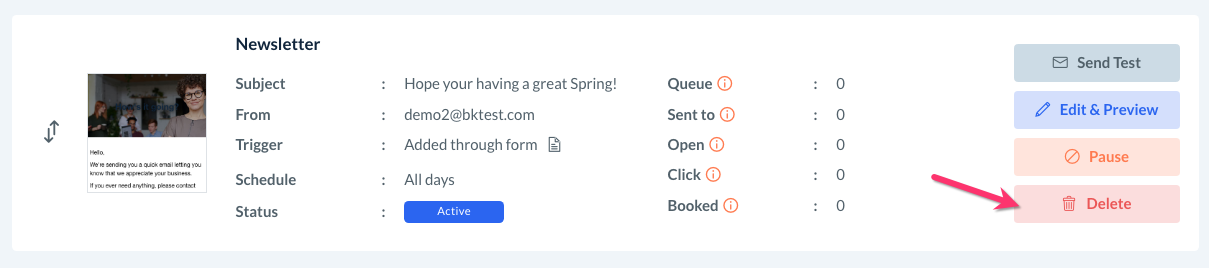
A pop-up window will appear, asking if you are sure you want to delete this segment. Once deleted, you will not be able to retrieve or reactivate this segment. If you are sure, click the blue "Yes" button to proceed.