The purpose of this article is to help you learn how to:
Create a new booking or recurring service for a customer
Select services and see the booking price
Override the booking time, service total, and/or price
Assign a provider or team to a booking
Save a booking to the waitlist/unassigned folder
Add the customer's details to the form
Select an existing or add a new payment method
Save a booking to the calendar
Save a booking as a draft or quote
How to Add a Booking
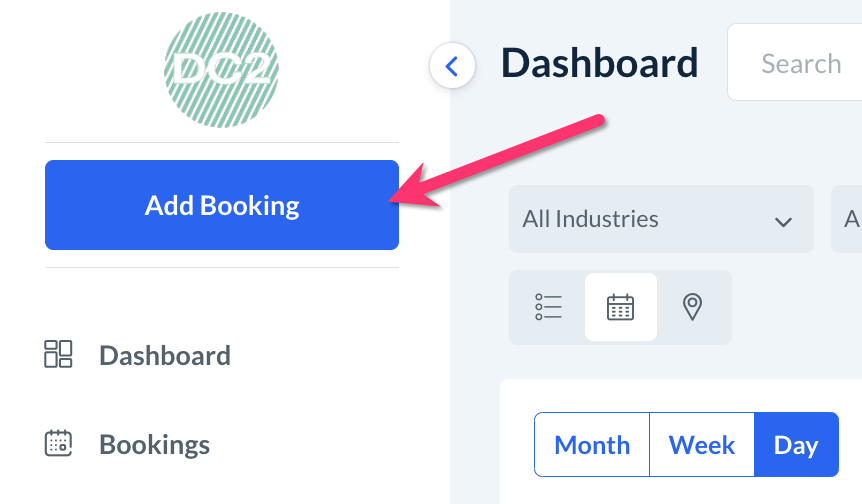
If you are ready to create a new booking for a customer, there are a few places where you can locate the "Add Booking" button.
There is an "Add Booking" button at the top of the left-side menu when logged into the admin or staff dashboard. Click here to learn how admin and staff can log in to access their dashboards.
If your account has multiple industries, a drop-down menu will allow you to select which industry to create a booking for.
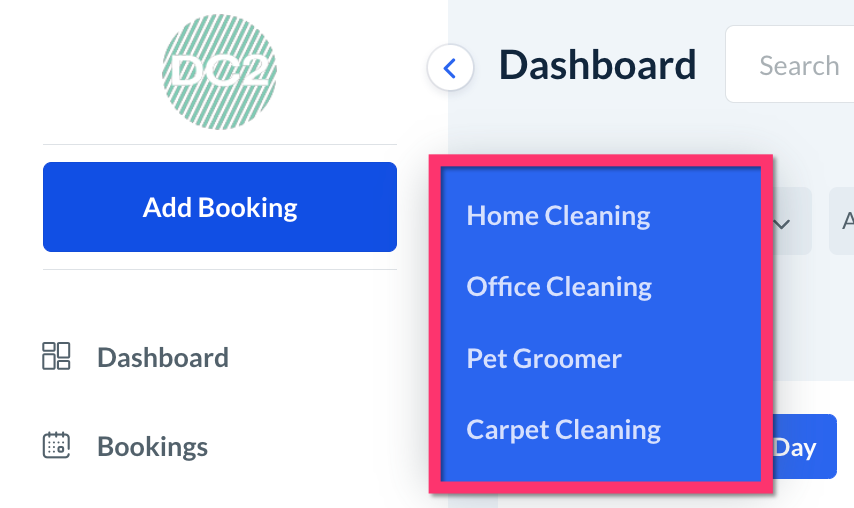
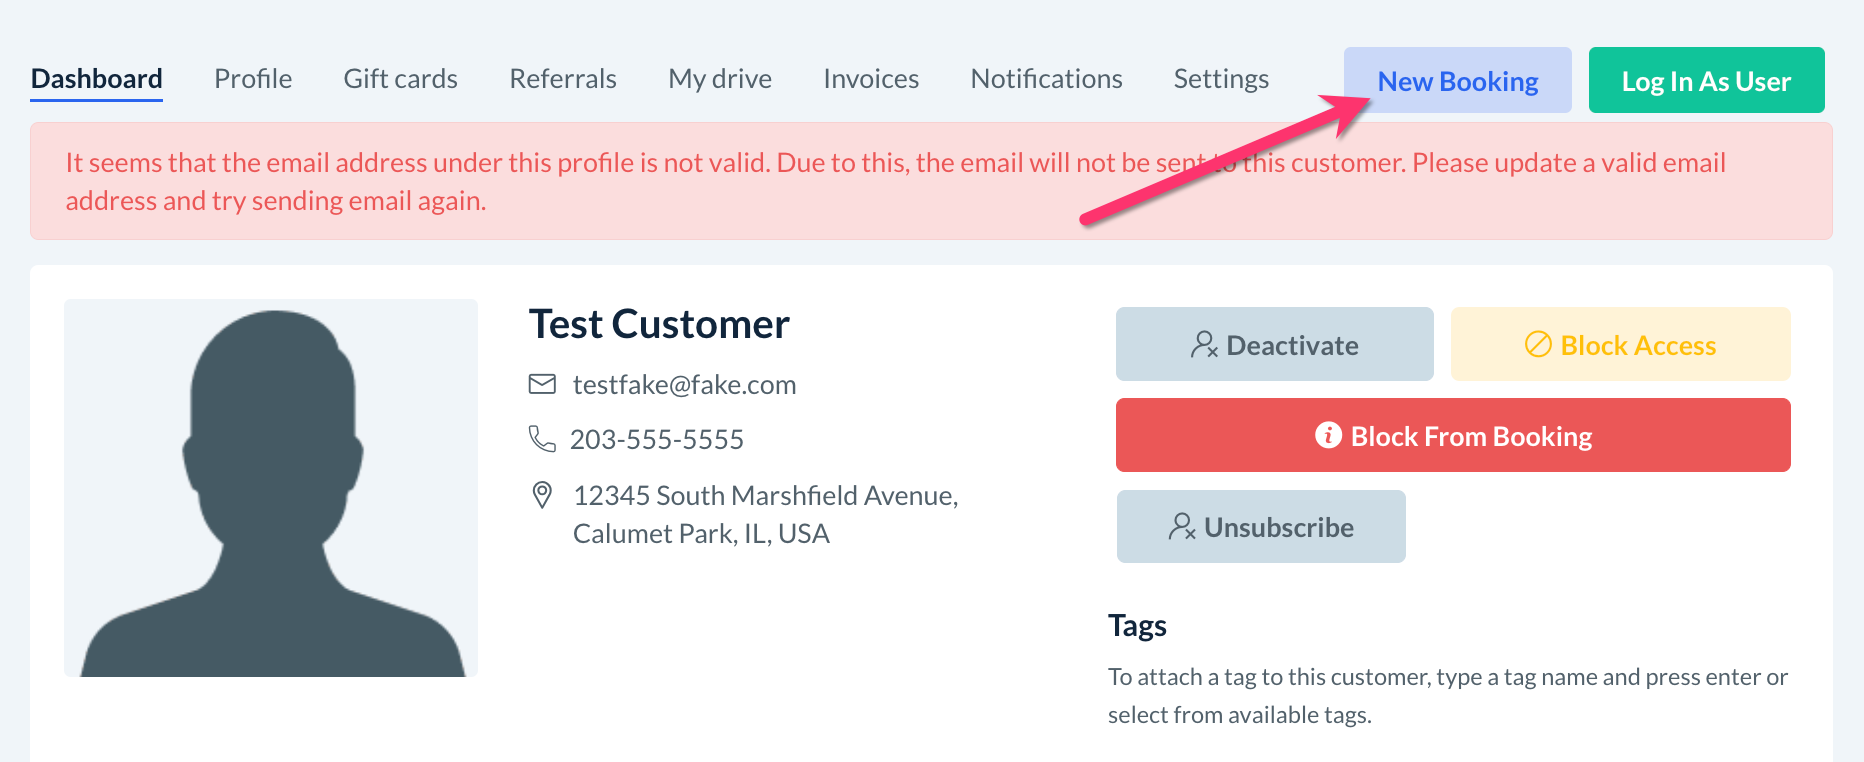
There is also an "Add Booking" button located at the top of the customer's dashboard.
If there is a combination of multiple forms, the pre-qualifying question(s) will be located at the top of the form.
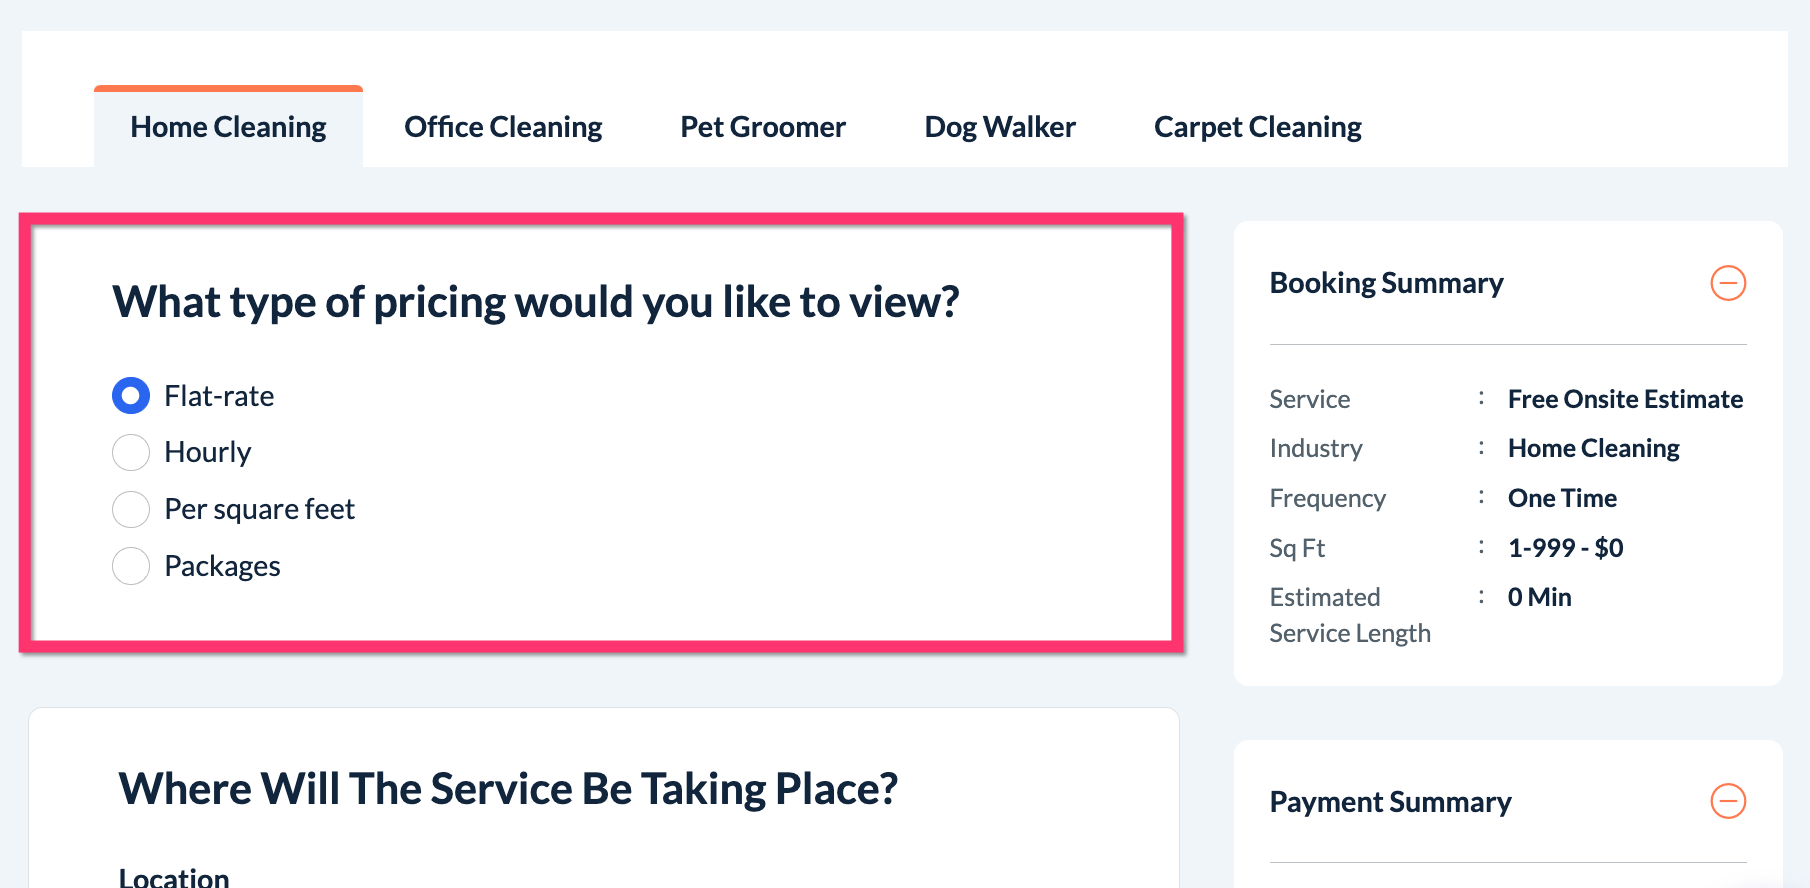
As the form is filled out, the Booking Summary and Payment Summary will be updated to show the selected services and pricing details.

The customer details section will be close to the top of the admin-facing form to quickly look up existing customers as needed using the "Existing Customer" option. Otherwise, the default will be set to "New Customer" where you can enter the customer's first name, last name, and email address when ready.
Override the Booking Time, Service Total, and Price
Scroll down until you see the "Booking Adjustments" section. This is normally located just above the "Choose Service Provider"/"Assigned To" section where you select the provider, date, and time.
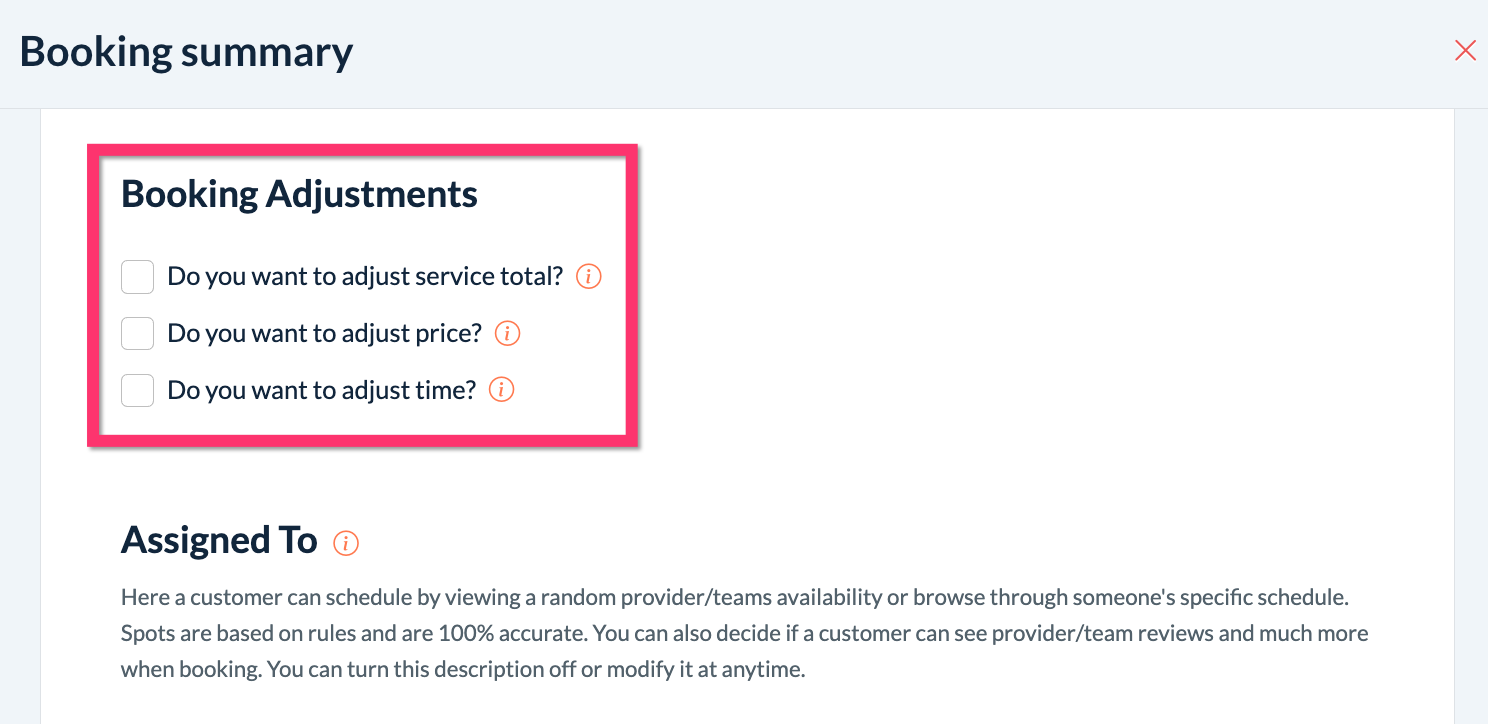
To override the automated pricing for this job BEFORE taxes, coupons, or discounts, check the box next to "Do you want to adjust service total?" Then, enter the new price into the field below.
In the Payment Summary box on the upper right side or bottom of the booking form, you will see the service total has been adjusted.

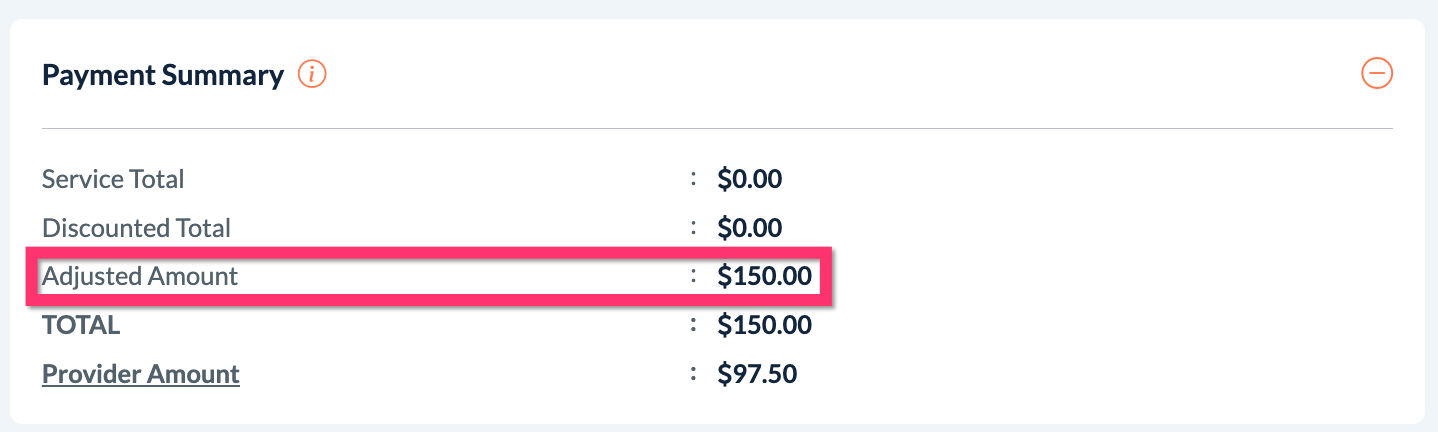
To override the automated pricing for this job BEFORE taxes but AFTER coupons or discounts, check the box next to "Do you want to adjust price?" Then, enter the new price into the field below.
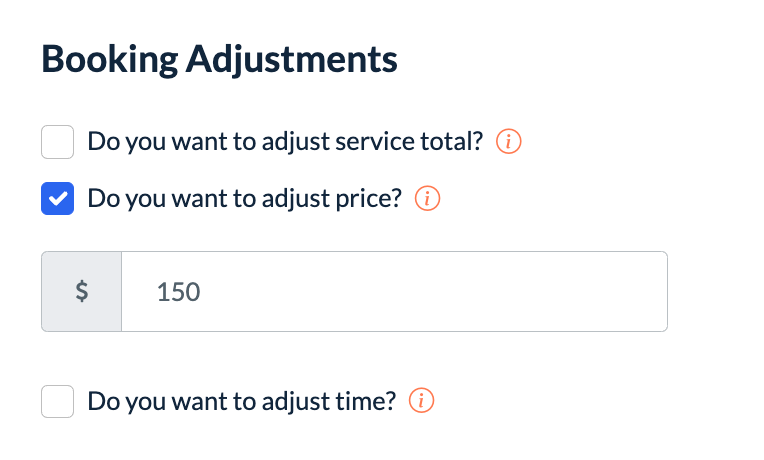
On the Payment Summary box on the upper right side or bottom of the booking form, you will see a new line for the adjusted total.
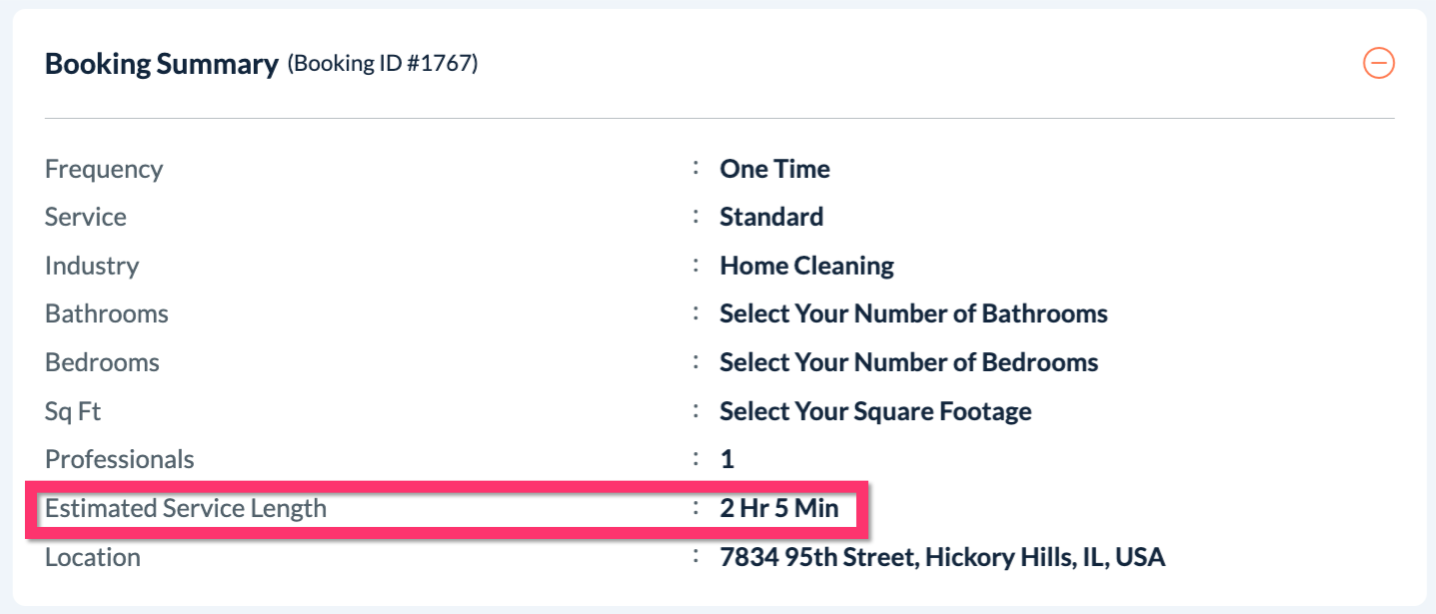
Below the price adjustment option, there is another option for “Do you want to adjust time?” Check this box to override the booking's estimated length of time.
The Booking Summary on the top right corner of the page will automatically reflect whatever time is entered into the hours and minutes boxes.
Assign a Provider or Team to a Booking
Scroll down to the "Choose Service Provider" section to assign a provider or team to a booking.
From Schedule Bookings
The first option is to check the schedule based on your availability as set up under Settings > General > Store Options > Scheduling tab and Settings > Booking Spots > Maximum Settings. This option is called "From Schedule". When selected, click on the date field to select an available date and time from your booking spots.
Whether or not an available provider or team is selected depends upon your answer to the scheduling setting, "Would you like to select the provider manually or automatically?".
If "Automatically" is selected, the system selects a provider based on the priority order as dictated under Providers > Providers > Set Priority button.
If "Manually" is selected, you will have an "Assign Provider" button to select a team or provider for the booking.
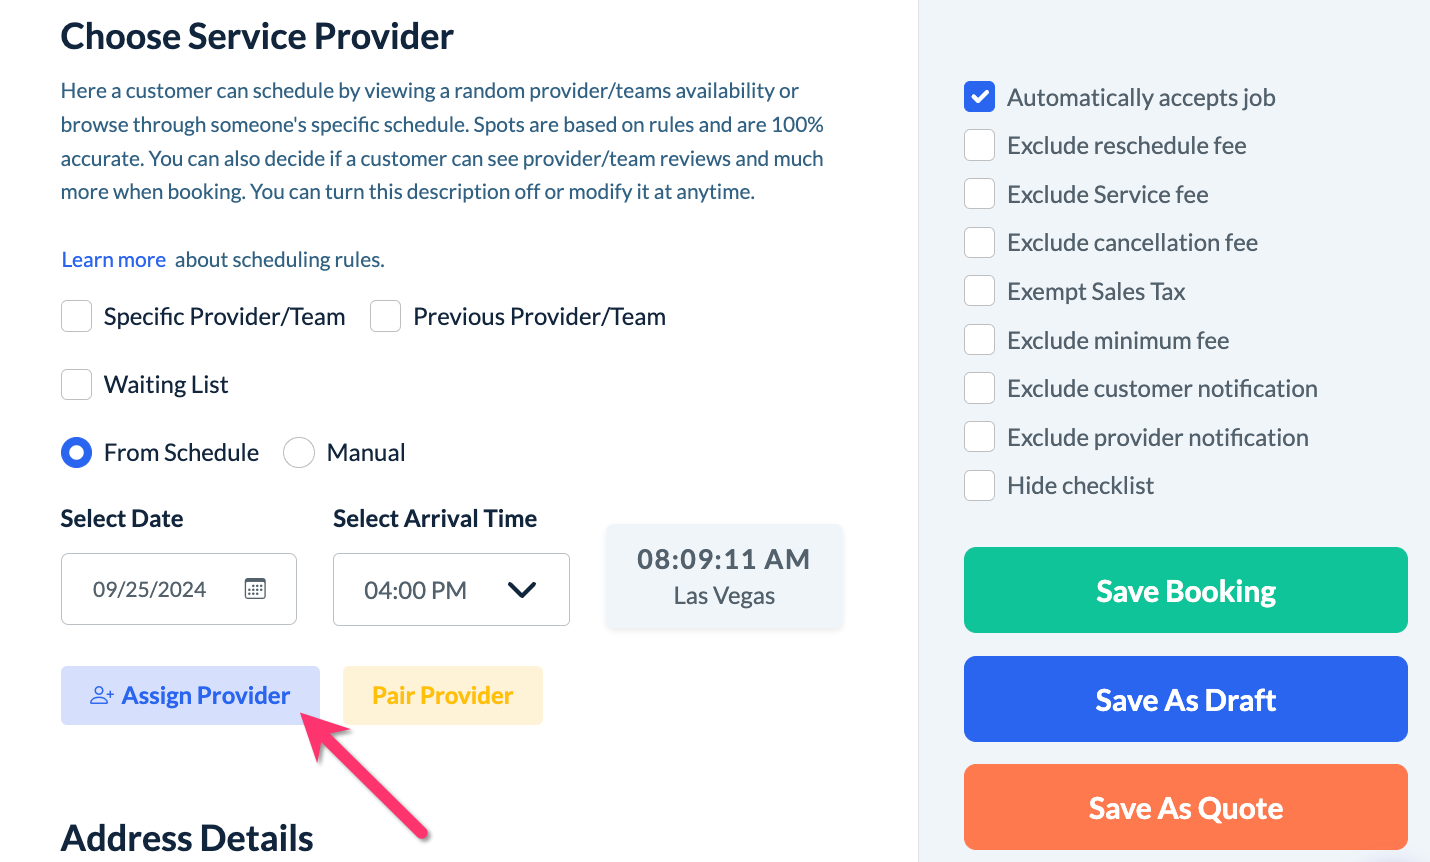
If you've selected an individual provider, you may see an option to "Pair Provider". Provider pairing allows individual providers to be placed into temporary teams per booking. This differs from regular teams, who always perform all jobs with the same team members every time.
Click the "Pair Provider" button to see a list of available, not available, and incompatible providers. Check the box(es) next to the provider(s) you want to pair for this booking and then click on the green "Pair" button at the top of the pop-up.
If you want to remove a paired provider, there will be a red "Remove Provider" button beneath their name.
Specific Provider
If you've enabled the option to choose a specific provider under your Store Option Scheduling settings, you will have a checkbox next to the "Specific Provider/Team" option. This allows you to type in the name of a specific provider or team and view their schedule specifically.
Waiting List
Another option with a checkbox next to it is the "Waiting List" option. This allows you to schedule bookings without assigning a provider and save them to the unassigned folder.
Once a booking is placed in the unassigned folder, you can update the priority color for your reference (customers and providers will not be able to see the priority). There are three levels of priority:
Low (Green)
Medium (Orange)
High (Red)
By default, all new bookings placed in the unassigned folder will be the medium priority unless you set it differently when scheduling the booking.
Manual Bookings
As opposed to "From Schedule" bookings, "Manual" bookings allow the admin and staff to manually set a date and start time/arrival range for the booking outside of your regular booking spots.
First, click on the "Select Date" field to select a date, then click on the "Select Arrival Time" field to set the start time.
If you would like to create an arrival range, use the "Arrival Window" fields to enter the length of the range in hours and minutes.
From here, click "Assign Provider" or "Pair Provider" to look for available providers and teams.
Add the Customer's Details
Once a date and time have been selected, you can fill out the customer's address.
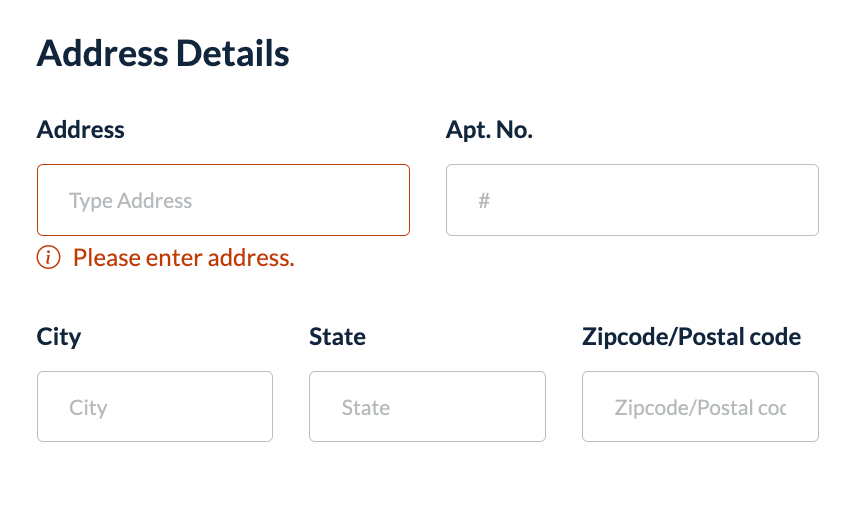
If you are booking an existing customer, select "Use Existing" to select an address from their profile.
Below this section, you may have enabled the "Key Information & Job Notes" or "Special Notes Or Instructions" sections to collect additional details about the booking.
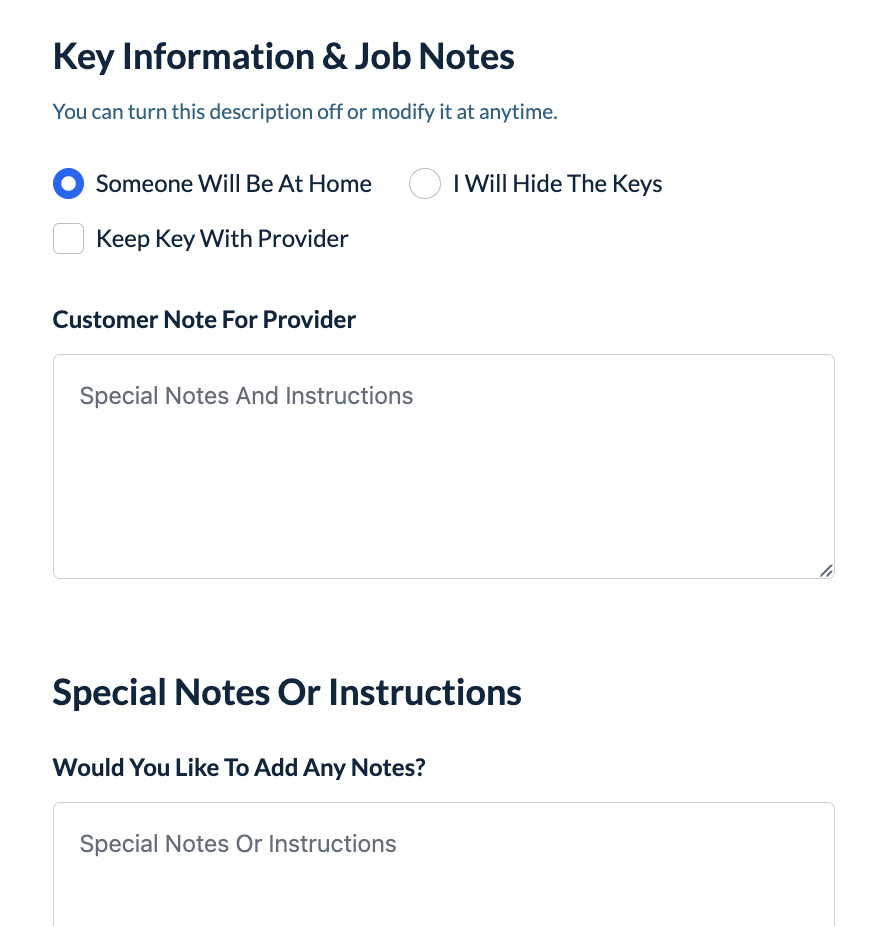
These sections can be shown or hidden from the form by going to Settings > Design Forms & Website > Website Builder & Themes > Customize Theme > Page menu > Book Now page. Click on the "Show/Hide" buttons to show or hide the sections.
Select a Payment Method
At the bottom of the booking page is the Payment Information section. This is where payment for the booking is designated. If you are booking an existing customer, you may have the option to use an "Existing credit card". Otherwise, select "New credit card" or "Cash/check".
You can change the names of the payment options by accessing the website and theme builder. Go to:
Settings > Design Forms & Website > Website Builder & Themes > Customize Theme
Click on the top center Page menu and go to the "Book Now" page. Scroll down the booking form until you reach the Payment Information section. Click on the text of the payment methods to reveal the Edit button. Once you click Edit, you can update the name of the method.
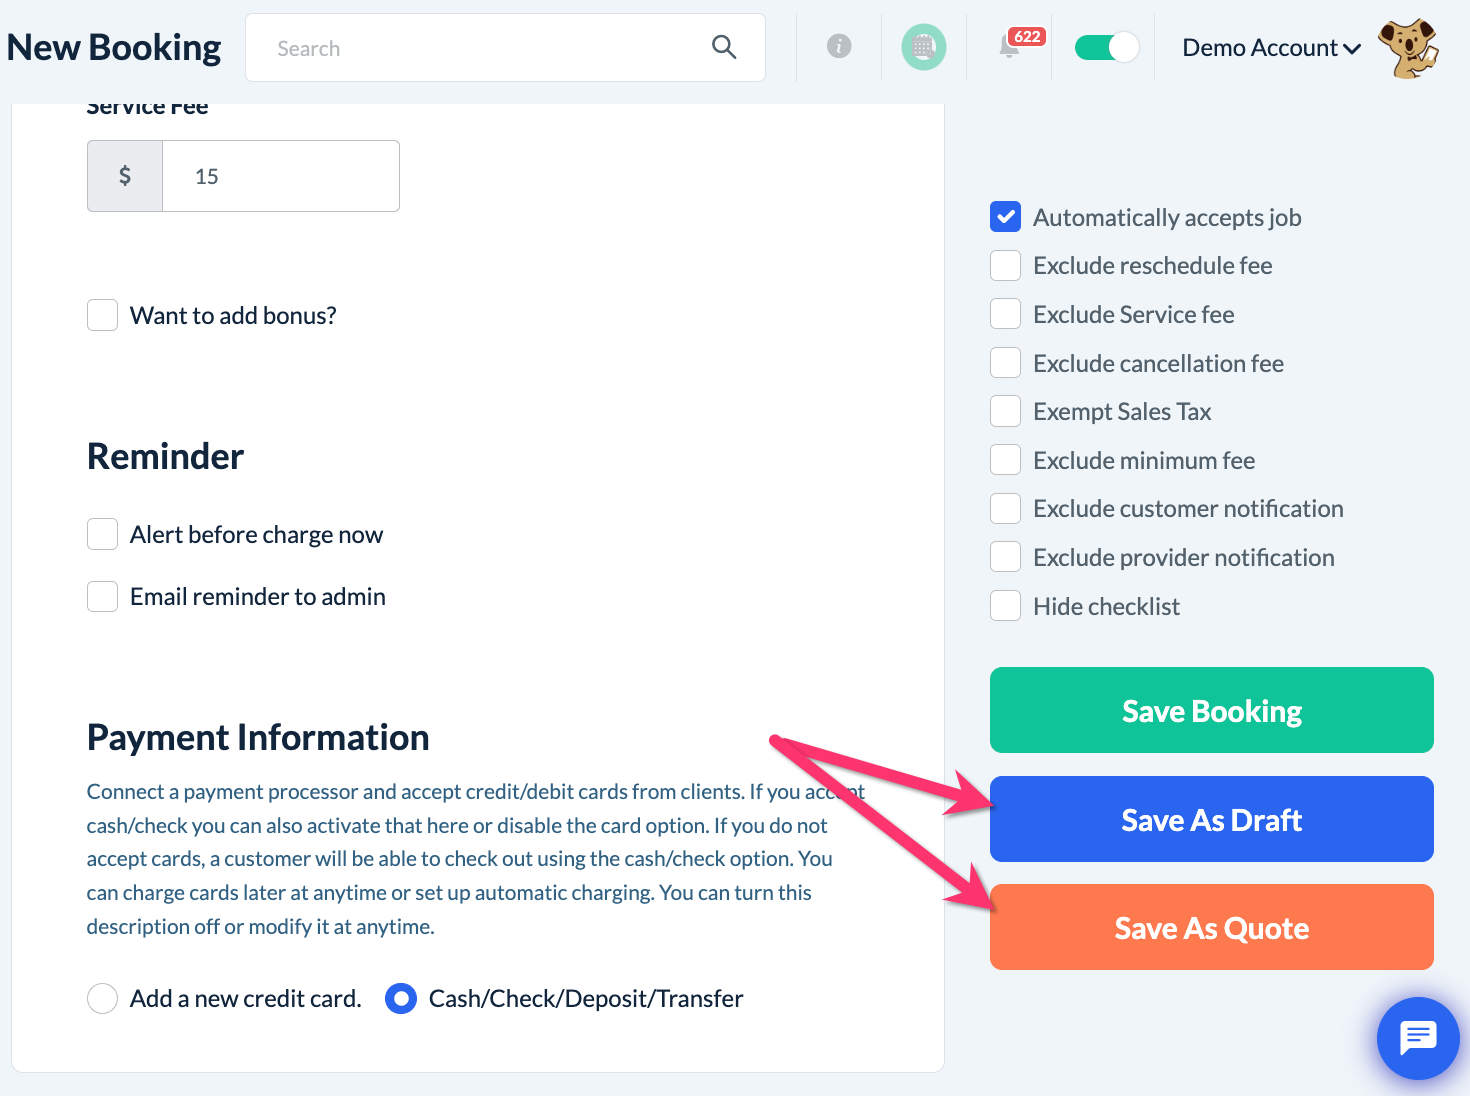
Save a Booking to the Calendar
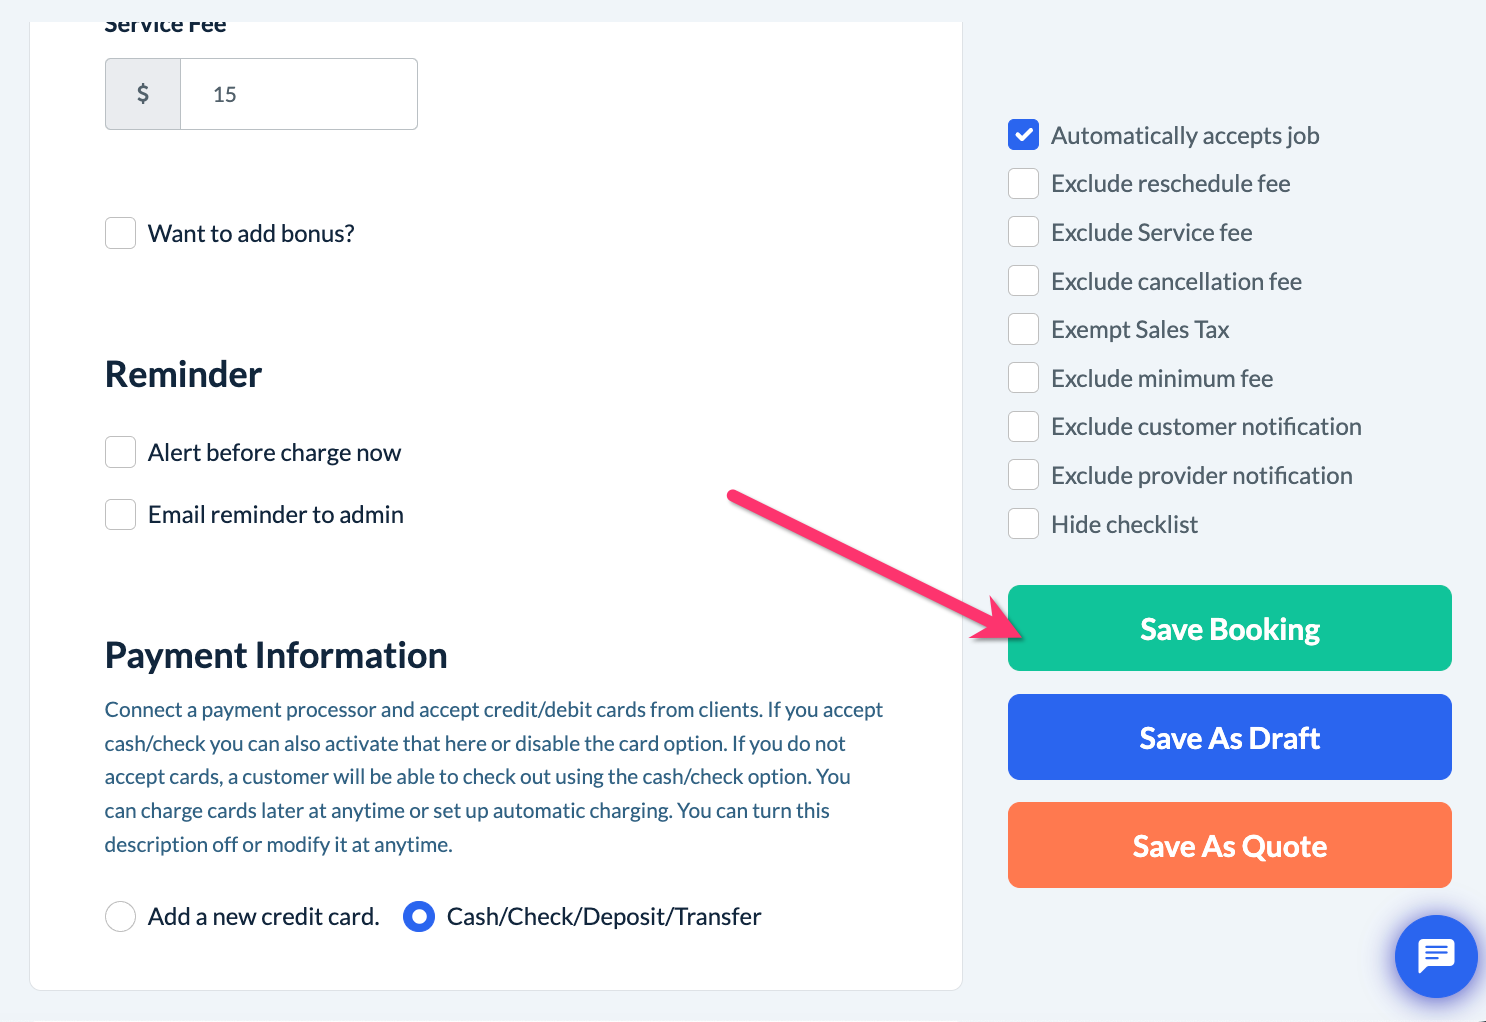
To save a booking to the calendar, you must, at minimum:
Enter a customer name
Enter an email address
Make form selection(s)
Select a date and time
Add a payment method (if there isn't one already)
Click the "Save Booking" button from the right side menu options
Once the booking is saved, you can find it by going to:
Bookings > Upcoming Bookings
Like the other booking sections, the Upcoming Booking section can be viewed in List View, Calendar View, or Map View.
Bookings can also be filtered by industry, location, and frequency, and can be searched by name, email address, phone number, booking ID, or address.
Save a Booking as a Draft or Quote
To save a booking as a draft or a quote, you must collect the customer's name and email address. Then, you would click "Save as Draft" if you do not intend to send it to the customer, or "Save As Quote" if you would like to send it to the customer.
If a booking is saved as a quote, you will be redirected to a pop-up where you can customize the email address the quote is sent to, when it expires, if you'd like to set up a quote reminder email to be sent after several days, or if you would like to set up an offer.
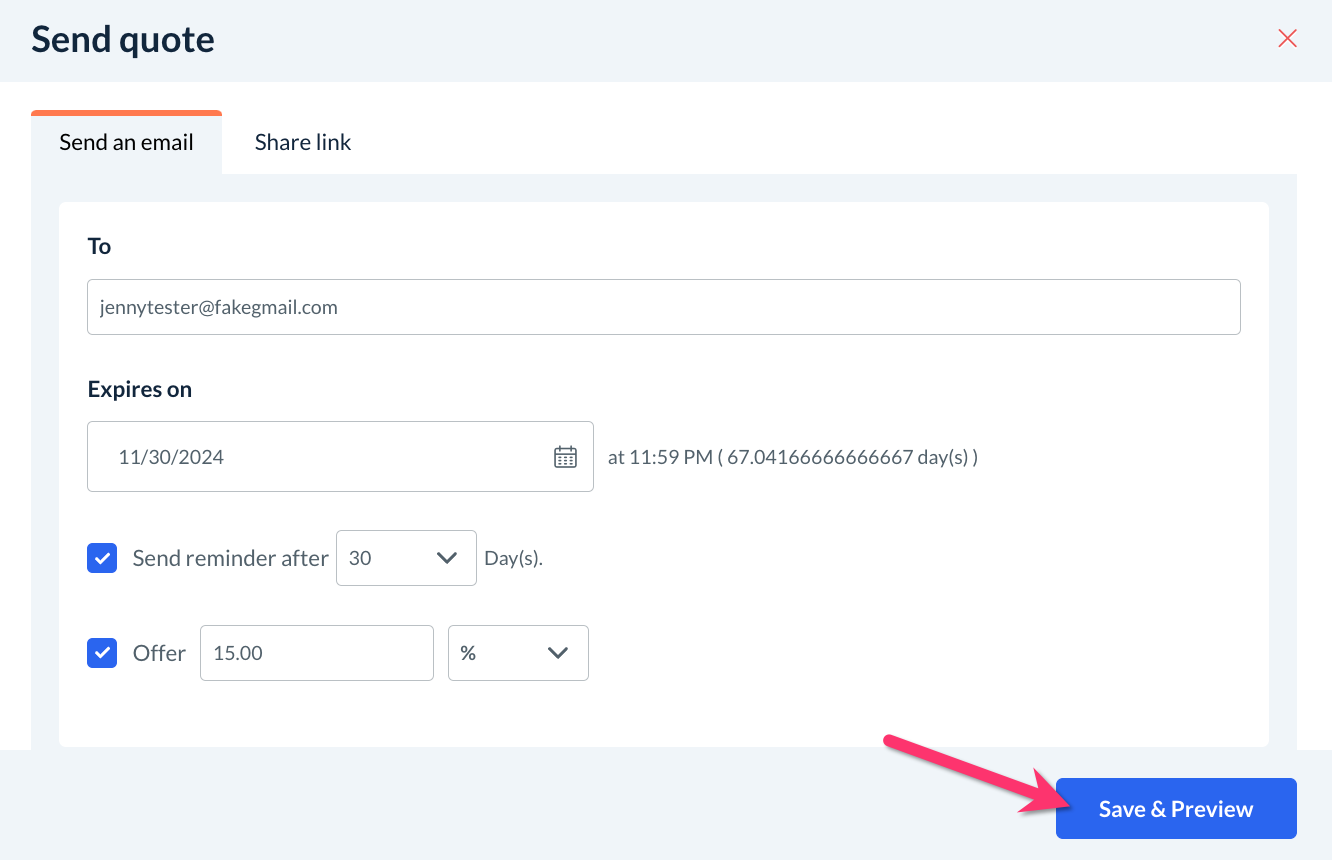
Click the "Save & Preview" button to view the quote as the customer will see it when they open the email. From here, you can Edit the email and Send it out.
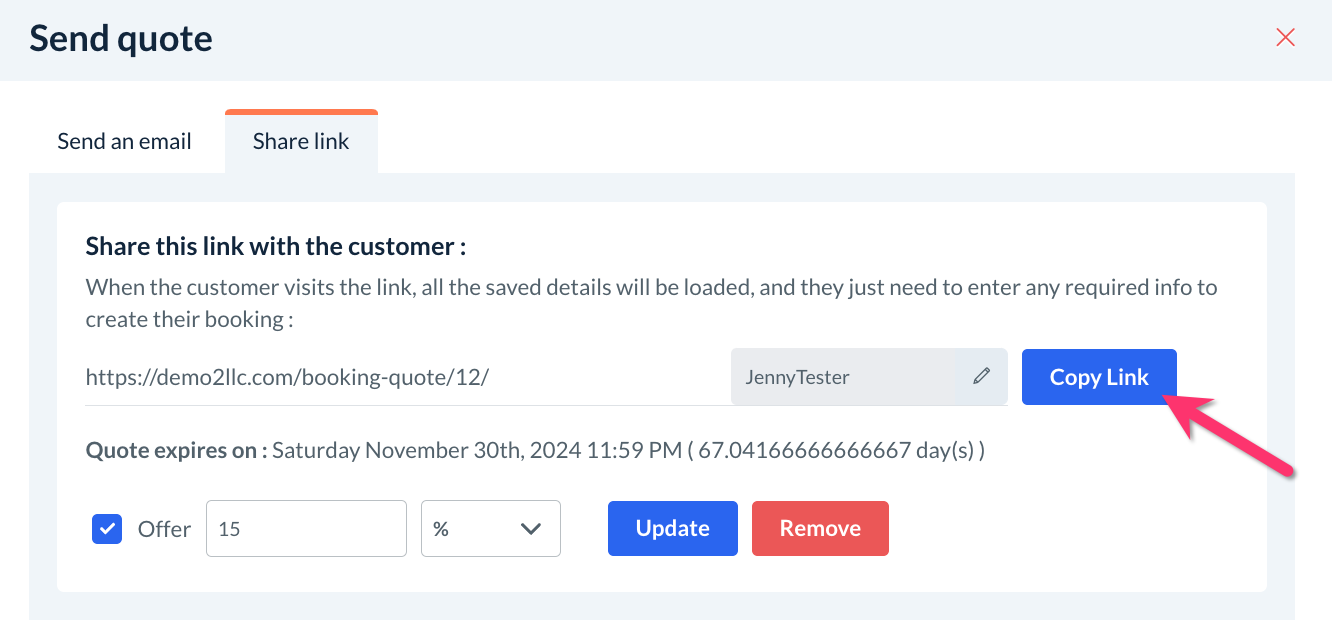
It is also possible to get a customizable share link by clicking the "Share Link" tab and using the "Copy Link" button. Like with the email option, you can apply a special offer to the share link by checking the box next to "Offer", entering an amount or percentage, and then clicking "Apply".
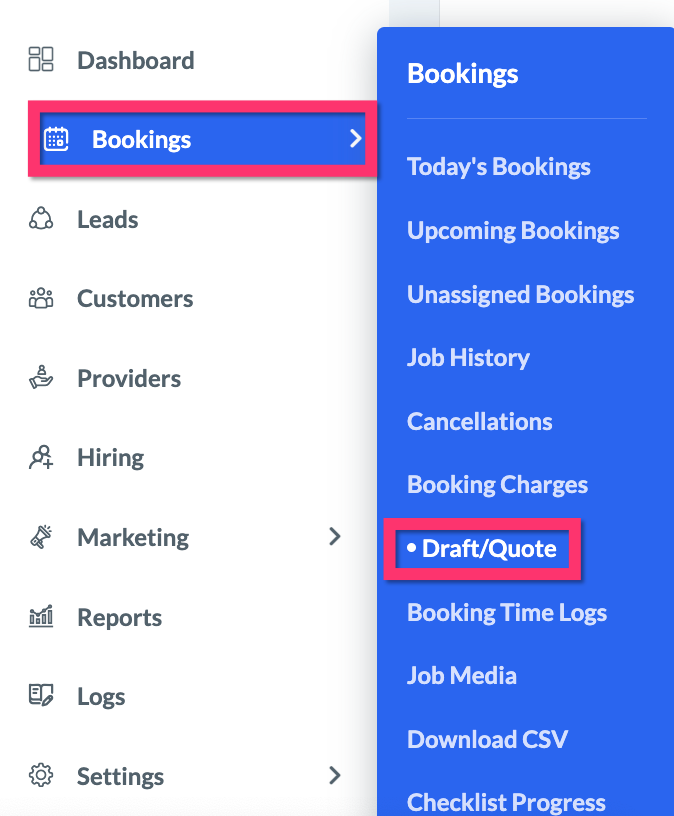
Once a booking is saved as a draft or a quote, it can be accessed anytime by going to:
Bookings > Draft/Quote
The Draft/Quote Dashboard contains filters at the top of the page so you can easily search drafts and quotes by industry, location, name, email, phone, draft ID, or address.

There are also options to:
Create a booking from the draft/quote
Send out the draft/quote via email
Share the quote link
Send the customer a custom email
Edit the draft/quote
View the history of changes to and creation date of the draft/quote
Delete the draft/quote