The purpose of this article is to help you:
- Permit providers to edit their schedules
- Permit providers to edit their settings
- Permit providers to see customer ratings and reviews
- Allow providers to view the customer's phone number
- Allow providers to view the customer's email address
- Allow providers to view the customer's name and profile picture
- Enable provider pairing
- Enable provider availability per location
- Set a default schedule for new providers
Scheduling Settings
This section contains options for allowing providers to edit their schedules and availability. To set up the "Scheduling" section under your Provider Store Options go to:
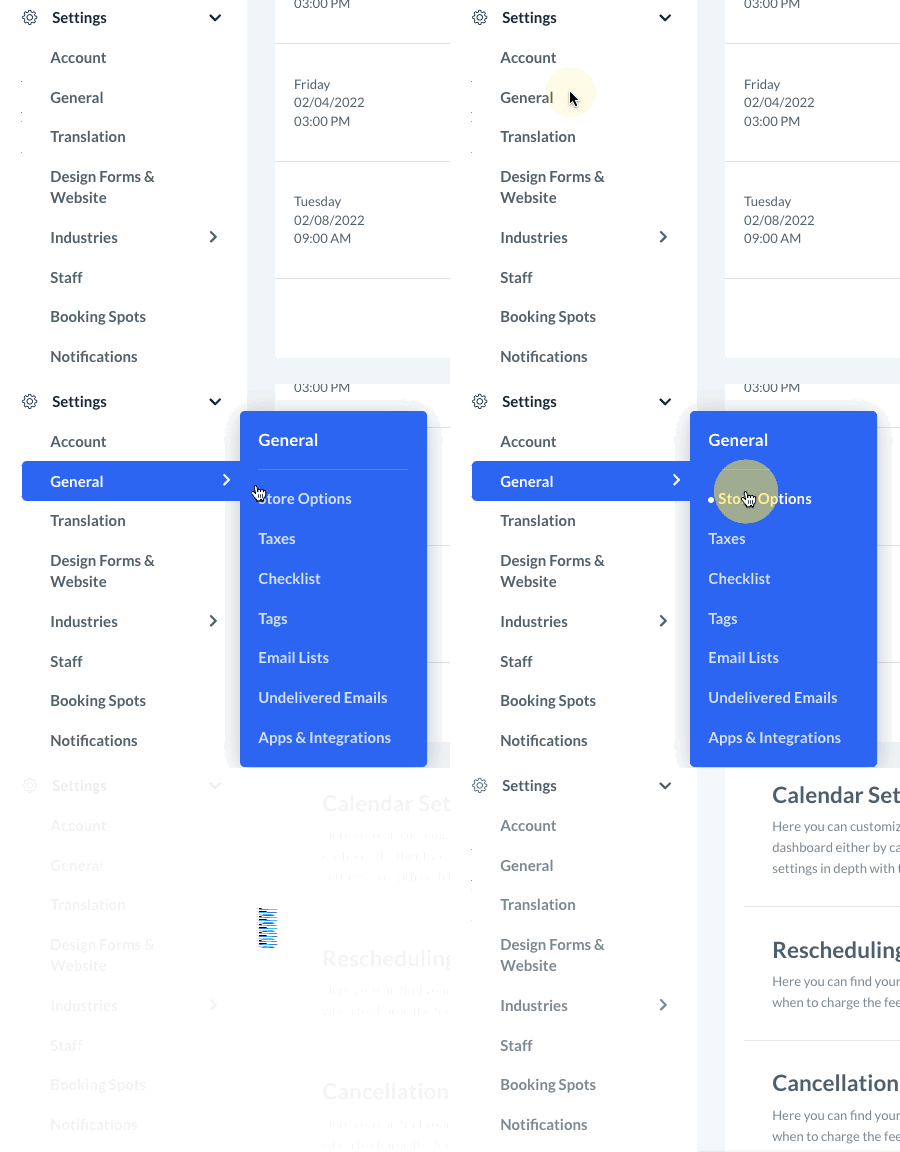
Settings > General > Store Options > Provider
Click the plus sign icon to expand the "Scheduling" section.
Would you like to allow your providers the ability to set and modify their own schedules?
- Select "Yes" to allow providers to set and modify their own schedules.
- Select "No" so all schedule changes must be made by the admin or staff.
What will happen if there are active booking(s) in the date range when providers try to modify or take a day off?
Select one of the following options:
-
- This option will automatically move any of the bookings impacted by the time-off request into the unassigned folder and send a notification to the admin.
-
- This option will send a request to the "Manage Availability" section under the "Providers" tab for admin/staff to approve.
-
-
This option will update the provider's availability but keep the booking assigned to them as "NA", or "Not Available" and send the admin a notification.
-
Would you like to include a tutorial video to help your providers with this section?
- Select "Yes" to share your own link or use the BookingKoala default video on how providers can modify their schedules.
- Select "No" to hide the tutorial video from their dashboard.
Would you like to allow the providers the ability to set and modify their own settings?
- Select "Yes" to customize which types of settings providers are allowed to modify.
- Select "No" to block providers from making any changes to their settings. All settings must be configured by an admin or staff member.
Do the providers need to leave a reason when making a modification to their settings?
- Select "Yes" to make it mandatory for providers to provide a comment as to why they are modifying their settings.
- Select "No" to make providing a reason optional.
Would you like to make it mandatory for you to approve the settings request?
- Select "Yes" to make admin approval mandatory for the settings update to take effect.
- Select "No" so the admin does not need to approve the request for the settings update to take effect.
If you selected "No" to the previous question, decide what will happen if there are active bookings that are affected by the provider's setting modification.
- Move booking(s) to the unassigned folder and apply changes
- The system will automatically move any impacted bookings to the unassigned folder.
- Don't move booking(s) to the unassigned folder and apply changes, active booking(s) will stay assigned to the provider and will show NA (Not Available) tag
- The system will apply the setting updates but assign the booking to the provider as "NA", or "Not Available".
Which settings would you like to allow your providers the ability to update?
Select which settings you would like providers to be able to edit by checking the box next to the setting name.
Would you like to include a tutorial video to help your providers with this section?
- Select "Yes" to share your own link or use the BookingKoala default video on how providers can modify their settings.
- Select "No" to hide the tutorial video from their dashboard.
Would you like to allow your providers the ability to see their own ratings?
- Select "Yes" to allow providers to see how they've been rated by clients.
- Select "No" so providers cannot see any ratings left by their customers.
Would you like to allow your providers to see the reviews customers leave?
- Select "Yes" to allow providers to see the written feedback left by their customers.
- Select "No" to block providers from seeing reviews.
Would you like to allow your providers to see the customer's email address in the booking?
- Select "Yes" to let providers view the customer's email address under certain circumstances.
- Check the box next to "Hide on unassigned bookings?" to hide the customer's email address when the booking has not yet been assigned to a provider.
- Check the box next to "Hide on completed bookings?" to hide the customer's email address once the booking has been completed.
- Check the box next to "Hide on unassigned bookings?" to hide the customer's email address when the booking has not yet been assigned to a provider.
- Select "No" to always hide the customer's email address from providers.
Would you like to allow your providers to see the customer's phone number in the booking?
- Select "Yes" to let providers view the customer's phone number under certain circumstances.
- Check the box next to "Hide on unassigned bookings?" to hide the customer's phone number when the booking has not yet been assigned to a provider.
- Check the box next to "Hide on completed bookings?" to hide the customer's phone number once the booking has been completed.
- Check the box next to "Hide on unassigned bookings?" to hide the customer's phone number when the booking has not yet been assigned to a provider.
- Select "No" to always hide the customer's phone number from providers.
Would you like to allow your providers to see the customer's name and photo?
- Select "Yes" to allow providers to see some or all of the customer's information.
- Check the boxes next to each piece of information you would like the provider to see.
- Check the boxes next to each piece of information you would like the provider to see.
- Select "No" to hide the customer's name and image from your providers.
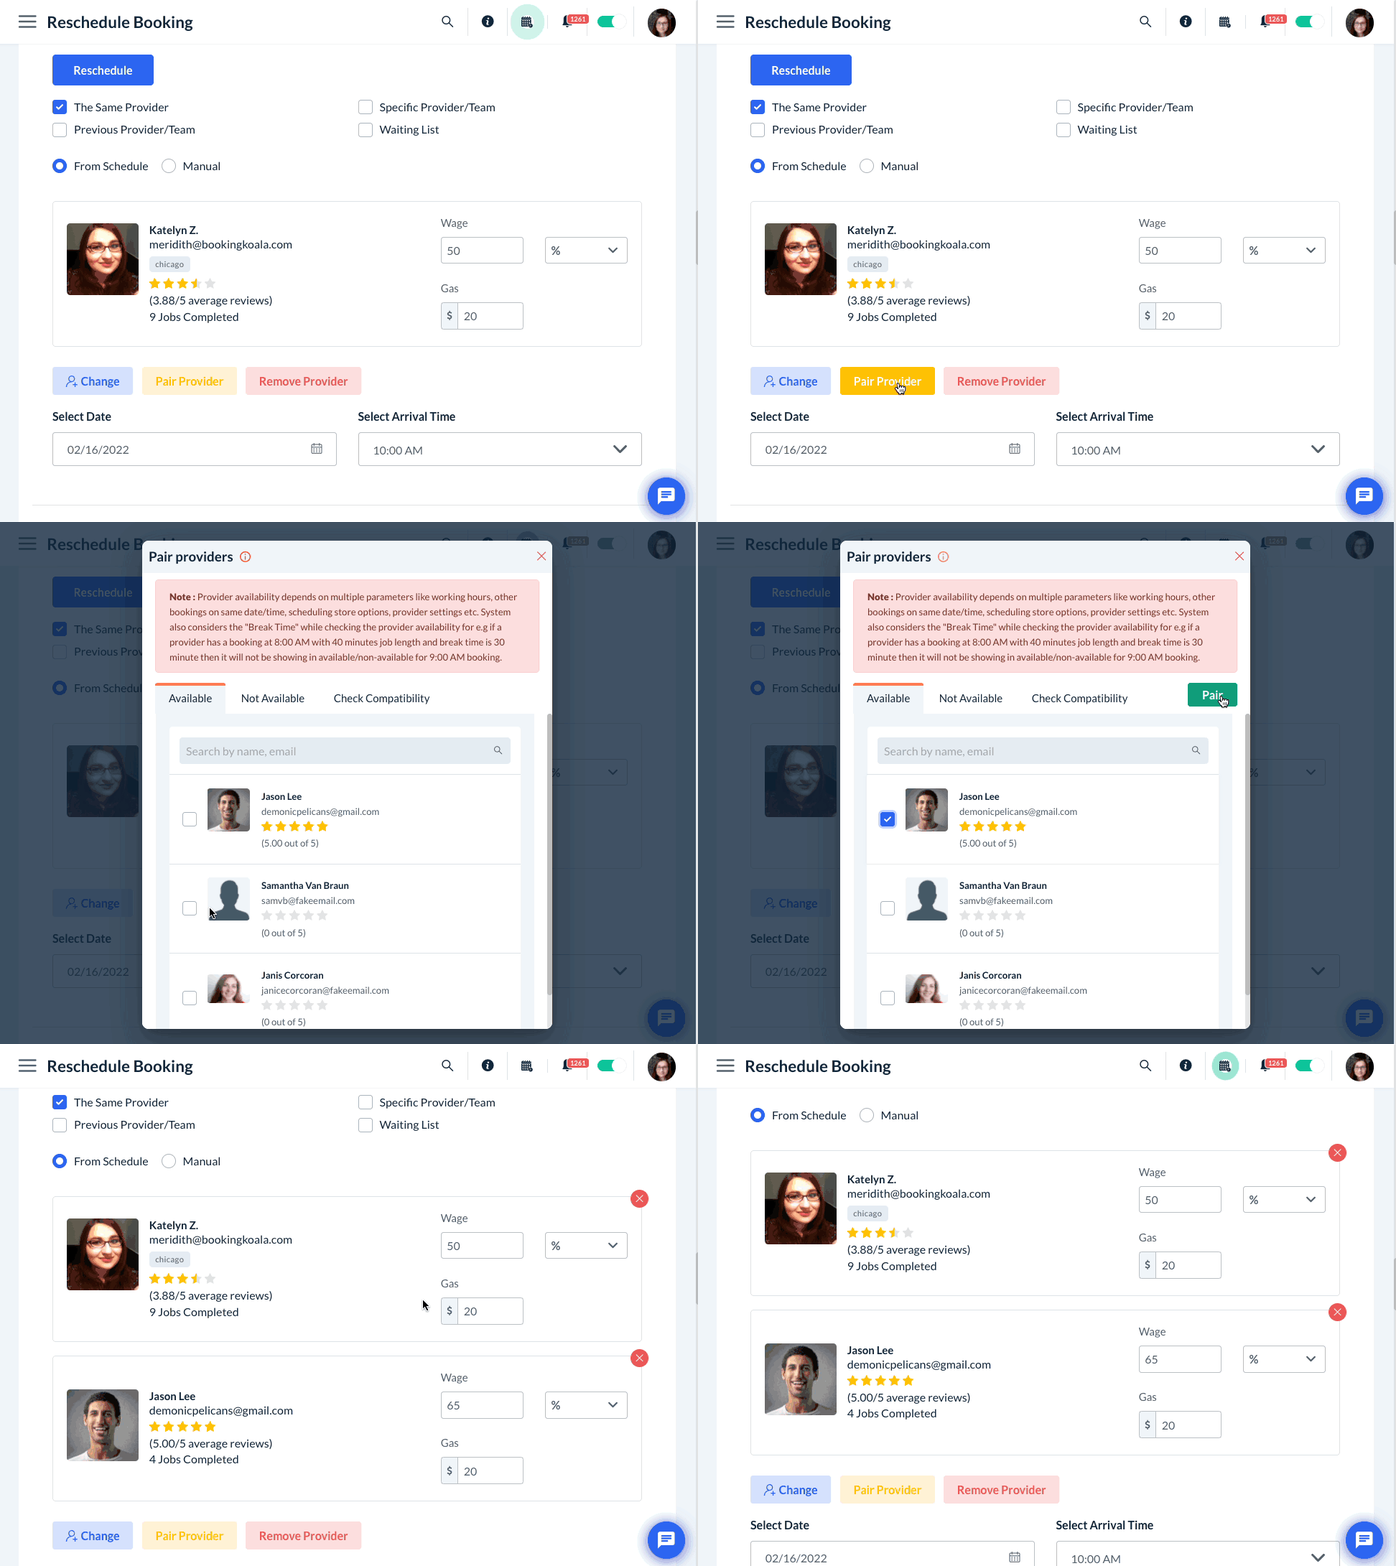
Would you like to enable provider pairing?
- Select "Yes" to enabled provider pairing. "Provider pairing" means two or more individual providers can be paired together on a booking-by-booking basis. Pairs differ from "Teams", which contain two or more providers that work together for all of their bookings.
- Select "No" to disable provider pairing. Only teams or an individual provider can be assigned to each booking.
Check the box next to "Override the individual provider settings and allow all for pairing" to enable pairing for all providers.
You can enable provider pairing per booking form type and industry by going to your provider's dashboard and clicking on:
Settings > Forms > [Industry Name] > [Form #]
Under "
Would you like to have the job length divided among the number of providers per booking or would you like it to not change?
This setting has to do with the job length if you have hourly appointments or assigned time lengths to your pricing parameters. If you have assigned more than one provider to a booking, decide if you would like the system to divide the job length by the number of providers.
- By selecting "Yes", your job's length will be divided by the number of providers assigned.
- For example, if a customer books 5 hours of service and two providers are assigned to the job, the updated job length will be 2.5 hours total. This is because each provider conducts 2.5 hours of work starting at the same time, resulting in 5 hours of work performed over 2.5 hours.
- You may prefer this option if you charge for your services per hour per person.
- If you select "No", the job's length will not be impacted by the number of providers assigned.
- For example, if a customer books a 10-hour service and you assign two providers, the job length will still display as "10 hours".
This option allows you to set up different schedules for your providers for each separate location you service, or set up one schedule that applies to all locations.
- Select "Per Location" to enable separate schedules and booking spots per location.
- Select "All Locations" to set up booking spots and provider schedules for all locations.
To learn more about how to set up booking spots for each of your locations, click here.
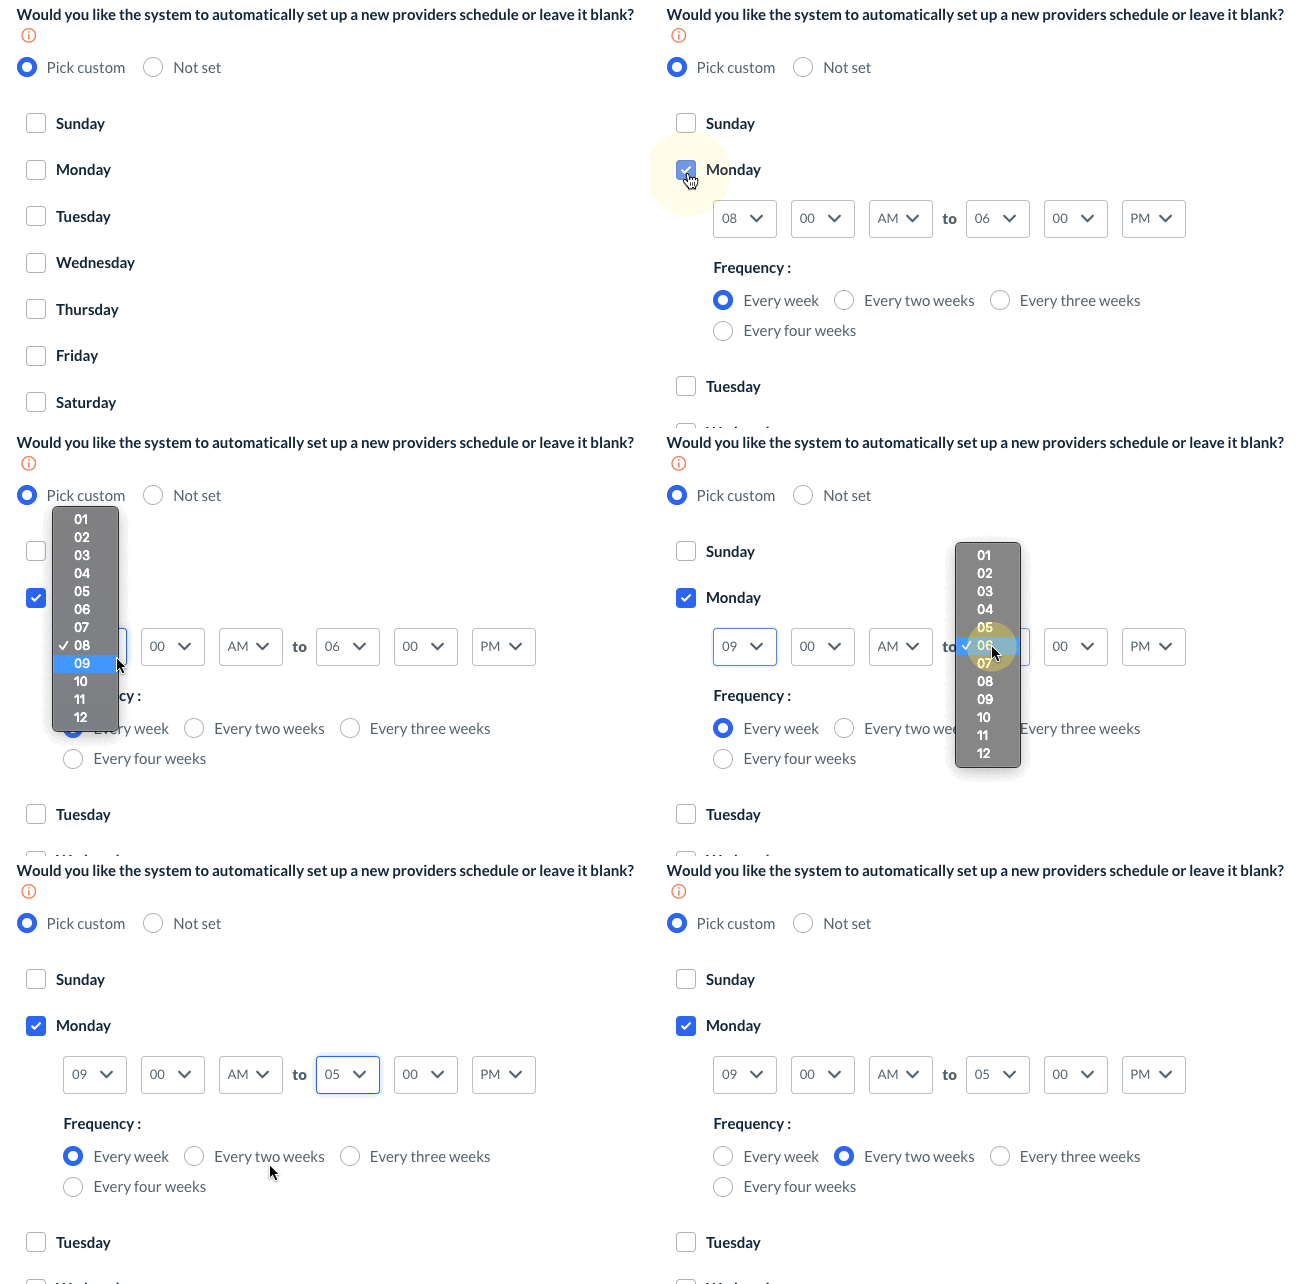
Would you like the system to automatically set up a new provider's schedule or leave it blank?
- Select "Pick Custom" to set up default availability for all newly-created provider accounts.
- To set up the default schedule for your new providers, check the box next to the day of the week. Then select the start and end times for the working hours. Finally, select a frequency for that day.
- For example, if you select "Monday", "9 AM" to "5 PM", "Every two weeks", availability would be added for:
- Monday, 2/2/2022, 9 AM - 5 PM
- Monday, 2/16/2022, 9 AM - 5 PM
- Monday, 3/2/2022, 9 AM - 5 PM, etc.
- To set up the default schedule for your new providers, check the box next to the day of the week. Then select the start and end times for the working hours. Finally, select a frequency for that day.
- Select "Not Set" to leave the new provider's availability empty until you or the provider modifies it.
Remember to Save!
If you have made any changes, remember to click the blue "Save" button at the bottom left corner of the page to update your settings.


